The Z Grills Mini (200A) is a great unit for apartments, camping, caravans and 4WD trips. Its compact design makes it portable, but still big enough to cook up a feast for a whole family.
The Mini delivers the same great cooking results as the larger Z Grills smokers. It’s a very competent smoker for low and slow favourites, and at higher temperatures is perfect for doing a traditional style Aussie BBQ.
Key Features
- Compact design, ideal for apartments, or outdoor adventures.
- Versatile cooking from smoking up to high temperature BBQ.
- 3.6kg wood pellet hopper capacity for 10+ hours of low temperature cooking.
- Heavy duty, quality components.
- RapidFlame™ ignitor for fast fire up and reliability
- PID controller for automatic temperature control.
- Fast heat up time (Only 10-15 minutes to >200ºC).
- Food probe for monitoring food internal temperatures.
- Adjustable height feet to ensure level operation even on a rough picnic table.
Accessory Bundles
We’ve made selecting your grill accessories easy by putting them together in BASIC and PRO bundles. Check out what’s included in each below. Click on their links to learn more.
Z Grills Mini
1 x Z Grills Mini Pellet Smoker
1 x Food Temperature Probe (for monitoring food temperatures)
Basic Bundle
The Mini plus the most popular set of accessories to get you cooking in style!
1 x Mini BBQ Hotplate (for hotplate cooking and searing)
1 x Waterproof Cover (protect your grill)
1 x Instant Read Thermometer (check temps and probe for tenderness)
1 x 10kg Bag of Wood Pellets (fuel for stacks of cooks)
Pro Bundle
The Pro Bundle includes everything in the basic bundle (above) plus these additional items.
1 x Heat Proof Gloves (protect your dainty digits)
1 x Wooden Cutting Board (for the “look what I cooked” photos)
1 x Artisan Knife Bundle (trim, carve and slice in style)
Dimensions & Weight
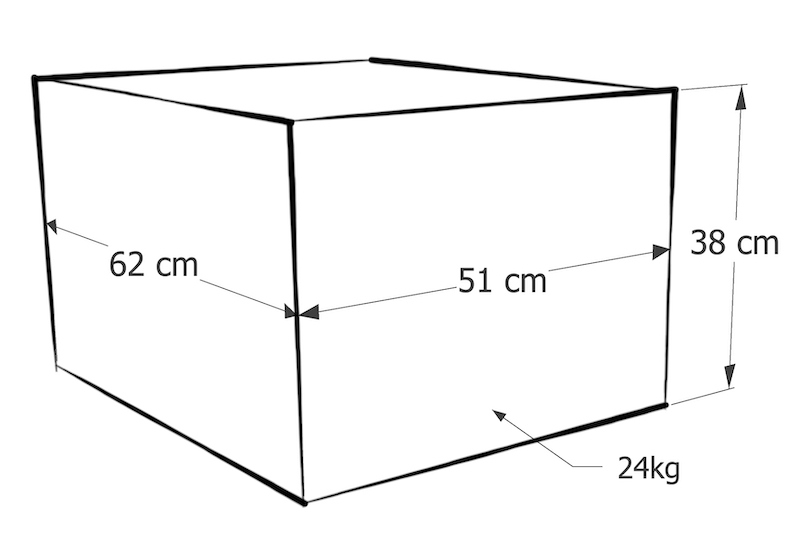
Box Dimensions
- 62 x 51 x 38cm (24kg)
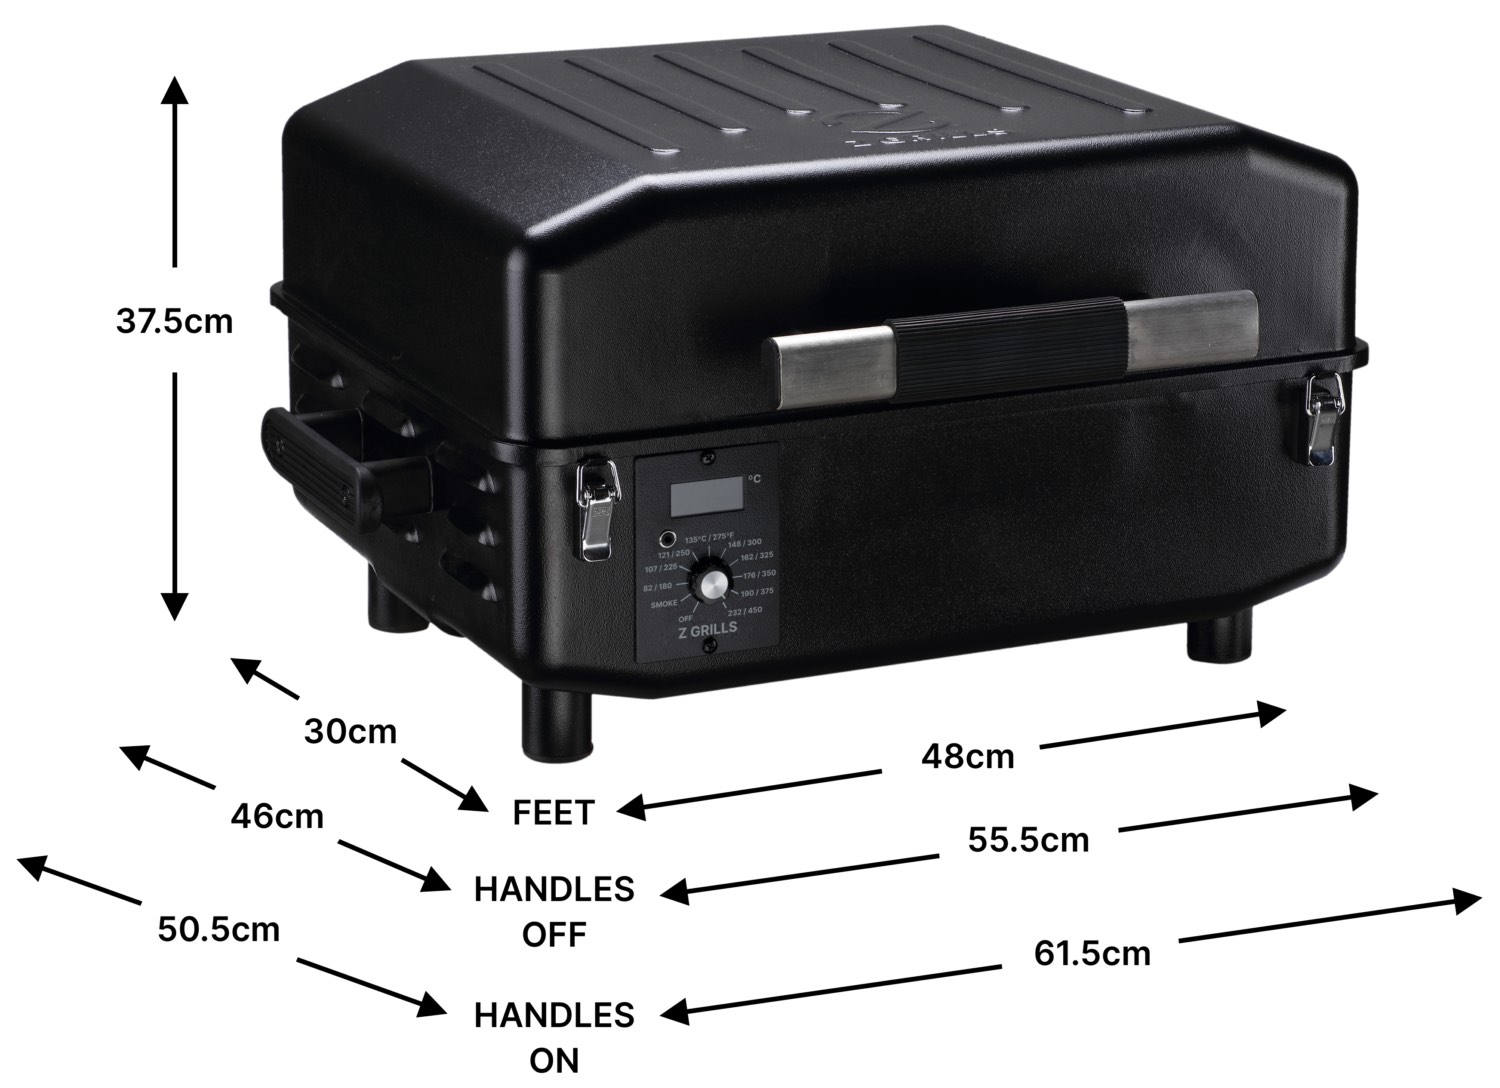
Grill Dimensions
- Gross dimensions: 61.5 x 50.5 x 37.5 cm (with side and front handles on)
- Feet footprint: If sitting in a tray, the feet require 30 x 48 cm.
- Feet are 40mm in diameter and centre to centre spacing of 435x260mm
- Weight of 20kg with no pellets in hopper. Pellets will add up to 3.6kg
Removing Handles to Reduce Size
The side handles may be removed to reduce the width to 55.5cm for packing in a car or caravan. The grill will be hot after use, so without handles, wear heat proof gloves or wait until cool before moving.
The front handle can also be easily removed (and put back on before use), reducing the depth to 46cm.
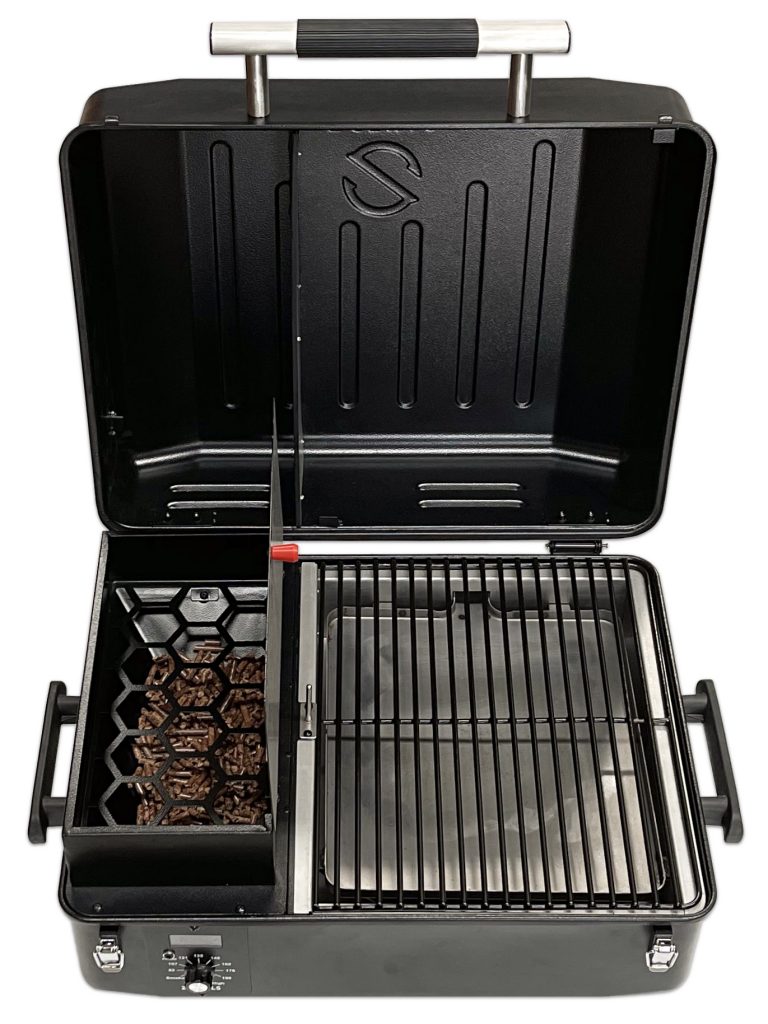
Grill Rack
Material
The grill rack is made from steel with a ceramic (enamel) coating, making it easier to clean than stainless steel or cast iron.

What can it fit?
The grill rack is 40 cm deep x 32 cm wide with a vertical space for food of 12cm.
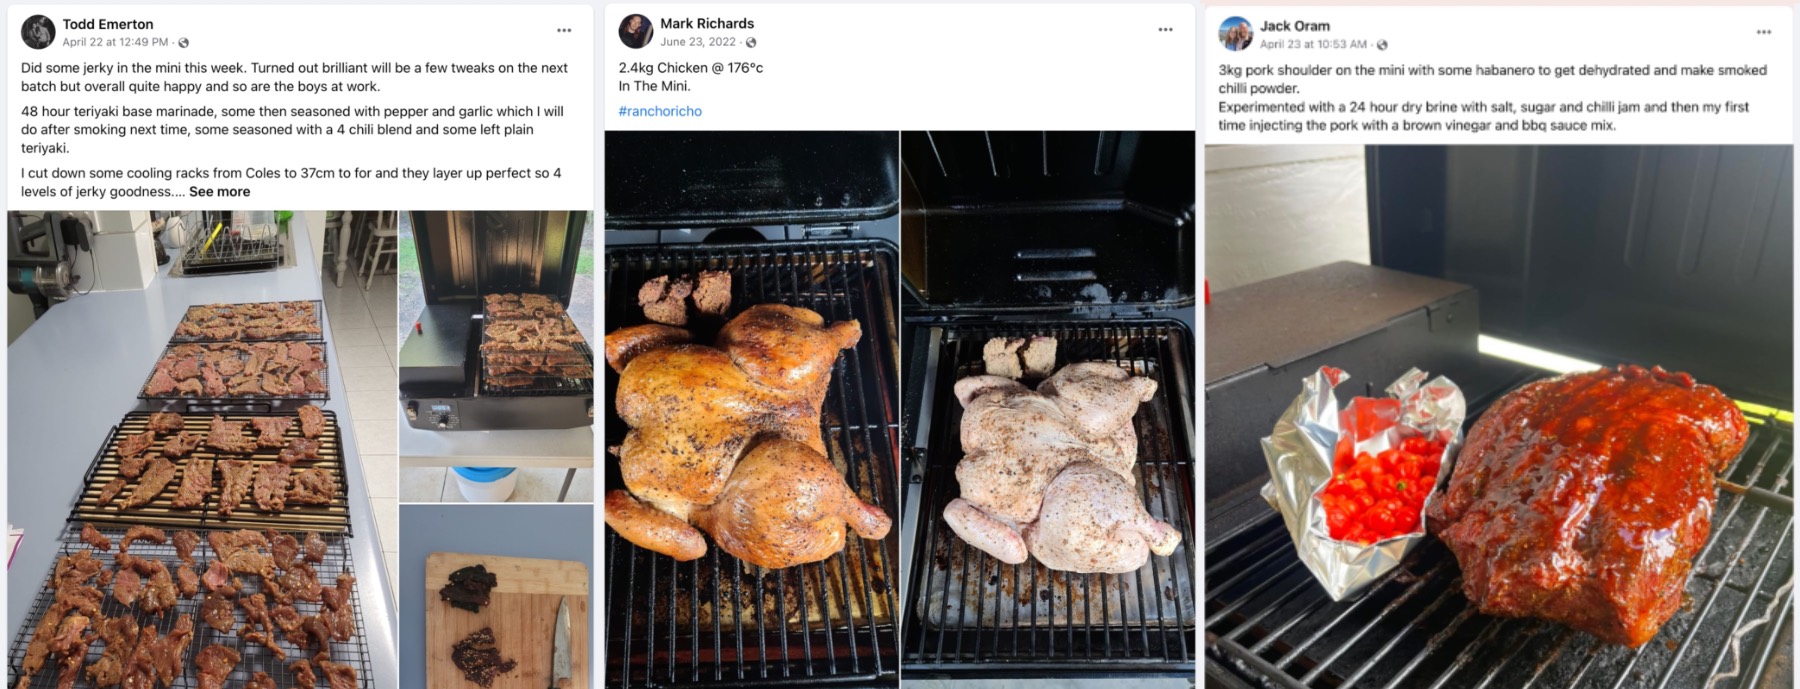
So while it may seem small the Mini can actually cook up a decent sized feed. Here are some example of what can fit on the Mini’s grill rack.
- 2 large racks of pork ribs
- 2 full slabs of beef ribs
- 1 large (28cm) pizza
- 3 to 4kg half brisket
- 3 to 4kg pork butt/shoulder
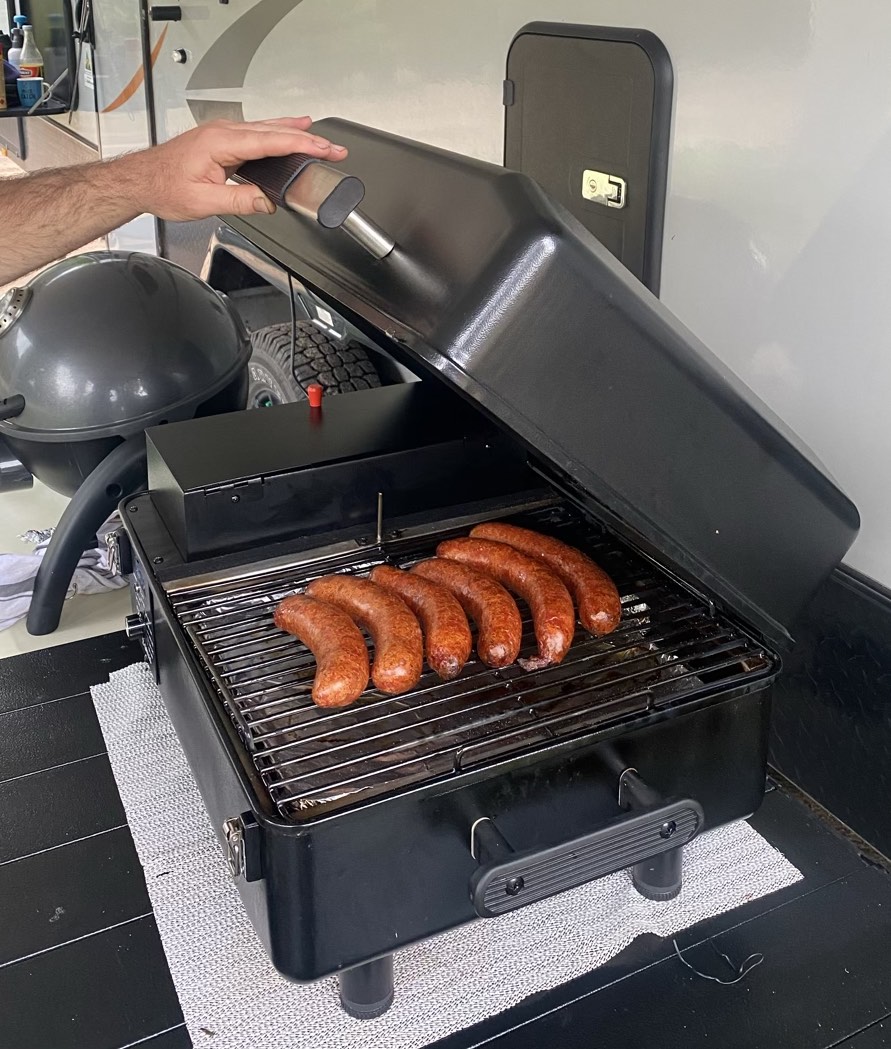
- 10-12 sausages
- 4 ribeye steaks
- 1 spatchcock (butterfly) chicken
Here are some examples of what you can fit in the Mini from our community members.
Snag roll bars
Matt lost a couple of snags off the side of his Mini during some careless tong action. The loss of those delicious home made sausages resulted in us adding snag roll bars to the grill rack, designed to help avoid such tragedies from occurring again!
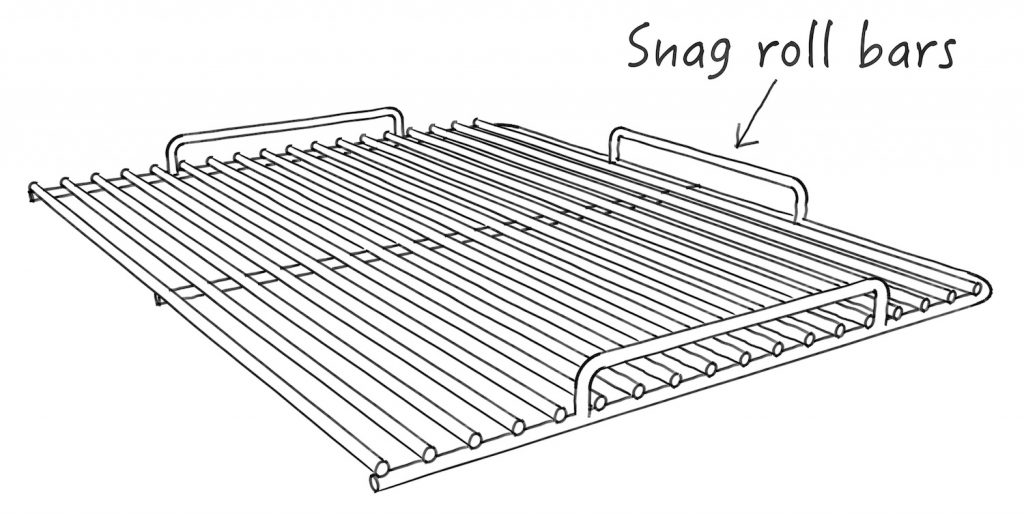
The Aussie version of the grill rack features “snag roll bars” to stop food rolling off the side, but they also work great as handles to lift the grill rack out.
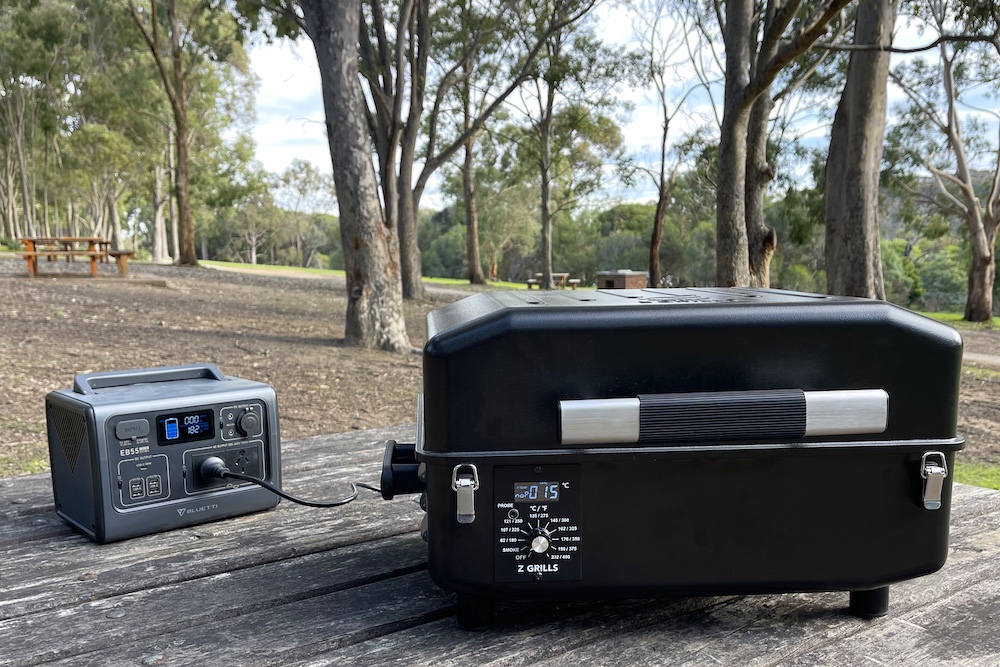
Electricity & Battery Usage
The Mini uses 240V AC power supply (not DC). At initial startup it will draw up to 450W for a few seconds, it then drops to around 250W for the next 4-5 minutes, then down to 25 to 50W during normal operation to run the controller, fan and auger motor.
The Mini can be run off a battery pack with at least 500W peak output and 500Wh (>2Ah) or more capacity (for long cooks). For a quick BBQ, then a smaller capacity (Wh) battery will suffice.
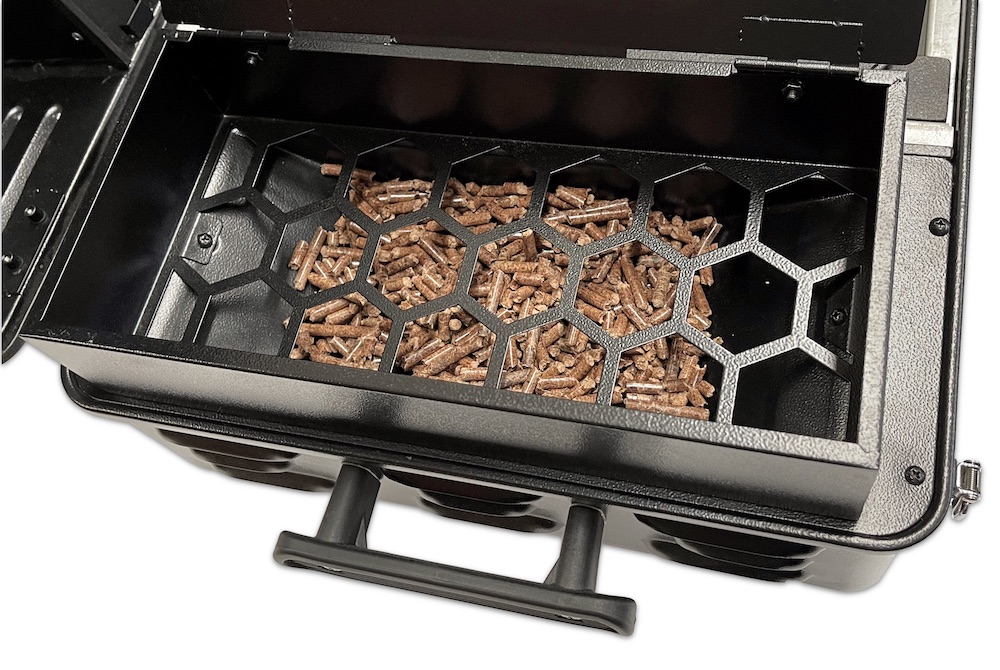
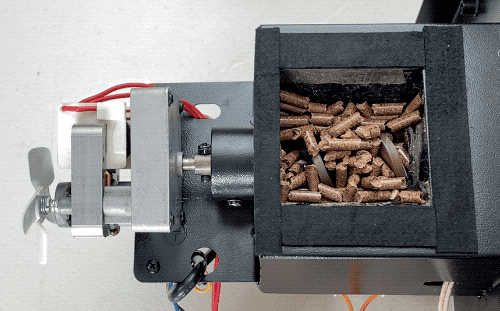
Wood Pellet Hopper
The Mini hopper can hold up to 3.6kg of wood pellets, enough for 10+ hours of low temperature cooking or 4 to 5 high temperature cooks.
It is not advisable to fill the hopper right up, instead just add enough for each cook.
Pellets may sometimes not feed evenly into the auger entry leading to a cavity forming at the entry of the auger, particularly as the pellets get low. This is more common with longer pellets. It is advisable to check the pellets every few hours during low temperature long cooks, and more frequently at higher temperatures when pellets are used faster. If they are feeding unevenly just give them a quick stir with a blunt object (not your finger).
How fast are pellets used?
- Low temperature operation = 0.15 to 0.25kg/hour (0.33 to 0.55lbs)
- High temperature operation = 0.5 to 1kg/hour (1.1 to 2.2lbs)
How to store wood pellets?
It is best to store wood pellets in a bucket/container with well sealed lid and just added some before each cook.
Click here to learn more about wood pellets
Burning out all the pellets is recommended if not planning to use the grill for several weeks or longer, especially in humid climates.
Click here to jump to the cleaning section to learn how.
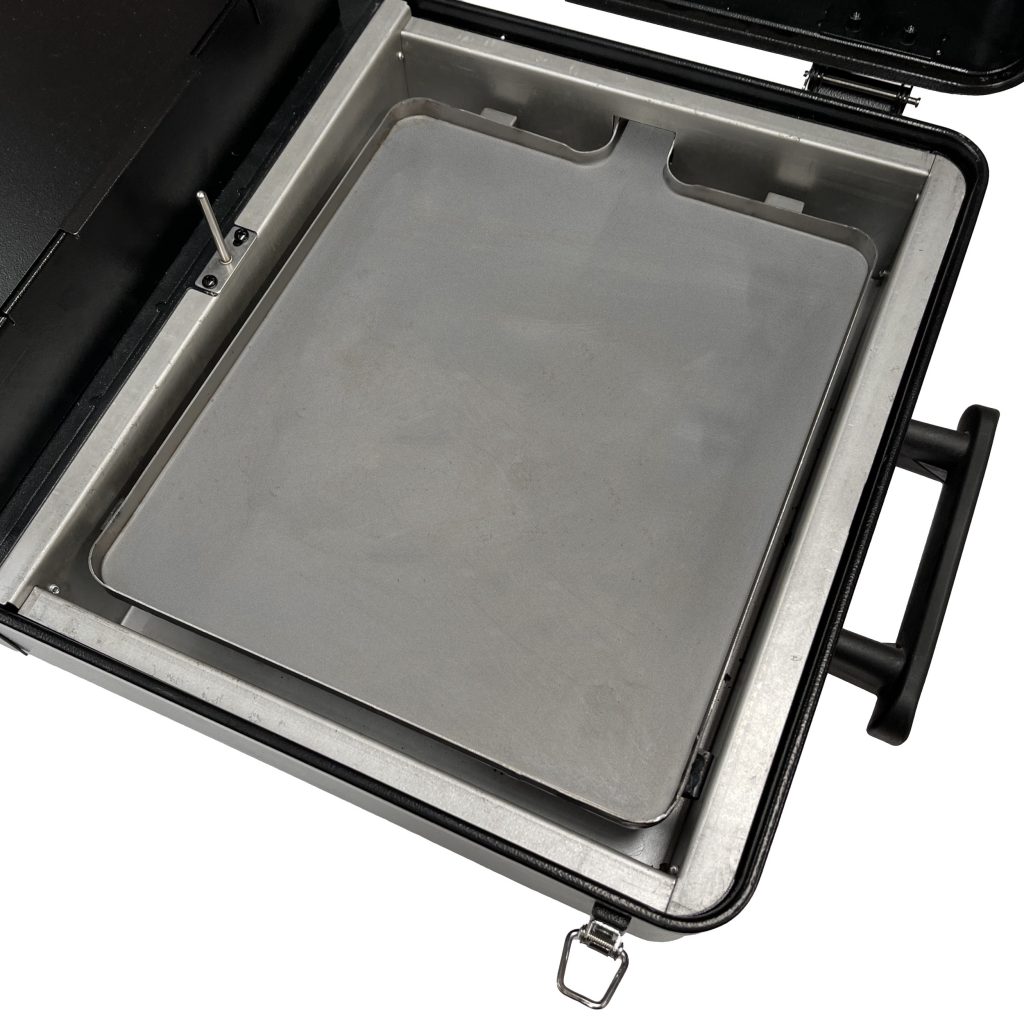
Grease Tray
The combination heat baffle and grease tray sits above the fire pot and should be used when cooking on the grill rack. Gaps along the sides allow the hot air flow from below to rise up into the cooking area.
The grease tray should be pushed fully towards the back to ensure correct spacing at the front.
The underside of the grease tray has a thick metal place which sits over the fire-pot to dissipate the heat more evenly throughout the grill and avoid a hot spot in the centre.
To make cleaning easy the grease tray can be lined with foil. It is important that the foil does not curl over the sides and block and hot air flow from below.
The grease tray can be removed when using the Mini BBQ hotplate for highest temperatures.
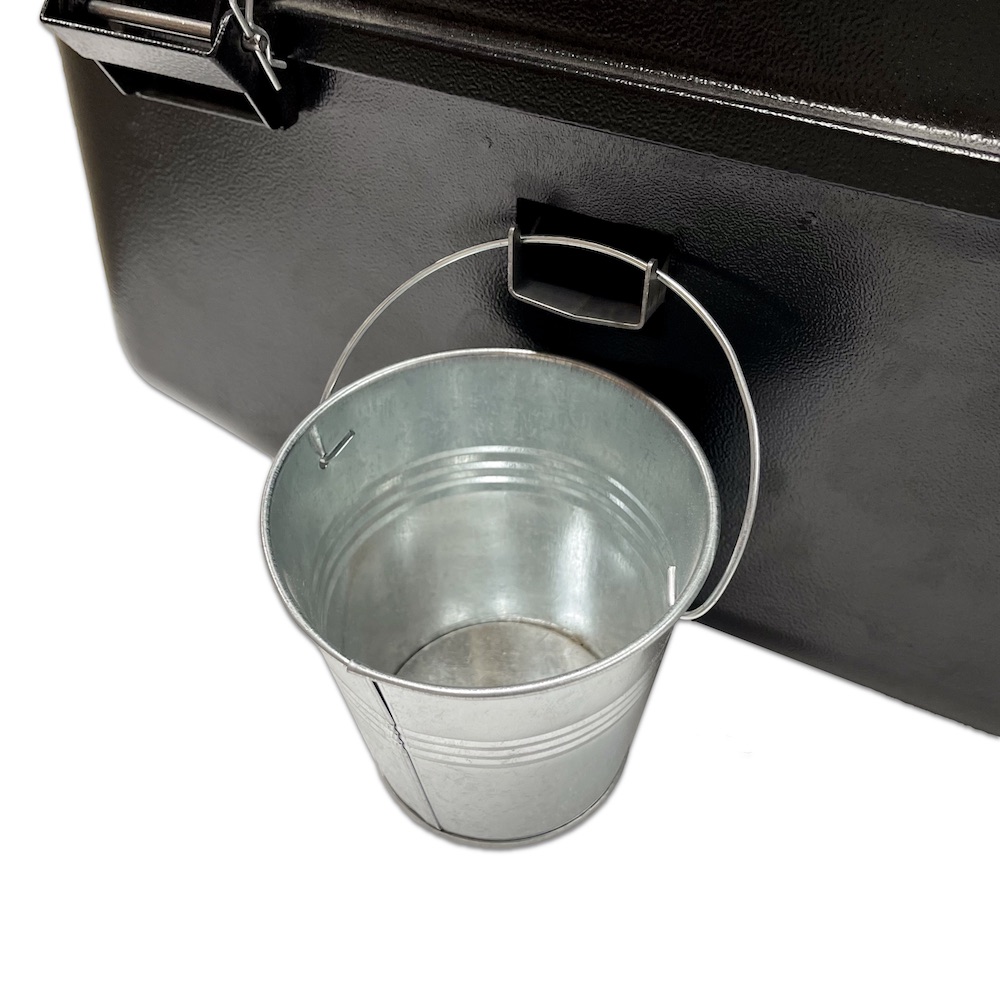
The tray is sloped to the rear of the grill with a spout out the back that a grease bucket hangs off to collect any grease. A jar or paper cup can be placed in the bucket for easier cleaning, or even lined with some aluminium foil.
How it Works
The Z Grills Mini smoker works in the same way as its larger siblings the 450A, 7002B and 700E-XL smokers.

The controller monitors the temperature in the grill and intermittently operates the auger motor, rotating the spiral auger shaft to push pellets from the hopper into the fire-pot.
The wood pellets are lit by the ignition rod and a fire is then automatically maintained.
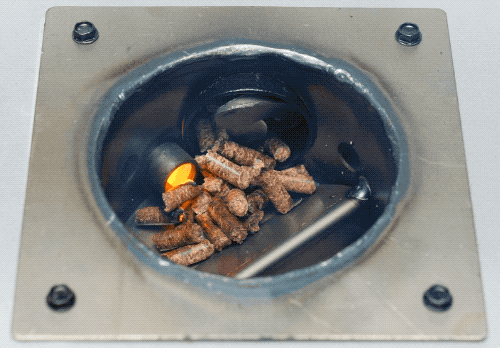
A fan underneath the hopper blows air through a number of holes in the fire-pot, feeding the fire with oxygen. After circulating around the grilling area, the hot air and smoke exits out through the vents in the back of the lid.
Due to the Mini’s small size so it only needs a very small fire to reach and maintain the target temperature. A 10kg bag of wood pellets can provide well over 40 hours of low temperature cooking.
Initial Startup and Burn-In
Priming wood pellets
The first time the grill is used, and after each time the pellets totally run out, the grill needs to be primed with pellets. Priming means feeding pellets from the hopper through the auger tube into the fire-pot.
Follow the instructions below to prime the grill with pellets:
- If the grill has previously been used, vacuum out the hopper and fire-pot.
- Pour fresh, dry pellets into the hopper. The hopper does not need to be filled right up, just add enough for each cook.
- With the grill lid open, turn the controller from OFF to SMOKE. The auger motor will intermittently run to feed pellets from the hopper through the auger tube into the fire-pot.
- After around 5 minutes (depending the length of the pellets) pellets will begin to drop into the fire-pot.
- As soon as pellets begin to drop into the fire-pot, turn the controller dial to OFF then immediately back to SMOKE which will turn the ignition rod back on again.
- If LER (low temperature error) appears on the display, just turn the dial back to OFF and then SMOKE again.
- Place the grease tray in over the fire-pot and grill rack for normal grilling, or the bbq hotplate.
Burn-in
This process runs the grill at the highest temperature setting (burning wood pellets for heat) to burn off any surface oils on the grease tray.
This must be completed before cooking any food. The smoke will have an oily odour, so avoid breathing in the smoke or completing the burn-in near an open window of your house.
Before starting the process, wipe off excess oil on the grease tray with paper towel. This will speed up the process and result in less smelly oil smoke during the burn-in process.
- Place in the grease tray (wiped clean). The grill rack or bbq hotplate do not need be placed in for the burn-in.
- If you have just completed the priming of wood pellets (outlined above), the unit should already be running on the SMOKE setting.
- If currently OFF, open the grill lid and turn to SMOKE. Once lots of smoke appears, then begins to clear and you hear the roaring sound of the fire, proceed to step 3.
- Close the grill lid and turn the dial to 232ºC.
- Run on the 232ºC setting for 45 minutes. The grill should reach over 200ºC after about 15 to 20 minutes.
- After 45 minutes, turn the dial to SMOKE. If you accidentally turn to OFF, just immediately turn back to SMOKE.
- Leave the grill running on SMOKE setting for at least 10 minutes to allow the fire to die down, then turn the dial to OFF. The fan will continue to run for about 10 minutes before turning itself off.
- Once cooled down, cover the grease tray with foil before using to cook food. Follow the Normal Operation process to start the grill up and begin cooking.
How to Use
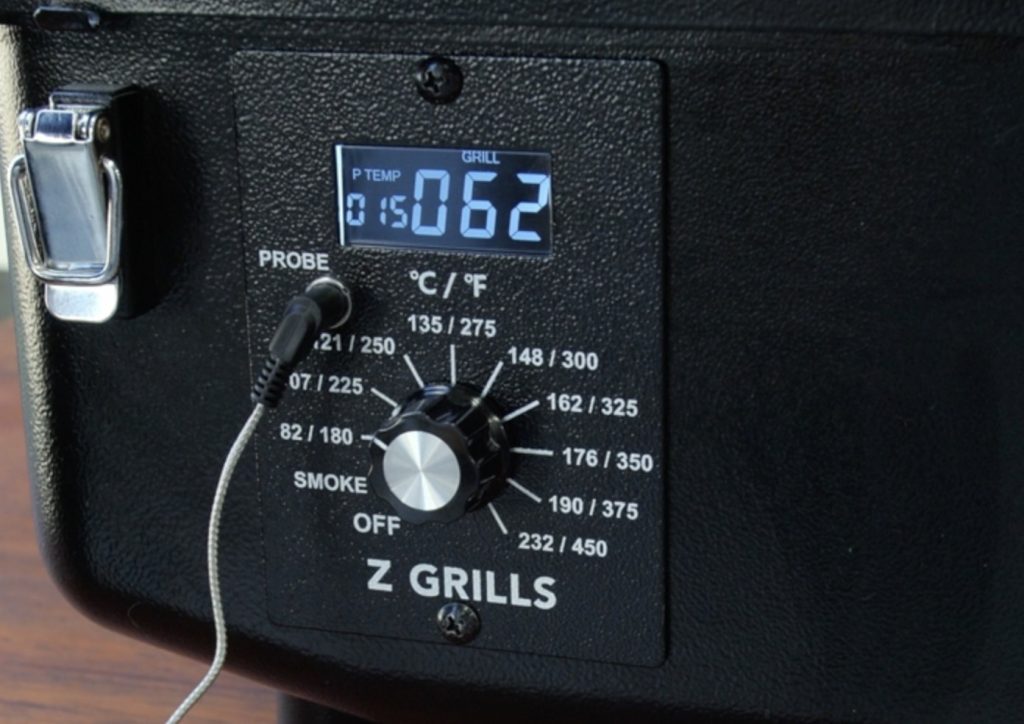
Controller Overview
The Z Grills Mini uses a digital PID controller to manage the operation of the grill.
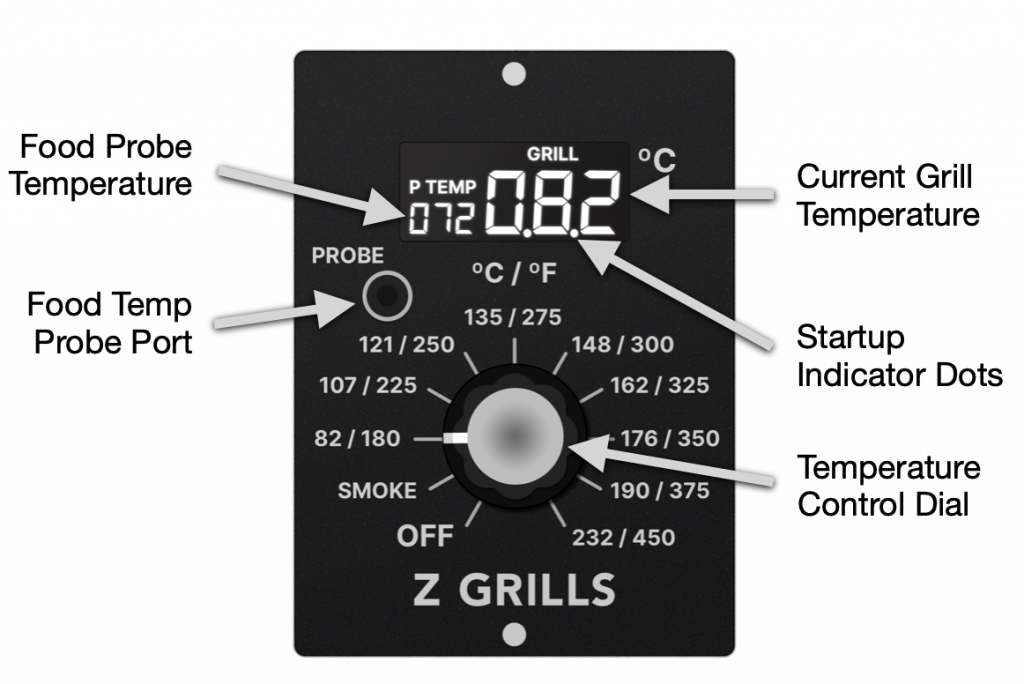
Changing the Temperature
Setting the target temperature is as easy as turning the dial to the desired setting. The grill will adjust the wood pellet delivery to gradually reach and maintain the target.
Temperature Display
The backlit screen displays both the current grill temperature (GRILL) and food probe (P TEMP), if plugged in.
The temperature dial has each target temperature with both ºC and ºF increments for convenience if working to Fahrenheit.
Flashing Dots
Two small dots will flash on the display during startup and will stop once the grill temperature increases enough to confirm that the fire has been established.
Controller Settings
Use the dial to rotate to the desired setting, as outlined below:
OFF
- Controller must be set to OFF when plugging the power in otherwise ER2 error will be displayed.
- Turning to OFF after operating the grill will run the fan for 10 minutes to let the fire burn down.
- Only turn off power supply or unplug the grill once the fan turns off.
SMOKE
- Turn to this setting to fire-up the grill.
- Smoke setting also provides the maximum amount of smoke with a temperature of 70 to 90ºC (160 to 195ºF) depending on the outside temperature.
82ºC
- This setting will provide the most stable lowest temperature (more-so than SMOKE).
- In hot weather the smallest fire the grill can maintain may still heat the grill to above this temperature, even up to around 95 to 100ºC (203 to 212ºF). Place the grill out of direct sunlight to help reduce the operating temperature.
107 and 121ºC
- The most commonly used temperatures for low and slow cooking.
- Will still provide plenty of smoke.
135 to 148ºC
- These mid temperatures will provide little smoke as a strong fire is constantly burning.
- Pellets ignite almost immediately once dropped into the fire-pot with minimal time to smoulder and release smoke.
162 to 232ºC
- These higher temperatures provide almost no smoke as a large, clean burning fire is maintained.
- Once cooking at these higher temperatures it is important to first turn the grill down to a lower temperature for around 10 minutes to allow the fire to die down, before turning the dial to OFF.
Click here for full Shut Down instructions.
Food Temperature Probe
The MINI comes with a food temperature probe allowing monitoring of the food temperature without having to open the grill lid. The probe and cable are high temperature rated so can operate inside the grill. For information on food temperatures click here.
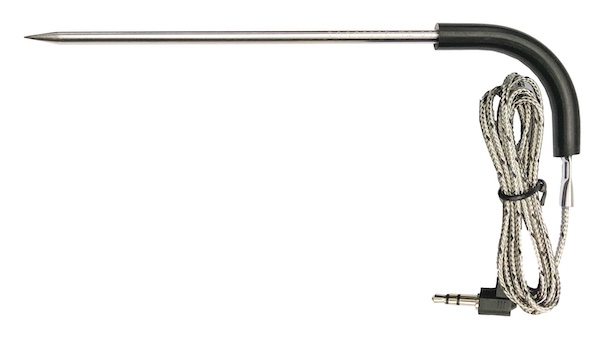
How to Use
- Plug the temperature probe into the port in the front of the controller.
- The temperature is shown directly on the controller display under P TEMP.
- The cable can run directly over the front lip of the grill and is not damaged by shutting the lid.
- Push the probe into the centre of the food.
Care and Cleaning
- After use, scrub the stainless steel probe clean with warm soapy water and rinse off and dry.
- Do not fully submerge the temperature probe or cable in water.
- Do not kink the metal cable.
Grill location
Table Material
- The underside of the grill does not get too hot so can be put on wooden, metal or ceramic surfaces.
- It is not recommend on plastic tables as the heat can cause the table to warp.
Flat, Stable Surface
- The grill must be positioned on a stable and relatively level surface. This is particularly important if using the BBQ hotplate to avoid oil spilling over the sides.
- The bottom feet can be rotated to adjust the height to ensure the grill is level.
Fire up the grill
Open grill lid
- It is important to open the lid to allow fresh air to circulate during the start up process.
Check pellet level
- Make sure there are enough wood pellets in the hopper. Click here to learn more.
- If the grill has not been used for a long time check to ensure the wood pellets are loose, dry and shiny. If any signs of moist pellets remove them all, run the grill empty and use fresh, dry pellets.
Clean fire-pot
- Always check to make sure the fire-pot does not have too much ash accumulated.
- It is best to vacuum out before each cook.
Plug in and turn controller to SMOKE
- Turn the dial to SMOKE to begin the startup cycle.
- Pellets will intermittently feed into the fire-pot, the fan will run continually and the ignition rod will get red hot to light the fire.
- If smoke is not released within 3-4 minutes, remove the grease tray and check the fire-pot.
Smoke and fire
- Wait to see a cloud of smoke and then hear the roaring sound of the fire.
- Close the grill lid and set controller to the target temperature.
Wait for heat-up
- Wait for the grill to reach the target temperature before placing in food.
- It is normal for the temperature to rise above the target before settling back down.
Keep the lid shut while cooking
- As the saying goes, “If you keep looking, you’re not cooking“, so keep the lid shut!
- Use the food probe to monitor the temperature rather than opening the lid too often.
- The temperature will drop each time the lid is opened and may spike back up above the target if the lid is opened for too long as lots of pellets will have been delivered into the fire-pot.
Normal operation
Once the grill has successfully started up and exceeded 60ºC the controller will turn off the ignition rod and commence normal operating mode.
The operating logic is basically as follows:
- If LOWER than the target temperature, deliver more pellets into the fire-pot
- If HIGHER than the target temperature, deliver less pellets into the fire-pot
Each time pellets are delivered into the fire-pot (roughly once every 60 to 90 seconds) and begin to burn, heat is released resulting in small temperature swings around the target, which is normal.
Shutdown the grill
The grill needs to ensure the fire is totally burnt out by running the fan for 10 minutes before turning itself off.
Always follow the correct process outlined below when shutting down the the grill.
Temperature above 160ºC
- If the grill is currently above 160ºC, turn the grill down to Smoke for 10 minutes to allow the fire to die down, then turn the controller dial to OFF.
- The fan will run for about 10 minutes then turn itself off.
- Always wait for the fan to turn off before unplugging the grill from power.
Temperature below 160ºC
- If the grill is currently below 160ºC, turn the controller dial to OFF.
- The fan will run for about 10 minutes then turn itself off.
- Always wait for the fan to turn off before unplugging the grill from power.
Power cut mid cook?
If during a cook the grill is accidentally turned off or power is cut, it needs to be turned back on to allow the fire to safely burn out.
Power off for less than 30 seconds
- If the power is off for less than 30 seconds the fire is most likely still burning.
- Leave the grill lid shut and turn the controller OFF then directly back to the target temperature.
- The startup cycle will run again, so if the target temperature is low (<121ºC) the temperature may spike back up above before settling back down.
Power off for longer than 30 seconds
- If the power is off for longer than 30 seconds, the lack of air flow from the fan may have resulted in the fire going out.
- It is important to OPEN THE GRILL LID to allow good air flow during the grill firing back up again.
- Turn the grill OFF then back to SMOKE.
- As soon as a confirmed the fire is established (after cloud of smoke) shut the grill lid and turn back to the target temperature.
Power can’t be provided
- If power can’t be provided within a couple of minutes, extra care must be taken when turning the grill back on, as burn back resulting in a smoky hopper can occur. This is more likely if the grill was operating at a high temperature with big fire when the power was cut.
- Follow the procedure outlined above for the “longer than 30 seconds” but also open the hopper lid and check to see if any smoke appears.
- If the grill fires up as normal and no smoke appears from the hopper, continue with the cook as normal.
- If any smoke appears from the hopper, scoop out as may pellets as possible (removing the top of the hopper if required) and then run the grill until empty. Once the fire is out and the grill has cooled down, vacuum out the hopper and fire-pot and then prime with fresh pellets.
Temperature Stability
Normal temperature performance
Z Grills controller’s PID software has been refined to maintain the most stable temperatures possible, but like any pellet smoker, temperature swings around the target are normal. This is simply due to the way the controller logic works and the fact that pellets are delivered every 1 to 2 minutes and so releasing heat in batches.
Controller vs grill rack temperatures
Grill rack temperature readings may be lower than the grill controller display if the probes are close to cold meat. Much higher readings will result if the probes are close to the edges of the grill rack where the hot air is rising from below. It is therefore best to take reading in a more central location on the grill rack and not too close to food.
Stable temperature tips
To maintain the most stable temperatures, follows these tips:
- Avoid opening the lid too much (can result in temperature spikes once lid is shut again).
- Keep the grill out of direct cold wind, as it can impact the temperature regulation.
- Keep the grill out of direct sunlight (if exceeding the target temperature).
Click here to learn more about how the controller works to manage the temperature.
When it doubt leave the grill for 10-15min for the temperature to stabilise and don’t overly stress about the temperature being exactly what you have set. Even an electric or gas oven the temperature cycles around the target setting.
Changing from HIGH to LOW temperatures
If the grill has been operating at a high temperature and is then set to a lower target, the grill will take a long time to cool down as fire in the fire-pot will keep producing heat.
The temperature will drop much slower in hot weather.
To drop the temperature more quickly:
- Open the lid to release heat until the controller displayed temperature drops close to the new, lower target, then shut the lid and continue cooking.
- Do not keep the lid open too long as if the temperature drops below the new target then too many pellets will be delivered causing a temperature spike.
Temperature spikes
Temperature spikes up to 120ºC are common in the first 10 to 15 minutes after startup even when set to a lower target due to the large amount of pellets delivered into the fire-pot.
- Open the lid for a minute to release some heat, or just wait for the temperature to gradually come back down, which may take 5 to 10 minutes.
- Next time, leave the lid open a bit longer after the initial cloud of smoke clears to release some more heat.
- The grill will gradually settle at the desired target but small swings of +/- 10ºC are normal. Because the heat is indirect this temperature cycling will not adversely effect the cooking of food. At higher temperature larger swings are common, especially in windy weather.
Hot weather operation
In hot weather the grill may not be able to maintain temperatures below 100ºC (on SMOKE or 82ºC setting) as even the smallest fire still provides lots of heat.
This is particularly the case if the grill is in direct sunlight, as even without the fire operating the grill maybe 40ºC or higher!
Temperature Issues
A number of factors can contribute to the temperature not being a stable as normal. First review the information above and the more detailed information here.
If the grill is consistently 20ºC above or below the target temperature it could indicate an issue with the temperature sensor in the grill. Contact our support team.
Cleaning
Keeping the Z Grills Mini smoker clean is very easy.
Grease Tray & Bucket
- Remove foil from the grease tray and wipe off any surface grease.
- Dispose of any grease in the grease bucket and wash clean with warm soapy water. For easy clean up, line the bucket with foil.
Grill Rack
- Use a Koala Claw wood scraper or other gentle material to scrape off any large chunks.
- Do NOT use a stainless steel wire brush as it can damage the ceramic coating.
- Wash in hot soapy water or just wipe down with a moist cloth or BBQ cleaning wipes.
- Do NOT use acidic or strong chemical cleaners as they may damage the grill rack ceramic coating.
- Dishwasher safe
Fire-pot
- Ash accumulates in the fire-pot and surrounding area and needs to be vacuumed out after each long cook or every 3-4kg of wood pellets usage.
- Only vacuum out ash when the grill is cold, switched OFF and unplugged.
- Some wood pellets produce lots of ash so may need to be cleaned after every cook.
- If any grease has dribbled down into the fire-pot area, clean with BBQ cleaning wipes.
Vents
- Once every 50+ hours of use, clean off any soot around the air vents on the rear of the lid with an old toothbrush and wipe clean with BBQ wipes.
Hopper
- If wood pellets sit for a long time (weeks) in the hopper they can become moist. This is especially the case in humid climates. Click here to learn more about wood pellets.
- So if not planning to use the grill for more than a few weeks (especially in humid climates) it is a good idea to run the grill empty of pellets.
- Scoop out pellets until you reach the protective guard.
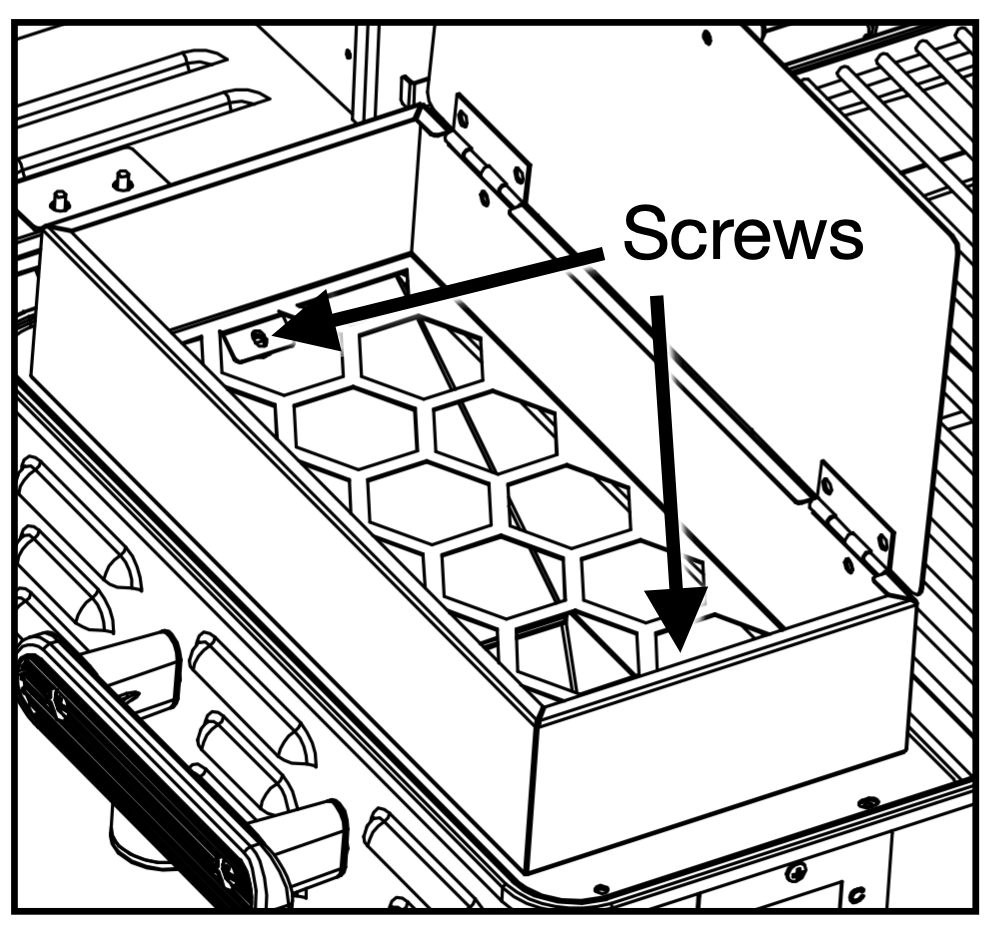
- Option 1: Vacuum out the remaining pellets (if you have suitable vacuum that can fit through the holes).
- Option 2: Tilt the grill forward to pour them out.
- Option 3: Remove the two screws that hold the top section of the hopper in place, then scoop out the remaining pellets.
- There are still pellets in the feed tube, so fire-up and run the grill until they are all burnt out and the temperature drops (fire is out). This should only take about 10-15minutes.
- Turn the grill to OFF.
- If the controller display shows LER, just turn to OFF and unplug from power.
- Once cooled down, vacuum out the hopper entry and fire-pot.
- Before the grill is next used it will need to be primed with pellets. Click here to learn how.
Grill Surfaces
- Wipe down the inside and outside of the grill with BBQ cleaning wipes, or warm soapy water and moist (not too wet) cloth.
- Cover the grill with a protective cover when not in use if stored outdoors. The grill must not be exposed to rain.
- Gently clean the temperature sensor inside the grill with wire-wool to ensure accurate temperature readings.
Food Temperature Probe
- Food probes must be scrubbed thoroughly after each use with hot soapy water to avoid food contamination.
- Do not immerse the entire probe or cable in water.
- Avoid twisting or kinking the cable as it may be damaged.
Click here for more information on cleaning your Z Grills smoker.
Errors
If there is a problem with the operation of the grill an error will be shown on the controller display and the grill with turn off.
LER: Low temperature error (click here to learn more)
HER: High temperature error (click here to learn more)
ER1: Temperature sensor signal error (click here to learn more)
ER2: Controller system error
- This will occur if the power is plugged in when the grill is already turned to a temperature setting.
- If happening mid cook, there may be a problem with the power supply or the controller.
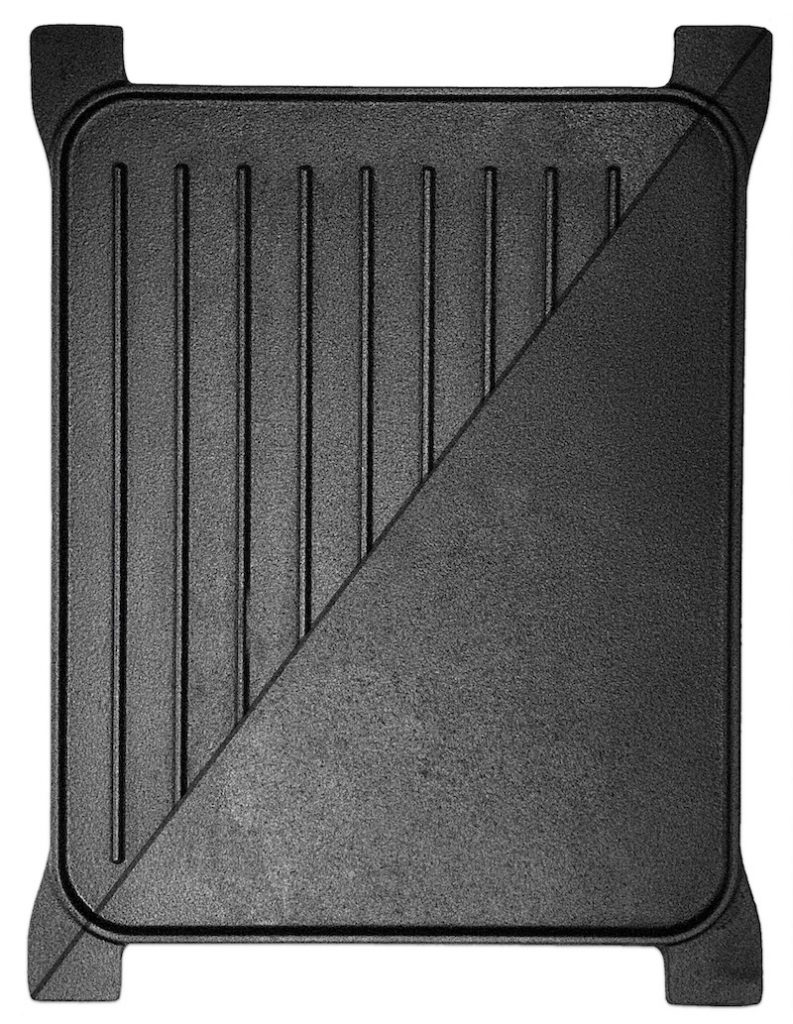
Mini BBQ Hotplate
The optional BBQ hotplate has a cooking area of 340 x 270mm and is made from heavy duty pre-seasoned cast iron. Total size is 405 x 305mm.
The plate has been specifically designed for the Z Grills Mini smoker with gaps down all four sides to allow the hot air from the fire to rise up into the grill area and out the rear exhaust vents.
The double sided design is smooth one side, ridged the other, perfect for doing some rissoles, steaks or onion rings.
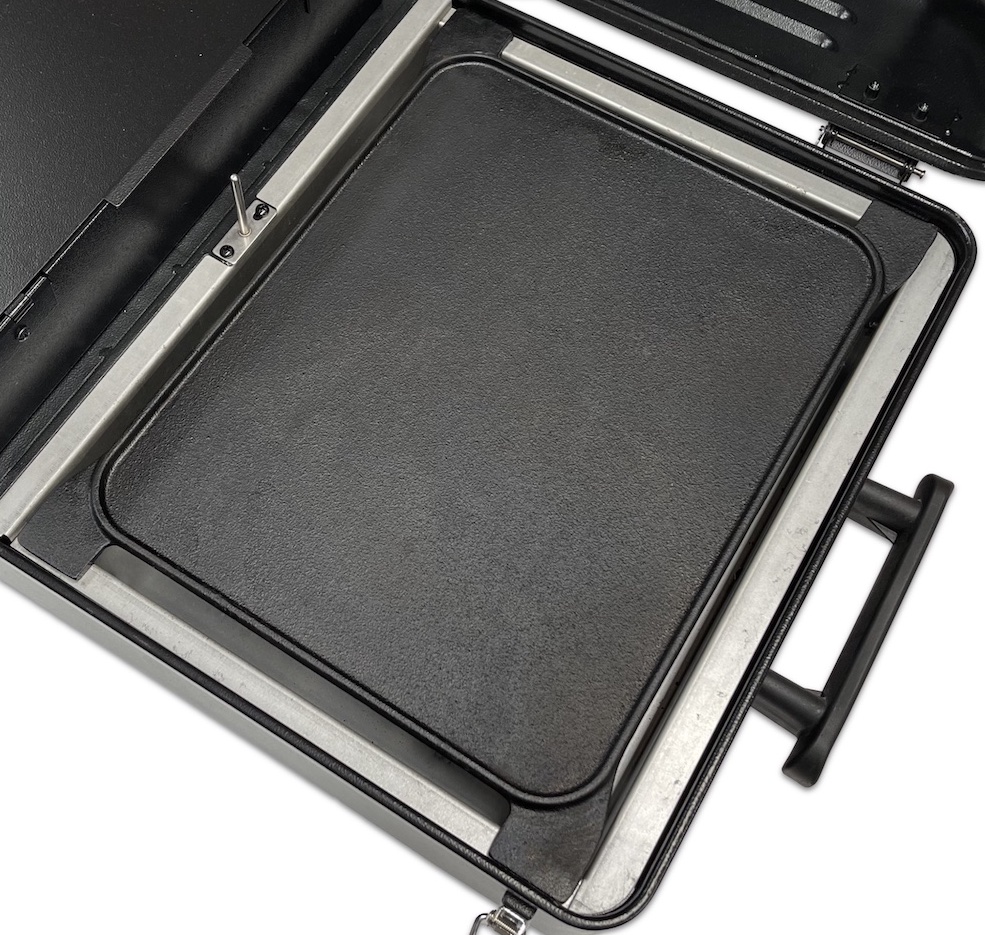
How to use the BBQ hotplate
- Remove the grill rack and grease tray.
- Sit the hot plate directly over the fire-pot, either smooth or ridged side up.
- Don’t put a very greasy plate over the fire as it can result in a grease fire. If it is greasy, first remove any excess with a paper towel, or wash with hot soapy water.
- Cast iron takes times to heat up, so place in the grill as early as possible, not just before placing on food.
- The grill will loose heat rapidly with the lid open, so if you need to flip food, do it fast and close the lid. Remember, If you keep looking, you’re not cooking!
- Never pour cold liquid onto a hot cast iron plate as it can crack due to rapid cooling.
- Avoid spilling food and oil over the edges of the hotplate down into the fire-pot area as it will mix with ash and be a mess to clean up and could lead to a dangerous grease fire.
- If any food or grease spills down into the fire-pot box, wait until the grill has cooled down and wipe up with paper towel or BBQ cleaning wipes.
- Clean the hotplate with hot soapy water. Use a plastic brush (never metal) to scrub if required. Dry thoroughly and lightly oil before storing.
- If the hotplate shows signs of rust, rub back and season again the same as any cast iron cookware. There are many tutorial videos online with step by step instructions.
Grill Cover
To protect the grill from rain and dust when not in use, grab a waterproof cover.
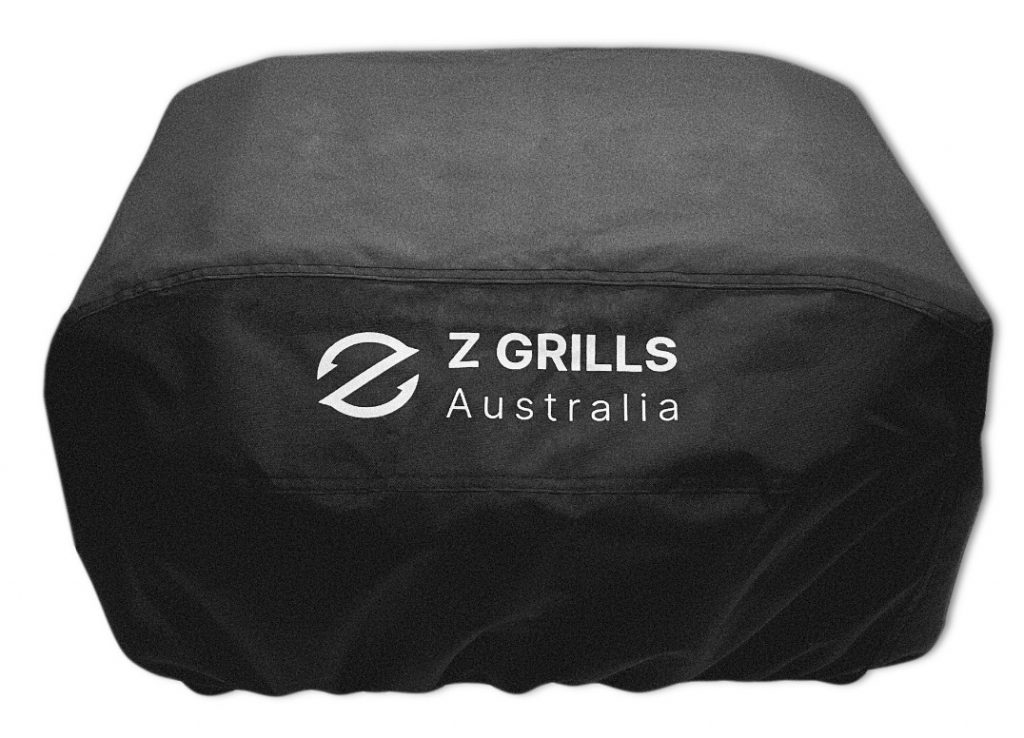
The cover is easy to put on and stays in place thanks to heavy duty elastic around the bottom.

Owner Manual
Click here to download the latest version of the Z Grills Mini owner manual.