This guide is for 700 series Z Grills with the Australian wireless controller.
Feed Pellets
The first time the grill is used, and after each time the pellets totally run out, the pellet feed tube needs to be filled up (primed) with pellets.
Follow the steps below:
- With the grill not fired up, press the control knob once to wake up the screen.
- Pour some wood pellets (3 to 4kg is enough) into the hopper.
- Press and hold the control knob for 2 seconds to enter the MENU, rotate to FEED PELLETS, press once to confirm.
- The pellets will feed for 4 minutes which is normally long enough to begin dropping them into the fire-pot. Press the control knob at anytime to stop feeding.
For full instructions on how to use the wireless controller click here.
Fire Up Grill
Open grill lid
- It is important to open the lid to allow fresh air to circulate during the start up process.
Check pellet level
- Make sure there are enough wood pellets in the hopper. Click here to learn more.
- If the grill has not been used for a long time check to ensure the wood pellets are loose, dry and shiny. If any signs of moist pellets remove them all, run the grill empty and use fresh, dry pellets.
Clean fire-pot
- Always check to make sure the fire-pot does not have too much ash accumulated.
- It is best to vacuum out before each cook.
Turn on and fire up
- Plug the grill into power and press the control knob once to turn on.
- Press and hold the control knob for 2 seconds to enter the MENU, rotate one step to FIRE UP and press once to confirm.
- Pellets will begin to feed intermittently into the fire-pot, the fan will run and the ignition rod will get red hot to light the fire.
- The fan sound will change as the speed changes. This is normal.
Smoke and fire
- Wait to see a cloud of smoke be released indicating the pellets are igniting.
- Close the grill lid.
- The controller will display Fire Lit once the grill temperature rises by at least 5℃ / 10℉ and at least 2 minutes has passed. Three short beeps will sound (if sound turned on).
- If smoke is not released within 3-4 minutes, remove the grease tray and check the fire-pot.
- If after 7 minutes, the fire is not successfully lit and the temperature does not rise, the controller stop the operation of the grill and show Error 4 – No Fire.
Set target temperature & smoke level
- Once the grill fire is lit, press the knob once to change the grill target temperature.
- Rotate to change the value and press again to confirm.
- After a target temperature of 110℃ / 230℉ and lower is set, the Smoke Level icons will flash. Rotate knob to change setting and press again to confirm. By default, choose 3 clouds for maximum smoke.
Wait for heat-up
- Wait for the grill to reach the target temperature before placing in food.
- It is normal for the temperature to rise above the target before settling back down.
Keep the lid shut!
- As the saying goes, “If you keep looking, you’re not cooking“, so keep the lid shut!
- Use the food probe to monitor the temperature rather than opening the lid too often.
- The temperature will drop each time the lid is opened and may spike back up above the target if the lid is opened for too long as lots of pellets will have been delivered into the fire-pot.
Normal operation
The operating logic is basically as follows:
- IF LOWER than the target temperature, deliver more pellets into the fire-pot
- IF HIGHER than the target temperature, deliver less pellets into the fire-pot
Each time pellets are delivered into the fire-pot (roughly once every 40 to 60 seconds) and begin to burn, heat is released resulting in small temperature swings around the target, which is normal.
For full instructions on how to use the wireless controller click here.
Shutdown Grill
The grill needs to ensure the fire is totally burnt out by running the fan for 10 minutes before turning itself off.
Always follow the correct process outlined below when shutting down the the grill.
No Fire Lit
- If the grill is not operating (no fire lit) the Shut Down selection in the Menu will shut turn the power off after only a quick 5 second countdown.
Fire Lit
If the grill is operating (fire lit) a longer Shut Down process is required to burn the fire out before turning the power off. Follow the process below:
- Press and hold the control knob for 2 seconds to enter the Menu, then rotate to Shut Down and press again to confirm.
- If less than 140℃ / 284℉ the grill will begin the Shut Down Cycle, running the fan for 10 minutes then turning the power off.
- If the grill is hotter than 140℃ / 284℉ it will first continue to operate with a small fire to cool down below 140℃ / 284℉ before commencing the Shut Down Cycle. This helps to prevent back-burn, which is possible after running at high temperatures. While the cooldown process is underway, press the control button at anytime to set a new target temperature to continuing running the grill as normal.
- Don’t disconnect or turn off the power until the fan stops.
For full instructions on how to use the wireless controller click here.
Fire up again during shut down cycle
To fire up the grill during the Shut Down cycle, follow these steps:
- Open the grill lid and wait at least 1 minute so the temperature can drop.
- Press and hold the control knob for 2 seconds then rotate to Fire Up, press again to confirm.
- Once there is smoke, or it is clear that fire is burning, close the lid and wait for Fire Lit to be displayed.
- The controller will display Fire Lit once the grill temperature rises by at least 5℃ / 10℉ and at least 2 minutes has passed.
- If “Error 4 – No Fire” occurs, open the lid for about 1 minute to allow the temperature to drop before trying to FIRE UP again.
Cleaning
Keeping the Z Grills 700E-XL Wireless smoker clean is very easy.
Grease Tray & Bucket
- Remove foil from the grease tray and wipe off any surface grease.
- Dispose of any grease in the grease bucket and wash clean with warm soapy water. For easy clean up, line the bucket with foil.
- Clean the V channel that the grease tray drains into as well as the spout leading to the grease bucket. To clean the spout just push through a cloth or paper towel.
Grill Rack
- Use a Koala Claw wood scraper or other gentle material to scrape off any large chunks.
- Do NOT use a stainless steel wire brush as it can damage the ceramic coating.
- Wash in hot soapy water or just wipe down with a moist cloth or BBQ cleaning wipes.
- Do NOT use acidic or strong chemical cleaners as they may damage the grill rack ceramic coating.
Fire-pot
- Ash accumulates in the fire-pot and surrounding area and needs to be vacuumed out after each long cook or every 3-4kg of wood pellets usage.
- Only vacuum out ash when the grill is cold, switched OFF and unplugged.
- If ash accumulates around the ignition rod, clean out with wire or other stiff object.
- Some wood pellets produce lots of ash so may need to be cleaned after every cook.
- If any grease has dribbled down into the fire-pot area, clean with BBQ cleaning wipes.
Chimney
- Once every 50+ hours of use, remove the chimney cap and clean the chimney pipe with an old toothbrush to remove accumulated soot.
Hopper
- If wood pellets sit for a long time (weeks) in the hopper they can become moist. This is especially the case in humid climates. Click here to learn more about wood pellets.
- So if not planning to use the grill for more than a few weeks (especially in humid climates) it is a good idea to run the grill empty of pellets.
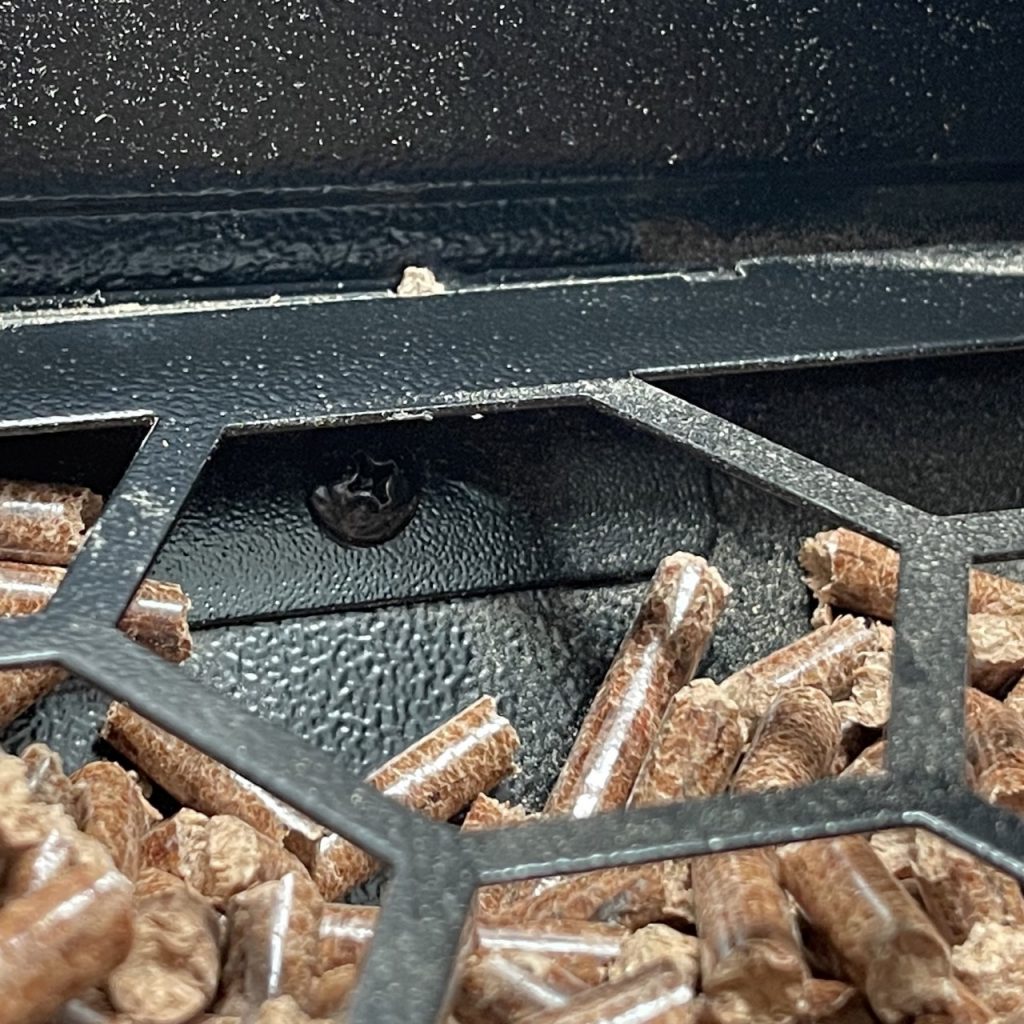
- Scoop out pellets until you reach the protective guard.
- The guard can be temporarily lifted out by removing the 4 screws (two front, two rear) that are just under the lip as shown in the photo below.
- Scoop out most of the pellets, then run the grill until they are all burnt out and the temperature drops (fire is out).
- Turn the grill to Shut Down.
- If the controller display shows LER, just turn to Shut Down and unplug from power.
- Once cooled down, vacuum out the hopper entry and fire-pot.
- Before the grill is next used it will need to be primed with pellets. Click here to learn how.
Grill Surfaces
- Wipe down the inside and outside of the grill with BBQ cleaning wipes, or warm soapy water and moist (not too wet) cloth.
- Stainless steel my need to polished from time to time to maintain a protective “stainless” coating. Click here to learn more.
- Cover the grill with a protective cover when not in use if stored outdoors. The grill must not be exposed to rain.
- Gently clean the temperature sensor inside the grill with wire-wool to ensure accurate temperature readings.
Food Temperature Probe
- Food probes must be scrubbed thoroughly after each use with hot soapy water to avoid food contamination.
- Do not immerse the entire probe or cable in water.
- Avoid twisting or kinking the cable as it may be damaged.
Click here for more information on Z Grills smoker cleaning.
Monitoring Temperature
Grill Temperature
The controller display shows the current grill temperature. Click here to learn more about temperature stability.
Food Probe Temperature
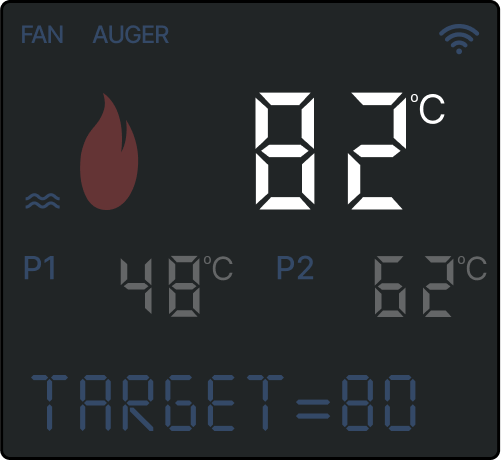
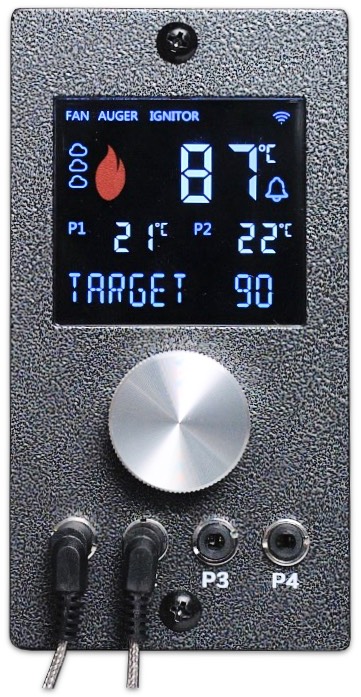
Up to four wired food probes can be plugged into the front of the controller, labelled P1, P2, P3 and P4.
The current probe temperatures are displayed directly on the grill controller screen. The image below shows P1 (20℃) and P2 (22℃) temperatures. When P3 or P4 are also plugged in the temperature display will cycle every couple of seconds between showing P1 and P2 to P3 and P4.
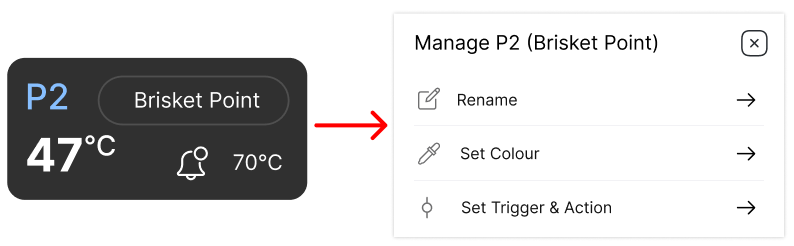
The food probe temperatures can also be viewed on the Z Grills Aus App and even used at a triggers for notifications and actions. Learn more here.
Temperature Stability
Normal temperature performance
Z Grills controller’s PID software has been refined to maintain the most stable temperatures possible, but like any pellet smoker, temperature swings around the target are normal. This is simply due to the way the controller logic works and the fact that pellets are delivered roughly every 30 to 60 seconds and so release heat in batches.
Controller display vs grill rack temperature
Grill rack temperature readings may be lower than the grill display if the probes are close to cold meat. Much higher readings will result if the probes are close to the front or rear of the grill where the hot air is rising from below. It is therefore best to take reading in a more central location on the grill rack and not too close to food.
Stable temperature tips
To maintain the most stable temperatures, follows these tips:
- Avoid opening the lid too much (can result in temperature spikes once lid is shut again).
- Keep the grill out of direct cold wind, as it can impact the temperature regulation.
- Keep the grill out of direct sunlight (if exceeding the target temperature).
Click here to learn more about how the controller works to manage the temperature.
Changing from HIGH to LOW temperatures
If the grill has been operating at a high temperature and is then set to a lower target, the grill will take a long time to cool down as fire in the fire-pot will keep producing heat.
The temperature will drop much slower in hot weather.
To drop the temperature more quickly:
- Open the lid to release heat until the controller displayed temperature drops close to the new, lower target, then shut the lid and continue cooking.
- Do not keep the lid open too long as if the temperature drops below the new target then too many pellets will be delivered causing a temperature spike.
Temperature spikes
Temperature spikes are common after opening the lid for too long as the controller will have be delivering lots of pellets to get the temperature back up, and they will release a lot of heat.
- Open the lid for a minute to release some heat, or just wait for the temperature to gradually come back down, which may take 5 to 10 minutes.
- Don’t leave the lid open so long that the temperature drops below the current target temperature, as that will only exacerbate the elevated temperature.
- The grill will gradually settle at the desired target but small swings of +/- 5ºC are normal. Because the heat is indirect this temperature cycling will not adversely effect the cooking of food. At higher temperature larger swings are common, especially in windy weather.
Failing to reach high temperatures
- Check the pellets being used. If they are moist the heat output will be greatly reduced. Some batches of oak based fruit pellets can have lower low heat output and result in failure to reach high operating temperatures.
- Try another type of pellets (or fresh, dry bag) to confirm if this is the issue.
Hot weather operation
- In hot weather the grill may not be able to maintain temperatures below 100ºC as even the smallest fire still provides lots of heat.
- This is particularly the case if the grill is in direct sunlight, as even without the fire operating the grill maybe 40ºC or higher!
Temperature Issues
A number of factors can contribute to the temperature not being a stable as normal.
Click here to help troubleshoot temperature issues.
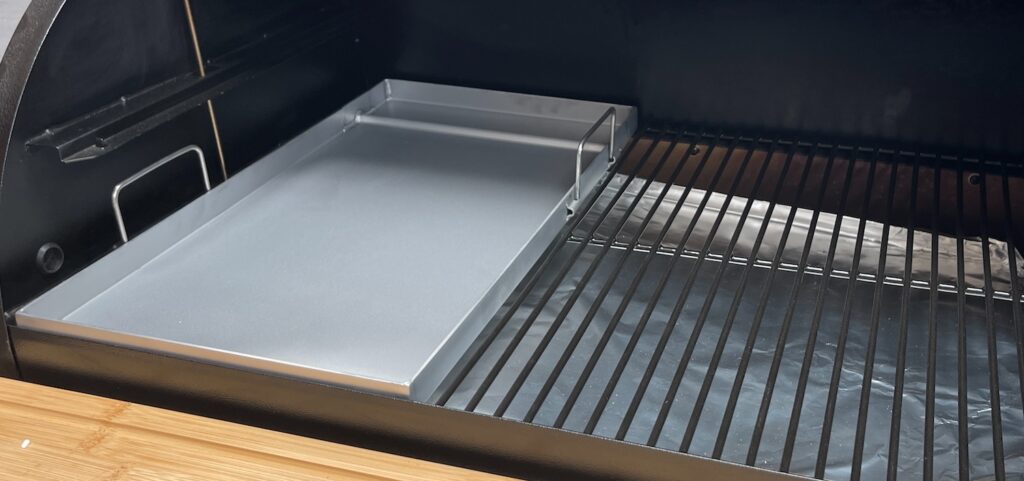
BBQ Hotplate Kit
The left hand (narrower) grill rack can be removed and a BBQ Hotplate dropped in its place for high temperature searing over the vented grease tray.
Click here for more information.
Can the BBQ hotplate be left in place long term?
- Yes it can
- Temperature regulation throughout the grill may be slightly different compared to when grill racks are in place. If doing a low and slow cook, it may be better to put the left grill rack back.
- Always ensure the grease tray vents are covered in foil when the BBQ hotplate is not in place.
Grease Tray
The grease tray sits just below the grill racks, sloping from left to right. Gaps along the front and rear sides of the grease tray allow the hot air flow from below to rise up into the cooking area.
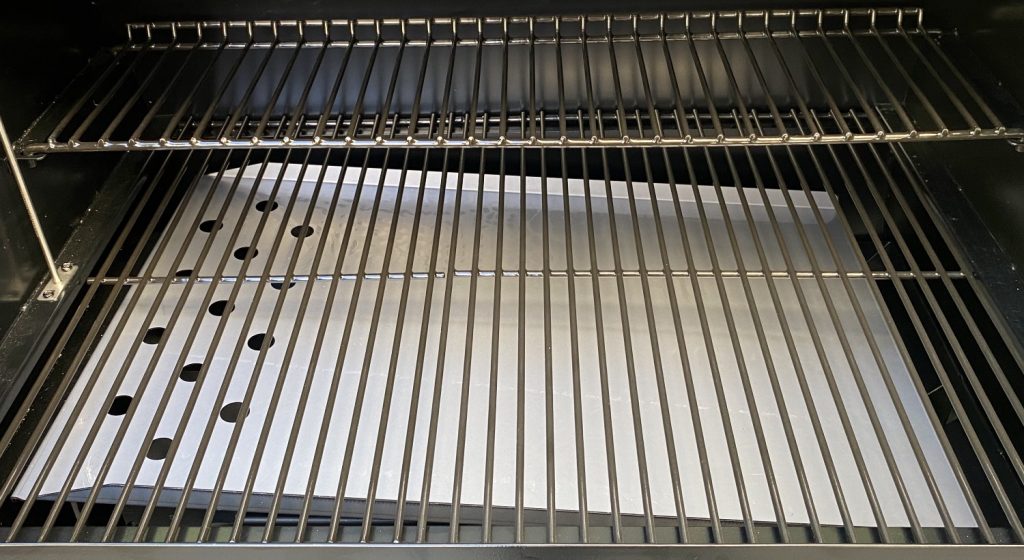
Starting with Version 5 of the 700E-XL smoker in 2021, the grease tray features vents on the left hand side for high temperature searing. Click here to learn more about the vented grease tray design.
How does the grease tray work?
- Grease and juice drips from food on the grill rack down on to the grease tray and drains left to right down to the V channel then through the spout into the grease bucket.
- Click here for grill cleaning instructions.
Cover grease tray with foil?
- During normal cooking with the grill rack in place these vents should be covered with aluminium foil.
- Using foil makes cleaning easier and ensures there is not a large accumulation on the grease tray which can release nasty smoke when running the grill at high temperatures, spoiling the food.
- It is important that the foil is wrapped tight at the edges though, as the gap front and back of the grease tray must be open to allow hot air to rise up.
- Covering vents ensures even temperatures through the grill and and avoids grease dripping down close to the fire-pot which could cause a grease fire.
Grease fire management
A dirty grill that has accumulated too much grease is the most common cause of a grease fire. Regular cleaning is therefore the main way to prevent this occurring.
If a grease fire occurs:
- Unplug the grill from power so the fan does not continue to feed it with air.
- Do not apply water or try to smother the fire.
- Do not open the lid if there is an active grease fire as it may flare up.
- If the lid is already open a dry chemical (A-B-E) fire extinguisher can be used to put out the fire if required.
- Wait until the fire goes out then thoroughly clean the grill.
Click here for grill cleaning instructions.
Power Off Mid Cook
Power turned OFF
If there is a power outage or the grill is accidentally turned off while running, follow these steps.
- Press the control knob to power the controller back on.
- Open the grill lid and wait at least 1 minute so the temperature can drop.
- Press and hold the control knob for 2 seconds then rotate to FIRE UP, press again to confirm.
- Once there is smoke, or it is clear that fire is burning, close the lid and wait for FIRE LIT to be displayed.
- The controller will display Fire Lit once the grill temperature rises by at least 5℃ / 10℉ and at least 2 minutes has passed.
- If “Error 4 – No Fire” occurs, open the lid for about 1 minute to allow the temperature to drop before trying to FIRE UP again.
Power can’t be provided
- If power can’t be provided within a couple of minutes, extra care must be taken when turning the grill back on, as burn back resulting in a smoky hopper can occur. This is more likely if the grill was operating at a high temperature with big fire when the power was cut.
- Follow the procedure outlined above but also open the hopper lid and check to see if any smoke appears.
- If the grill fires up as normal and no smoke appears from the hopper, continue with the cook as normal.
- If any smoke appears from the hopper, scoop out as may pellets as possible (removing the grill guard in the hopper if required) and then run the grill until empty. Once the fire is out and the grill has cooled down, vacuum out the hopper and fire-pot and then use the Pellet Feed function to prime with fresh pellets.
Ran Out of Pellets
Ran out of pellets
If the temperature of the grill drops the fire has gone out, most likely due to running out of pellets. The grill can be back up and running in less than 10 minutes, but must be done safely. Review the three scenarios below and follow the steps.
Scenario 1: No pellets in hopper
If the grill temperature as dropped a lot, such that the fire has clearly been out for some time then then the feed tube between the hopper and the fire-pot has been fully cleared out.
- Add pellets into the hopper
- Press and hold the control knob for 2 seconds to enter the MENU, rotate to FEED PELLET and press again to select. The auger will run for 3-4 minutes (depending on your grill model) and then turn off.
- Fire up the grill as normal.
Scenario 2: Some pellets still in auger tube
Do NOT simply Fire up the grill again! If there are a small quantity of pellets left in the auger tube, a cavity may have formed in the pellets causing them to run out.
- Check the fire-pot to make sure it is empty. If there are any pellets in there scoop those out first.
- Add pellets into the hopper
- Fire up the grill as normal.
- There may be a small section in the feed tube with no pellets which could cause the fire to go out again (if operating at low temp setting), so closely monitor the grill for at least 15 minutes before confirming that everything is back to normal operation.
Scenario 3: Lots of pellets still in hopper
If there are lots of pellets in the hopper then the fire likely went out due to smothering by too much ash, moist pellets or a hardware failure. A hardware failure should result in a Error (5, 6 or 7), so if they did not occur, checking the fire-pot for ash should be the first step.
- Check the fire-pot to make sure it is empty. If there are any pellets or ash in there scoop/vacuum those out first. Don’t vacuum if there are live embers!
- Fire up the grill as normal.
- Monitor the operating of the grill. If the temperature drops again, the may be an issue with the pellets not burning properly due to moisture or creating too much ash.
Owner Manual
Click here to download the latest copy of the owner manual for Z Grills 700E-XL (V6) Wireless Pellet Smoker Grill.
Older versions of the manuals for 700E and 700E-XL grill models can be accessed here, but for most up to date operation and safety information please refer to the latest version linked above.
Errors
The controller monitors the grill operation and devices (Temperature Sensor, Fan, Auger & Ignition Rod) to detect any potential issues.
If an error occurs several things will happen:
- Three long “beeps” will sound (if Alarm Sound is turned on).
- The controller will begin the Shut Down cycle.
- The error will be displayed on the controller screen. e.g. ERROR 1 TEMP SENSOR
ERROR 1 – TEMP SENSOR
- Temperature sensor failure, or cable connection issue.
- Click here for more information.
ERROR 2 – HIGH TEMP
- Temperature measured above 260℃ for more than 1 minute.
- Click here for more information.
ERROR 3 – FLAME OUT
- Temperature has dropped significantly for at least 10 minutes, due to the fire potentially going out. Leaving the lid open can also lead to this error occurring.
- Click here for more information.
ERROR 4 – NO FIRE
- Fire has not been successfully lit.
- Click here for more information.
ERROR 5 – AUGER
- Auger motor is not using power and may be faulty.
- Click here for more information.
ERROR 6 – FAN
- Fan motor is not using power and may be faulty.
- Click here for more information.
ERROR 7 – I-ROD
- Ignition Rod is not using power and may be faulty.
- Click here for more information.
ERROR 8 – SYSTEM
- Fan, Auger Motor or Ignition Rod may be using power when not turned on, potentially due to a faulty in the controller.
- Click here for more information.