Controller Overview
Developed by Z Grills Australia specifically for the Australia market, the Wireless Controller provides a wide range of features directly on the controller and further functionally and remote monitoring using the Z Grills Aus App.
Key Features
- Custom configured PID logic for optimal temperature control.
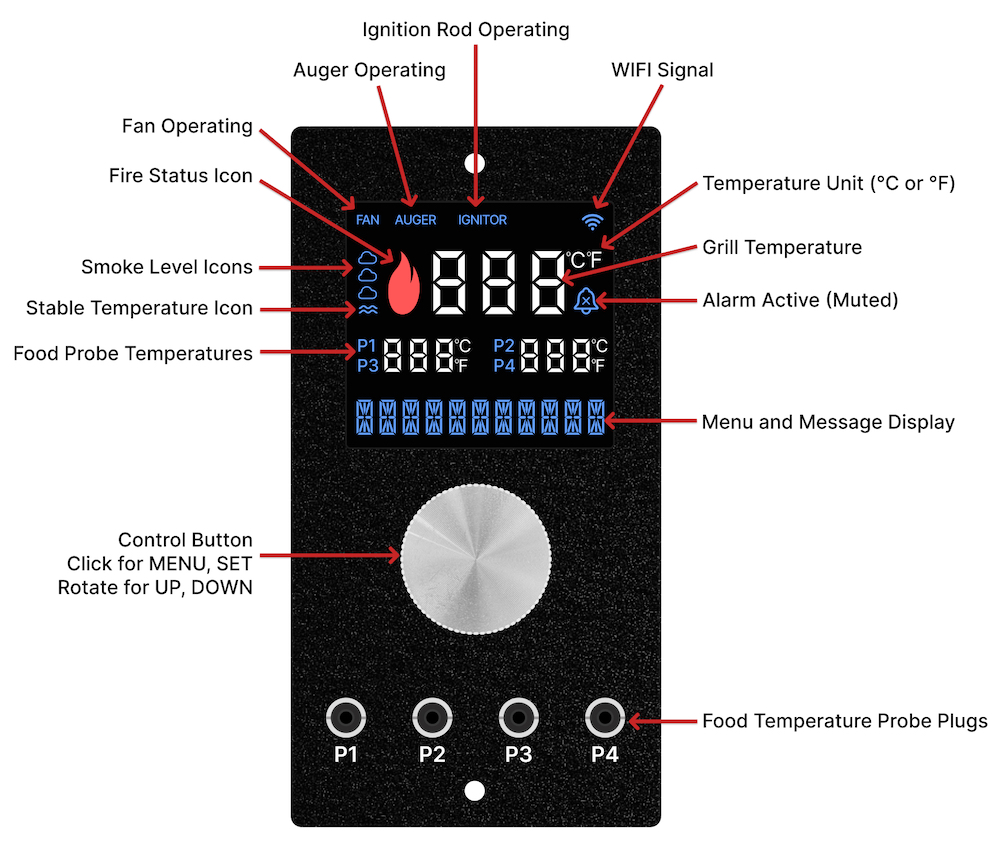
- Colour LCD display clearly shows all grill operating and temperature information
- Large, easy to operate control knob.
- 75 to 240℃ (167 to 465℉) temperature range adjustable in 1 degree increments
- Inputs for up to four wired food temperature probes, with on screen display.
- Bluetooth and WIFI for wireless connectivity with external antenna
- Compatible with Z Grills wireless food probes and pellet level sensor (coming soon).
- Connect to the Z Grill Aus App for remote monitoring and control.
- Easily install software updates through the App, for new features over time.
Upgrade Existing Z Grills
All 450A, 7002B and 700E series grills sold in Australia are compatible with this new controller, allowing them to be upgraded to the latest controller hardware, software and App!
Click here for step-by-step instructions to change out an existing controller with new wireless controller.
Operating Principle
The controller monitors the temperature sensor inside the grill and then adjusts the fan speed and turns the auger on/off to deliver wood pellets into the fire-pot.
The grill internal temperature and four food temperature probes can be monitored on the controller display.
Remote Monitoring & Control
The controller can be remotely monitored and many features controlled using the Z Grills Aus iOS and Android App. Click here for instructions on how to download, install and connect to your Z Grills Wireless Controller.
Quick Start Guide
Please read this document to understand all the features of the controller!
FIRST EVER USE: Click here, do not proceed with the normal operation!
WAKE SCREEN: Once plugged into power, press the knob once to wake up the controller screen.
MENU: At any time, press and hold the control knob for 2 seconds to enter the MENU.
SELECT: When in the menu, press the control knob once to select the item.
FIRE UP:
● Open grill lid, enter the MENU, rotate one step to FIRE UP, press once to confirm.
● As soon as any smoke appears close the grill lid.
● Once Fire is Lit (after 2-4 minutes) Set Target & Smoke Level.
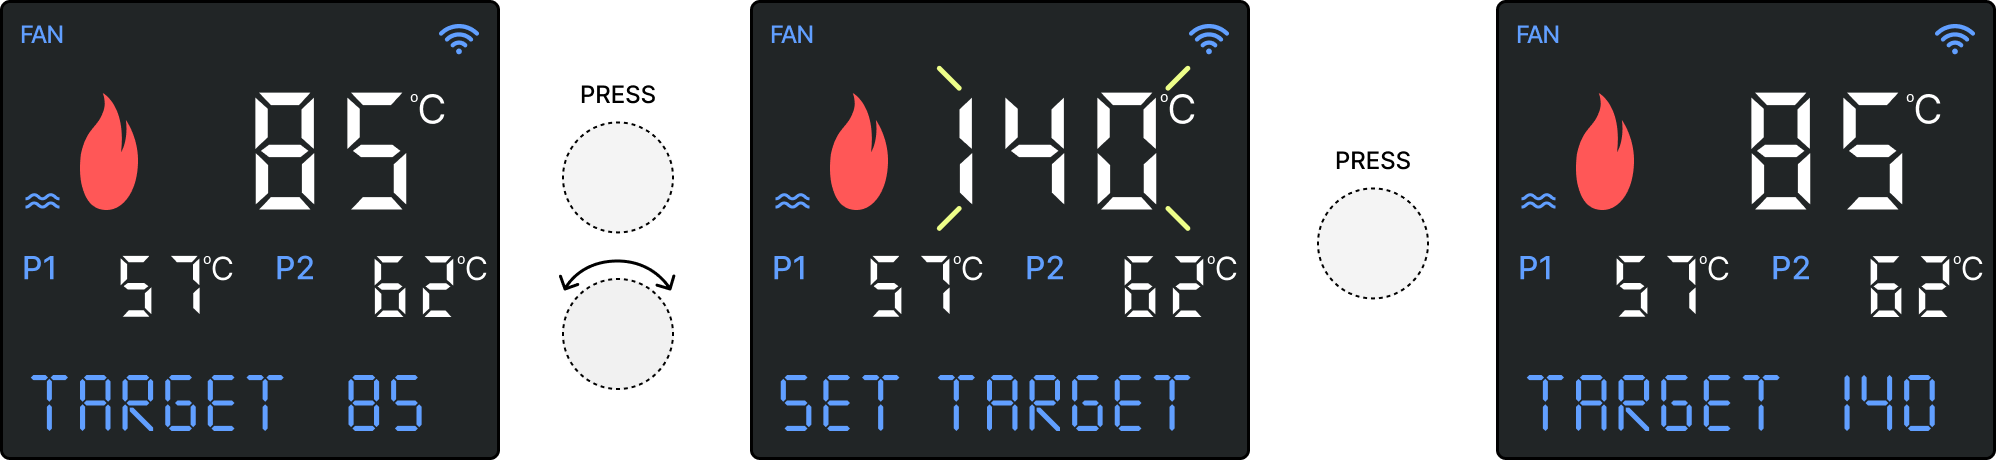
SET TARGET & SMOKE LEVEL:
● Once the grill fire is lit, press the knob once to change the grill target temperature.
● Rotate to change the value and press again to confirm.
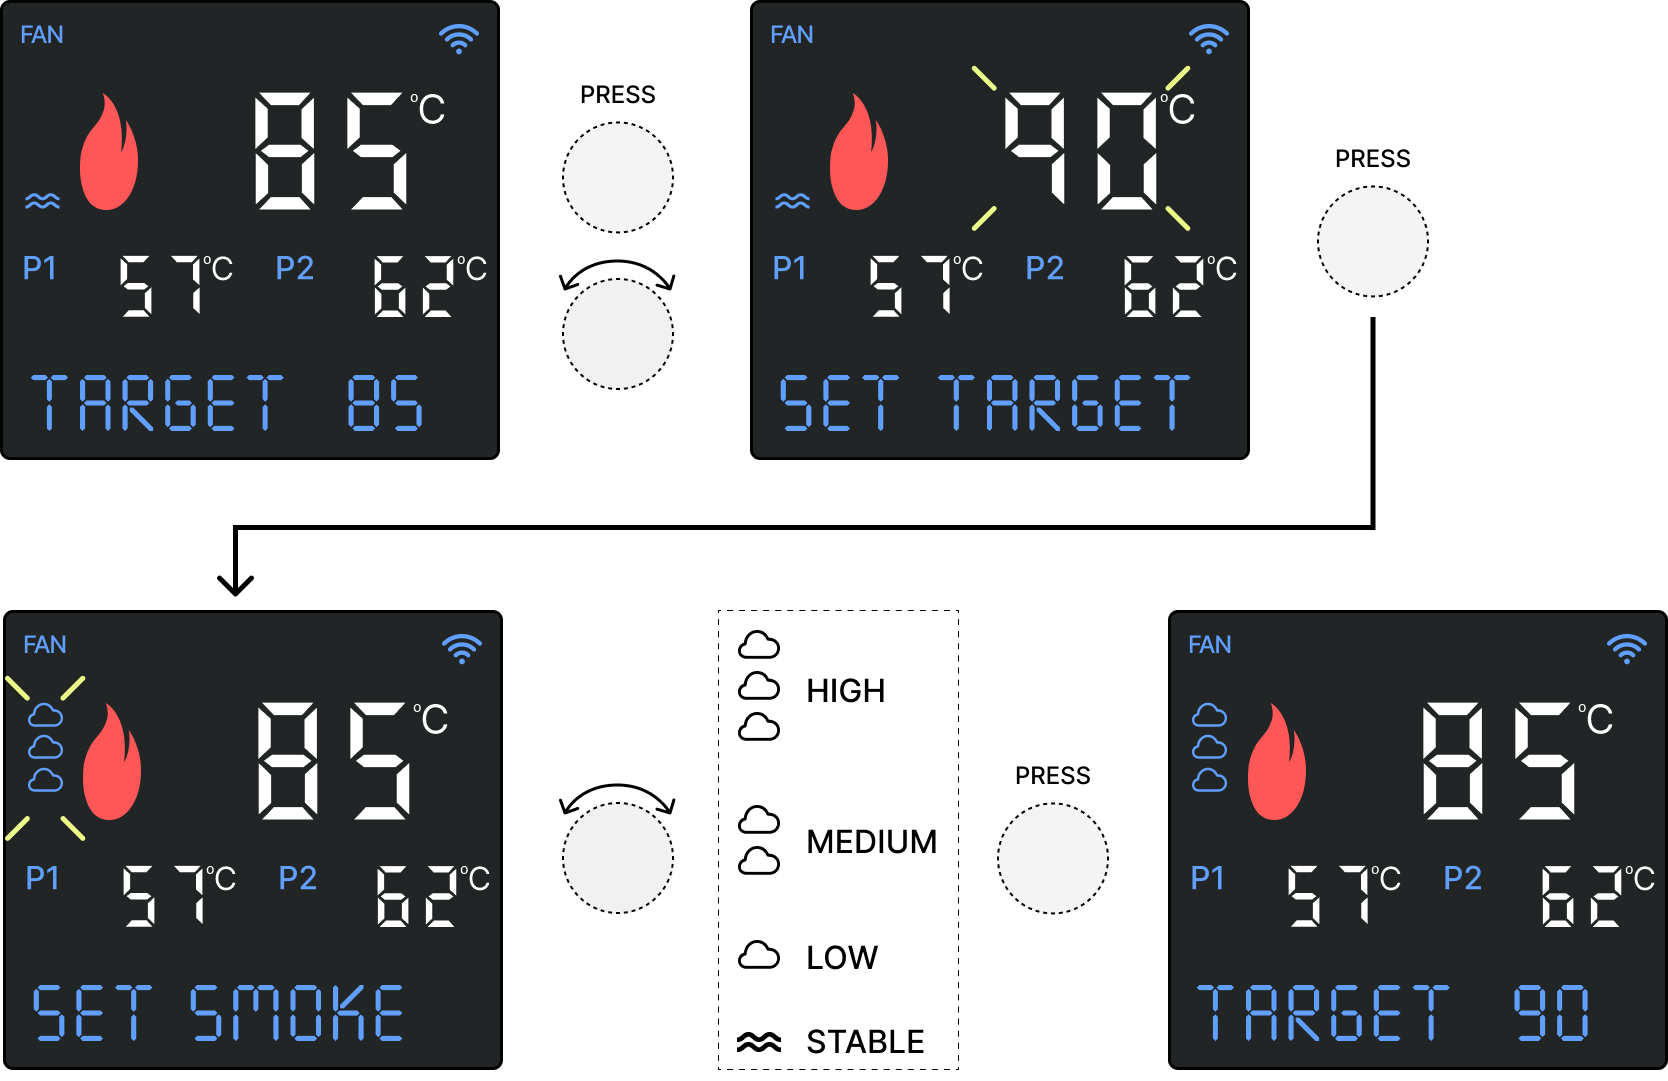
● After a target temperature of 110℃ / 230℉ or lower is set, the Smoke Setting icons will then flash. Rotate to change setting and press again to confirm. By default, choose 3 clouds for maximum smoke.
SHUT DOWN:
● Press and hold the control knob for 2 seconds to enter the MENU, rotate one step to Shut Down, press once to confirm.
● The fan will run for 10 minutes, then turn off.
Controller Functions
Below is a summary of all menu items. Click on each to jump to a more detailed explanation.
FIRE UP: Lights the grill fire by feeding wood pellets into the fire-pot and turning on the ignition rod and fan.
SHUT DOWN: Begins the Shut Down cycle to safely burn out the fire and turn the grill off after running the fan for 10 minutes.
FEED PELLET: Feeds pellets from hopper to fire-pot, used when the pellet feed tube is empty.
CLEAR PELL: Runs the auger to clear pellets from the auger tube in the case of burn-back.
Options: SHORT 30 S (30 seconds); LONG 10 MIN (10 minutes)
COLD S FAN: Turns on the fire-pot fan only (no fire in fire-pot) for cold smoking.
STOP FAN: Turns the Cold Smoke Fan off.
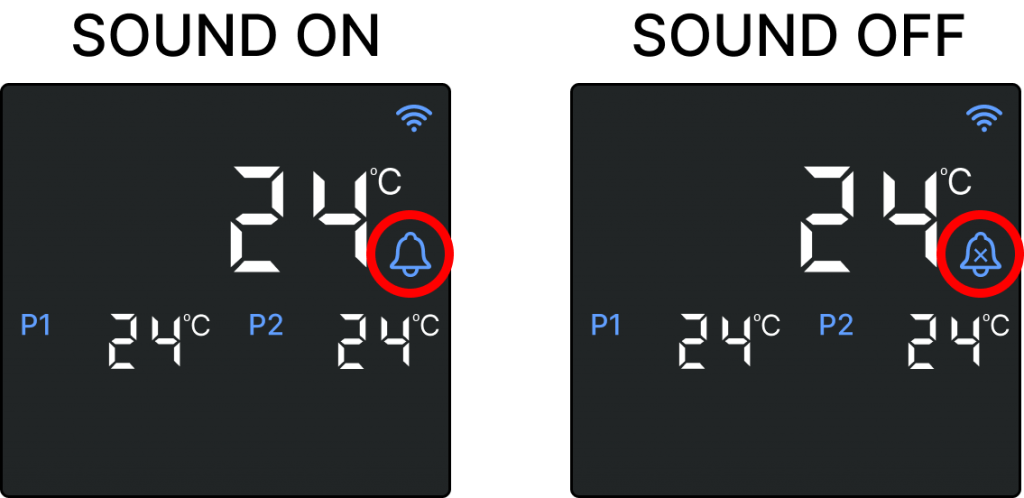
SOUND ON/OFF: Turn the audible “beep” sound ON/OFF for Fire Lit alert, Error alert and for any notifications set up on the mobile App.
Options: SOUND ON, SOUND OFF
TEMP OFFSET: Adjust the grill temperature reading up or down to more closely match the average grill rack temperature.
TEMP UNITS: Set temperature unit display for the grill and food probes.
Options: Celsius (℃), Fahrenheit (℉)
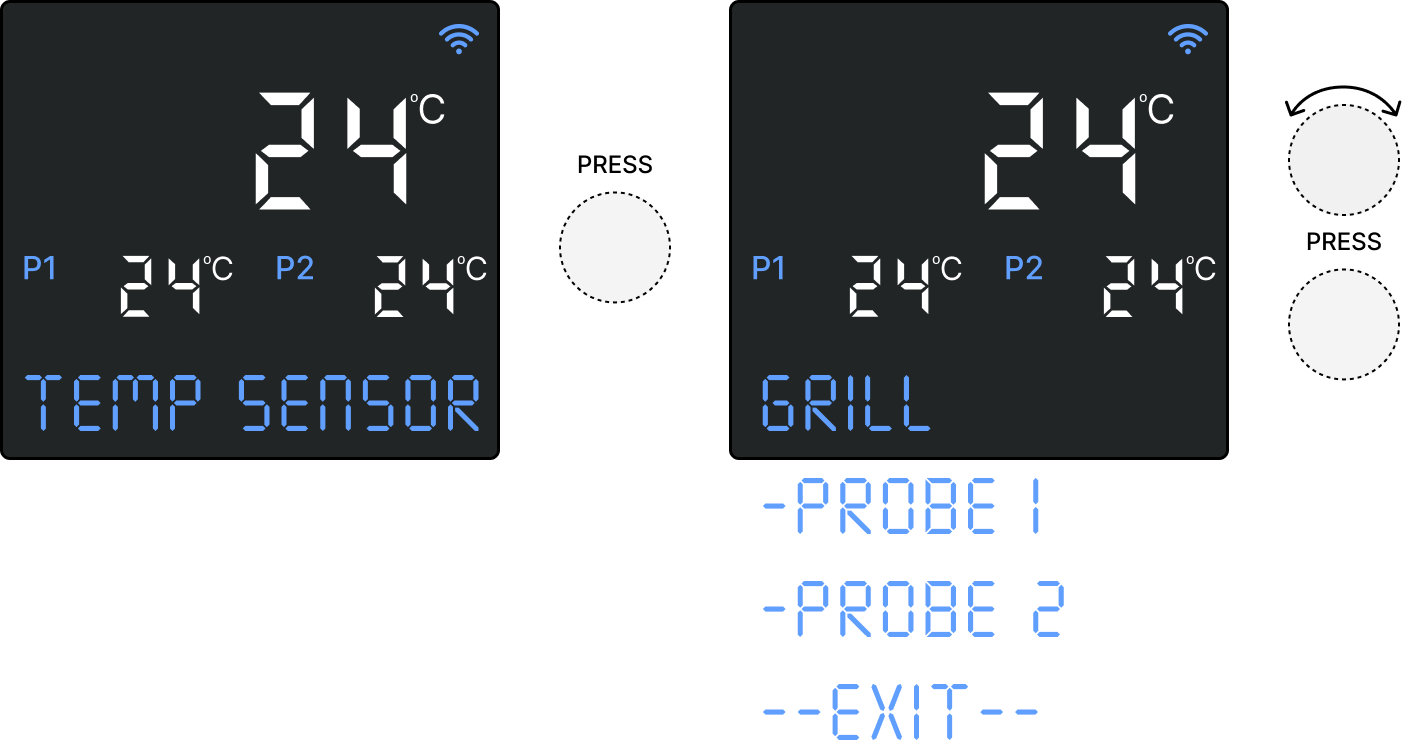
TEMP SENSOR: Select the temperature sensor for grill operation, useful if the grill temperature sensor has a bad reading.
Options: GRILL (default), PROBE 1, PROBE 2
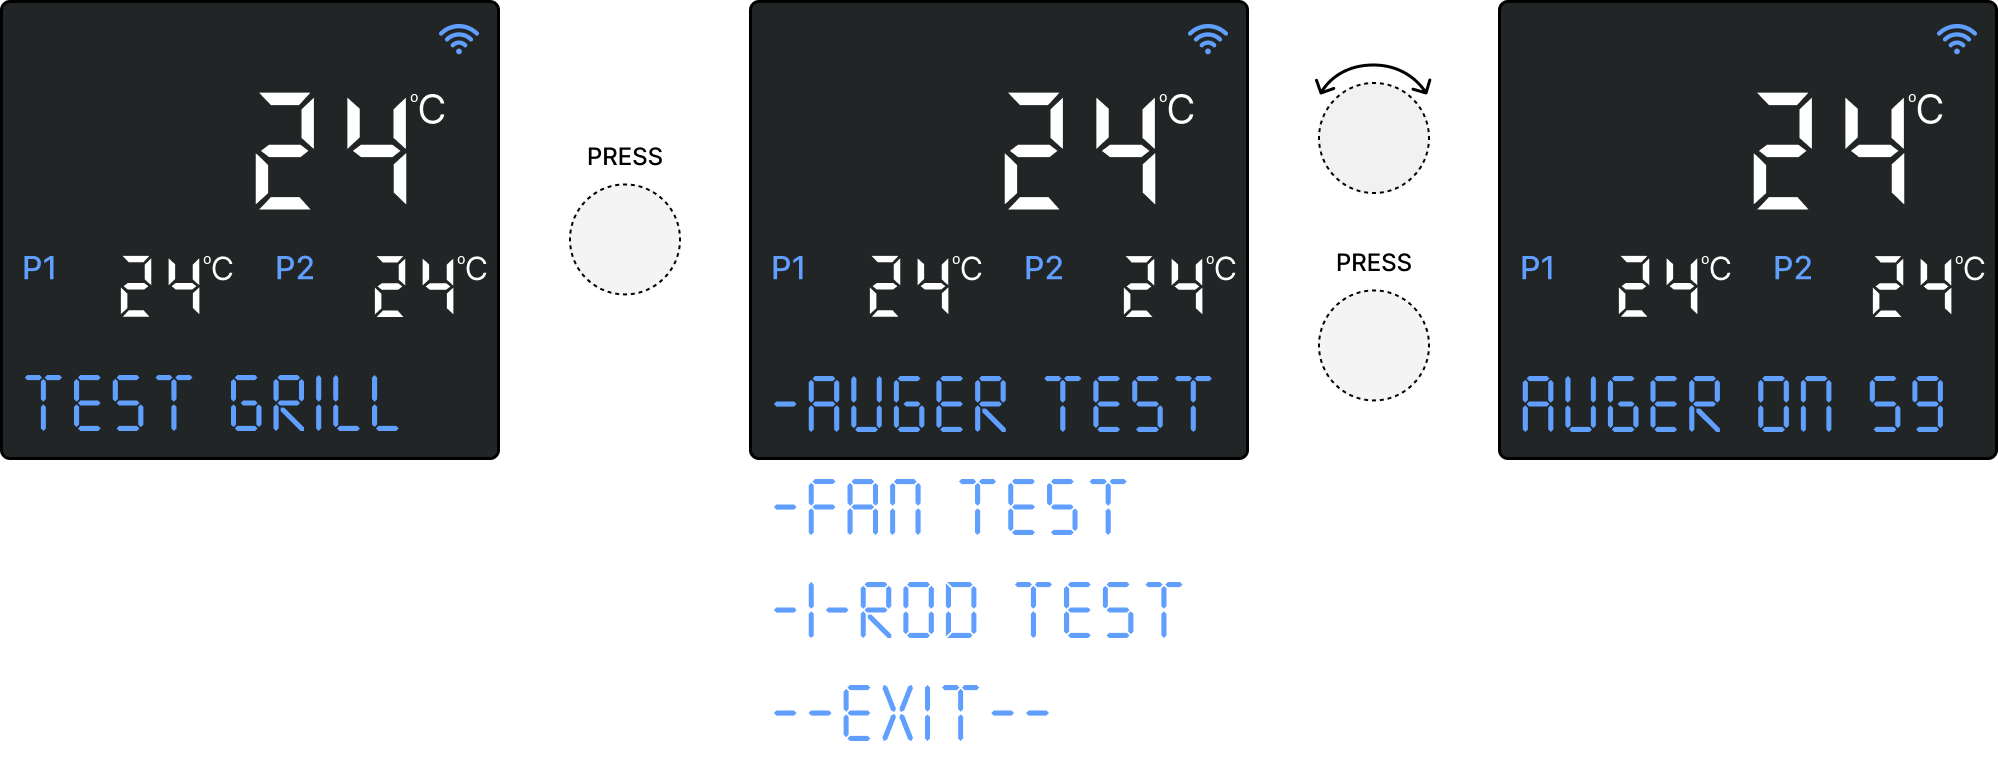
TEST GRILL: Manually run the AUGER, FAN or I-ROD (ignition rod) for 60 seconds, useful for testing purposes if troubleshooting or after repairs.
I-ROD: Operate the grill without the ignition rod, useful if the ignition rod isn’t operating correctly.
CALIBRATE: Adjust the temperature of each of the food probes (P1, 2, 3 & 4) for accurate readings.
CHILD LOCK: Prevent unwanted changes to the grill settings by inquisitive little fingers! Press and hold for 5 seconds to unlock again.
EXIT: Exit out of the menu (or just wait for 5+ seconds).
Menu items are different based on the operating status of the grill, as outlined below. More advanced functions are available by connecting the controller to the Z Grills Aus App.

Fire Up the Grill
First Time Use
If you haven’t used the grill yet, first click here to understand the important steps to feed the pellets and burn the grill in which must be done before cooking.
Firing Up Steps
- With the grill plugged into power, press the controller knob to turn the power on.
- Open the grill lid and check that there are enough wood pellets in the hopper. If first time ever running the grill the FEED PELLET function must be used to first fill up the pellet tube.
- Press and hold the control knob for 2 seconds to enter the MENU, then rotate to select FIRE UP and press again to select.
- Wait until a cloud of smoke is released and the roaring sound of the fire can be heard. This should take 3-4 minutes.
- Shut the grill lid so the grill temperature can begin to rise.
- The controller will display FIRE LIT (and sound three “beeps” if SOUND ON) once the grill temperature rises by at least 5℃ / 10℉ and at least 2 minutes has passed.
- The Fire Lit message may occur before the lid is shut as only a small temperature rise needs to be measured to confirm a fire is burning.
- After the fire is lit the grill will run at a target temperature of 80℃ / 176℉ until a new target is set.
- The target temperature and smoke level (if applicable) can now be set, as outlined below.
Target Temp & Smoke Level
- While the grill is operating, press the control knob and the target temperature will begin to flash.
- Rotate the control knob to adjust the temperature between 75℃ to 240℃ / 167℉ to 464℉. Rotate the knob faster to change more quickly, or slowly for 1 degree increments.
- Press again to confirm.
- If the target temperature is set to 110℃ / 230℉ or below, the smoke level icons will flash and can be selected by rotating the control knob.
Understanding Smoke Levels
Smoke is released when the pellets smoulder for a period of time before fully igniting. This happens most when the fire is very small so when operating at low grill temperatures. Once the grill is above about 120℃ / 248℉ there is very little smoke as a large fire is constantly burning in the fire-pot (especially in cold weather), and so the pellets ignite very quickly.
Many pellets smokers use a set on/off time period for their “Max” or “Super” smoke modes. The problem with these options is they do not work to regulate the temperature and as such can vary significantly depending on the weather (winter vs summer). They may produce a larger amount of smoke but can not be relied on for long periods of time due to the temperature variability.
Through hundreds of hours of grill testing with different wood pellet varieties and ambient temperatures, the Z Grills Australian team have developed PID logic that allows excellent smoke output at temperature up to 110℃ / 230℉ while ensuring good temperature regulation.
The controller has 4 “smoke” settings (Stable, Low, Medium & High) which can be selected at temperatures of 110℃ / 230℉ and below. Above 110℃ / 230℉ only STABLE is available. These settings adjust how frequently the on/off auger time is adjusted (PID cycle time).
Stable smoke setting has a short PID cycle time, allowing the controller to react more rapidly to temperature fluctuations. Low, Medium and High smoke settings have increasingly longer PID cycle times which can result in larger temperature swings and a different smoke profile.
It would be very convenient if High = Maximum Smoke, but unfortunately it just isn’t that simple as the type of wood and outside temperature can also impact how much smoke is released. HIGH may work best for certain types of wood that take a longer time to ignite, but STABLE or LOW may provide best results for others.
To keep things simple, by default it is recommended to use the High smoke setting but also considering experimenting with the Stable, Low and Medium to see the difference with your chosen pellets.
Heat Up Time
The grill will take around 15 to 20 minutes to reach the target temperature and up to 30 minutes to stabilise with small swings above and below the target. Food can be placed in as soon as the target temperature is reached.
In cold, windy weather the grill can take longer to heat up. Oak based wood pellets provide less heat than Australian hardwood, so will impact the heat up time as well.
Below is a example of the typical temperature graph from firing up to 120℃ / 248℉ target. The controller delivers enough wood pellets reach the target temperature quickly, but not so fast that it overshoots too much. Over time the PID control logic finds the optimal pellet delivery amount to maintain the temperature.
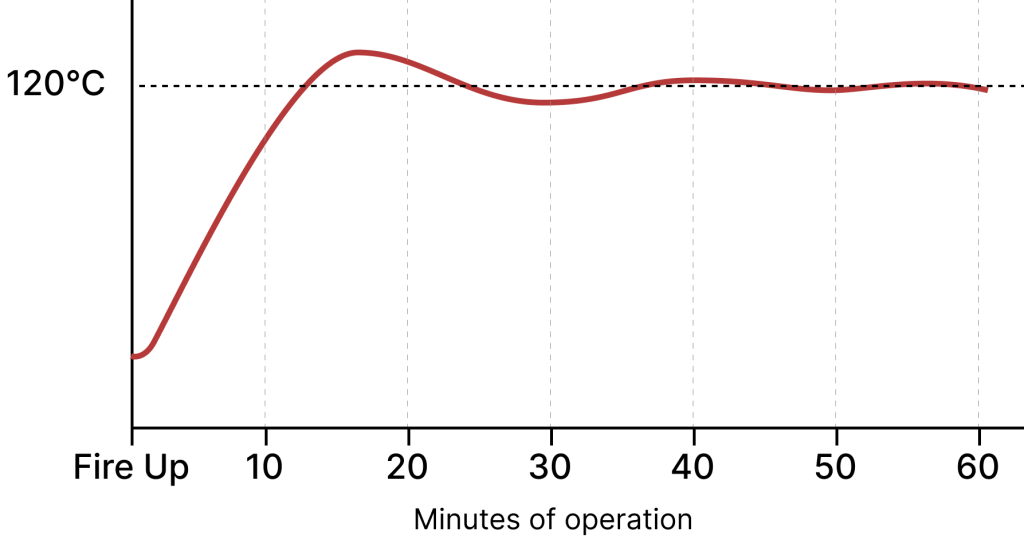
Many other brands configure the PID to more slowly reach the target without overshooting, but we know you want to quickly get the grill up to temperature start cooking. The grill rack temperature will react more slowly than the temperature measured by the controller, and so these swings won’t negatively impact your cooking.
PID Cycle & Pellet Delivery
As explained above the PID control logic works to find the ideal on/off ratio to maintain the target temperature. The environment is not perfectly stable as wind is blowing, the lid may be periodically opened and even the wood pellet heat output can vary slightly. The controller is designed to adapt to theses changing conditions and adjusts the on/off ratio of the auger delivering pellets once every 60 to 90 seconds, depending on the temperature setting (PID cycle time). For example, if at the end of the last cycle the temperature was above the target or rising too quickly, the on/off ratio will be adjusted to provide less fuel to the fire, and this process is repeated every 60-90 seconds.
Wood pellets are not constantly fed into the fire-pot, instead the auger motor turns on/off. At low target temperature settings the auger motor runs for 6 seconds then stays off for 15 to 45 seconds. At high temperature setting the auger runs almost constantly.
Due to the batch delivery of pellets and the PID logic constantly adapting to find the ideal on/off ratio, temperature swings of up to 10℃ / 20℉ at low temperatures and 20℃ / 40℉ at high temperatures, are perfectly normal.
In hot, sunny conditions the grill may not be able to stabilise below 90℃ / 194℉ as the heat from the minimum pellet delivery (6 seconds) and longest off time (45 seconds) still provides a fire with more heat than the heat that is lost from the grill. Delivering less than 6 seconds worth of pellets every 45 seconds will result in the fire going out, which is not at all desirable!
Taking the grill out of the sun and even providing some air flow (fan) can help to bring the temperature down if aiming for a lower temperature. The grill temperature all comes down to heat output from the fire vs heat loss to the environment.
Shut Down the Grill
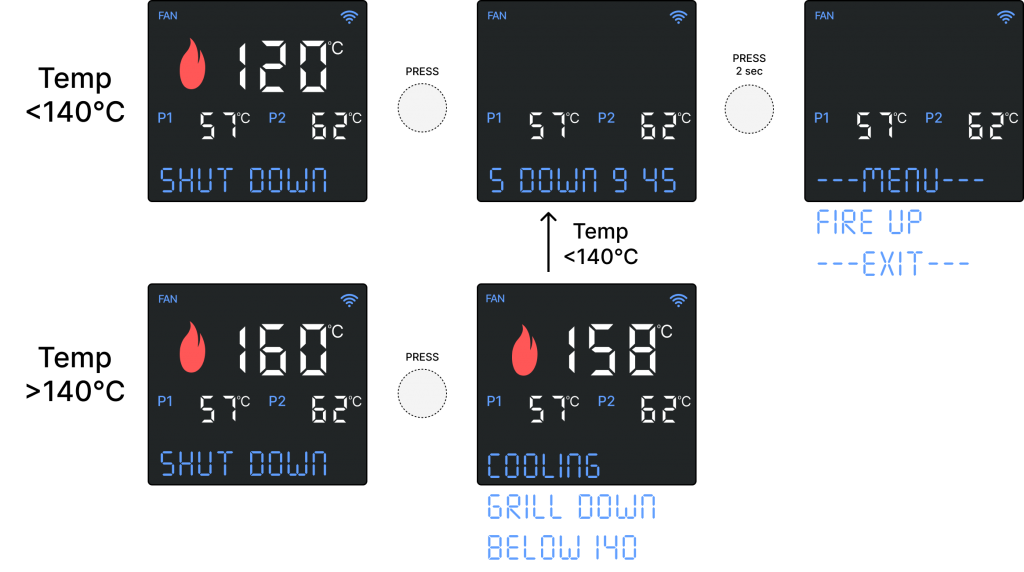
NO FIRE: If the grill is not operating (no fire lit) the Shut Down selection in the MENU will shut turn the power off after only a quick 5 second countdown.
FIRE LIT: If the grill is operating (fire lit) a longer Shut Down process is required to burn the fire out before turning the power off. Follow the process below:
- Press and hold the control knob for 2 seconds to enter the MENU, then rotate to SHUT DOWN and press again to confirm.
- If less than 140℃ / 284℉ the grill will begin the SHUT DOWN cycle, running the fan for 10 minutes then turning the power off. Never disconnect the power until the fan stops.
- If the grill is hotter than 140℃ / 284℉ it will first continue to operate with a small fire to cool down below 140℃ / 284℉ before commencing the SHUT DOWN cycle. This helps to prevent back-burn, which is possible after running at high temperatures. While the cooldown process is underway, press the control button at anytime to set a new target temperature to continuing running the grill as normal.
Fire Up again during Shut Down
To fire up the grill during the Shut Down cycle, follow these steps:
- Open the grill lid and wait at least 1 minute so the temperature can drop.
- Press and hold the control knob for 2 seconds then rotate to FIRE UP, press again to confirm.
- Once there is smoke, or it is clear that fire is burning, close the lid and wait for FIRE LIT to be displayed.
- The controller will display FIRE LIT once the grill temperature rises by at least 5℃ / 10℉ and at least 2 minutes has passed.
- If “Error 4 – No Fire” occurs, open the lid for about 1 minute to allow the temperature to drop before trying to FIRE UP again.
Power accidentally turned OFF or disconnected
- Press the control knob to power the controller back on.
- Open the grill lid and wait at least 1 minute so the temperature can drop.
- Press and hold the control knob for 2 seconds then rotate to FIRE UP, press again to confirm.
- Once there is smoke, or it is clear that fire is burning, close the lid and wait for FIRE LIT to be displayed.
- The controller will display FIRE LIT once the grill temperature rises by at least 5℃ / 10℉ and at least 2 minutes has passed.
- If “Error 4 – No Fire” occurs, open the lid for about 1 minute to allow the temperature to drop before trying to FIRE UP again.
Feed Pellets
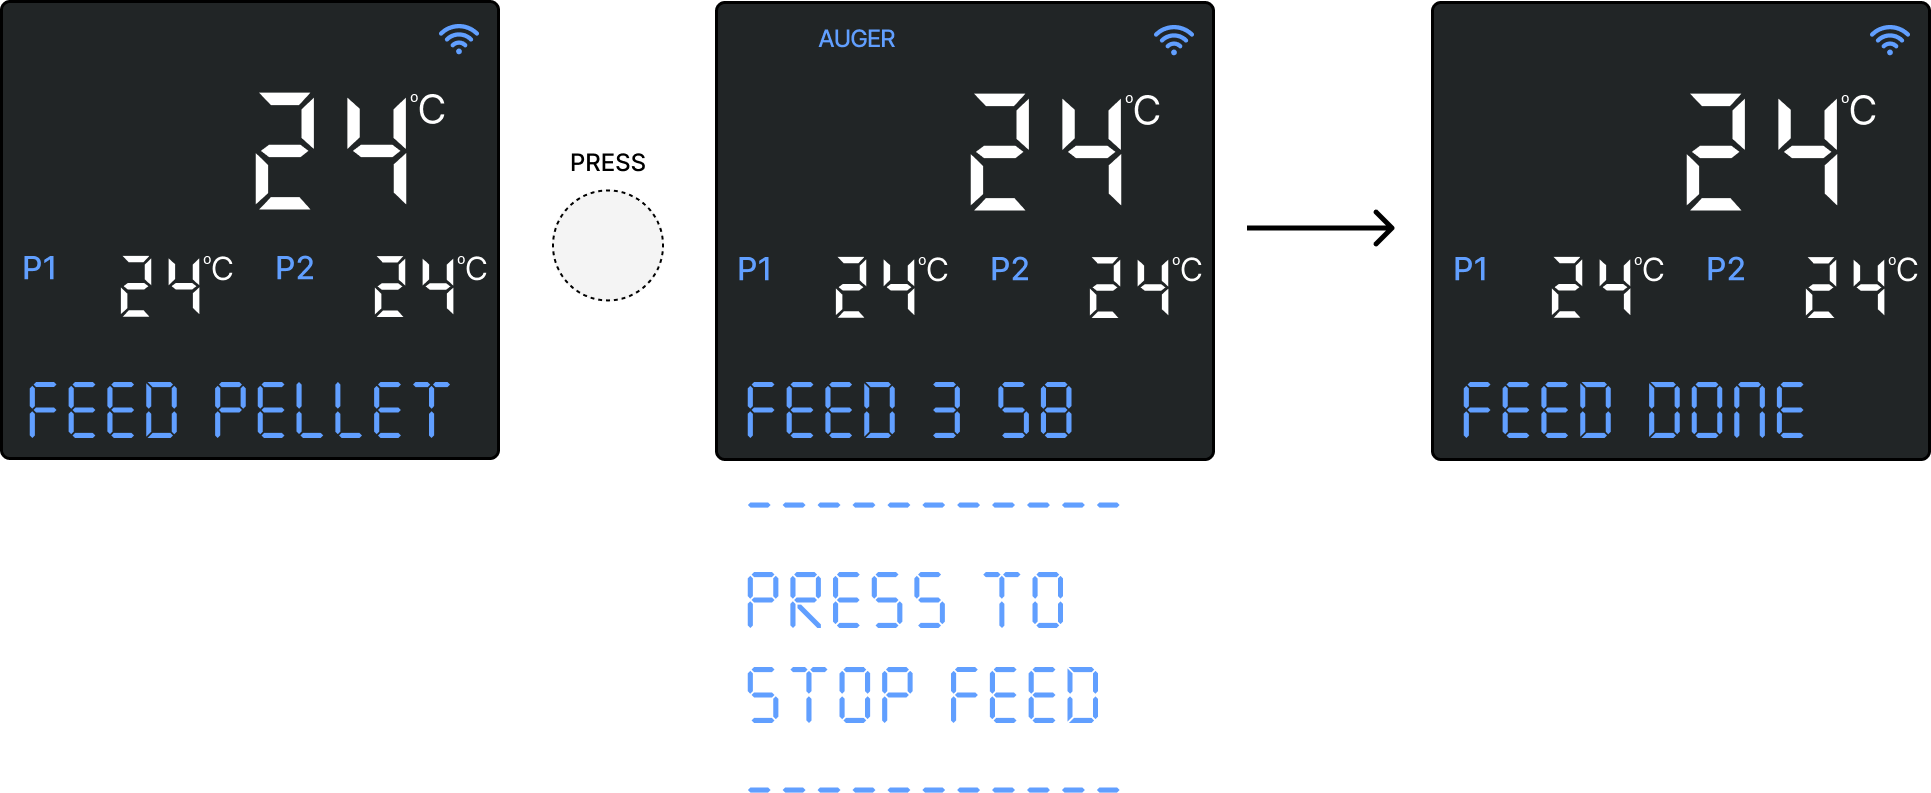
- Use the FEED PELLET function to feed wood pellets from the hopper through the auger feed tube to the fire-pot.
- This is useful when first using the grill and anytime after the hopper is totally emptied.
- This function can only be used when the grill is not operating.
Start Feeding
- If the first time ever using the grill, lift out the grill racks, grease tray and heat baffle to see inside the fire-pot.
- Press and hold the control knob for 2 seconds to enter the MENU, then rotate to FEED PELLET and press again to confirm.
- The auger will run for a set period of time based on the grill model (approximately 4 minutes) which is normally sufficient to fill the auger tube.
- If the pellets have not fed all the way through by the time the timer ends, just feed again.
Stop Feeding
- Press the control button at anytime to stop feeding.
Clear Pellets
In some cases pellets smokers can experience what is referred to as burn-back, where the fire burns back up the pellet feed tube a distance, causing smoke to be released from the hopper. If correctly managed this is not dangerous and will not result in a fire in the actual hoper.
Burn-back is normally caused by:
- Too much ash in the fire-pot, causing the fire to sit at the height of the wood pellet feed tube.
- Operating with a very big fire (high temperature grilling) and then turning directly to Shut Down.
The wireless controller has a Shut Down Cooling function to help prevent this type of burn back from occurring, whereby the grill will operate with a small fire until the temperature drops below 140℃ / 284℉ before starting the fan only shut down cycle.
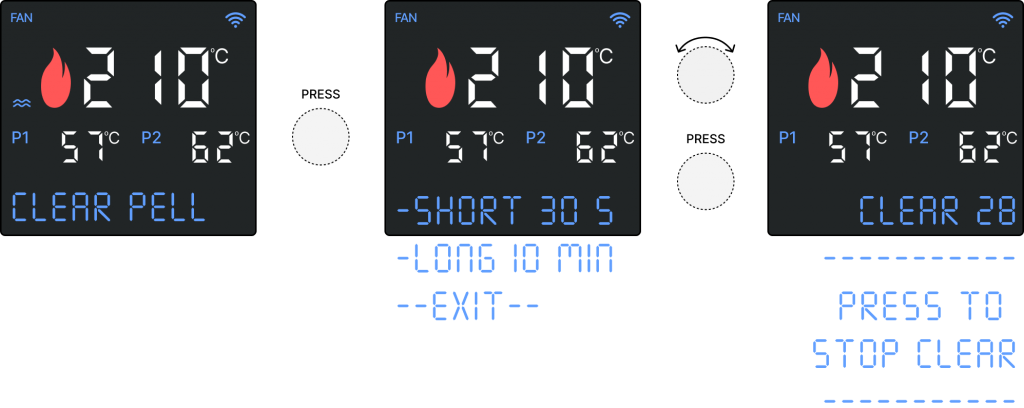
The Clear Pellets function can be used to help clear the auger feed tube. In most cases the grill will still need to be Shut Down and the hopper emptied of wood pellets and a full clean of the fire-pot and hopper completed.
If a small amount of smoke is being released from the hopper, first try the 30 second option. If smoke continues to be released, scoop out all the pellets from the hopper and use the 10 minute option to fully clear the feed tube of pellets. The pellets will eventually all burn out.
Start Clearing
- Press and hold the control knob for 2 seconds to enter the MENU, then rotate to CLEAR PELL and press again to confirm.
- Rotate the control knob to select SHORT 30 S or LONG 10 MIN option and press again to confirm.
- A countdown of the time remaining will be shown.
Stop Clearing
- Push the control knob at anytime to stop the clearing.
Cold Smoke Fan
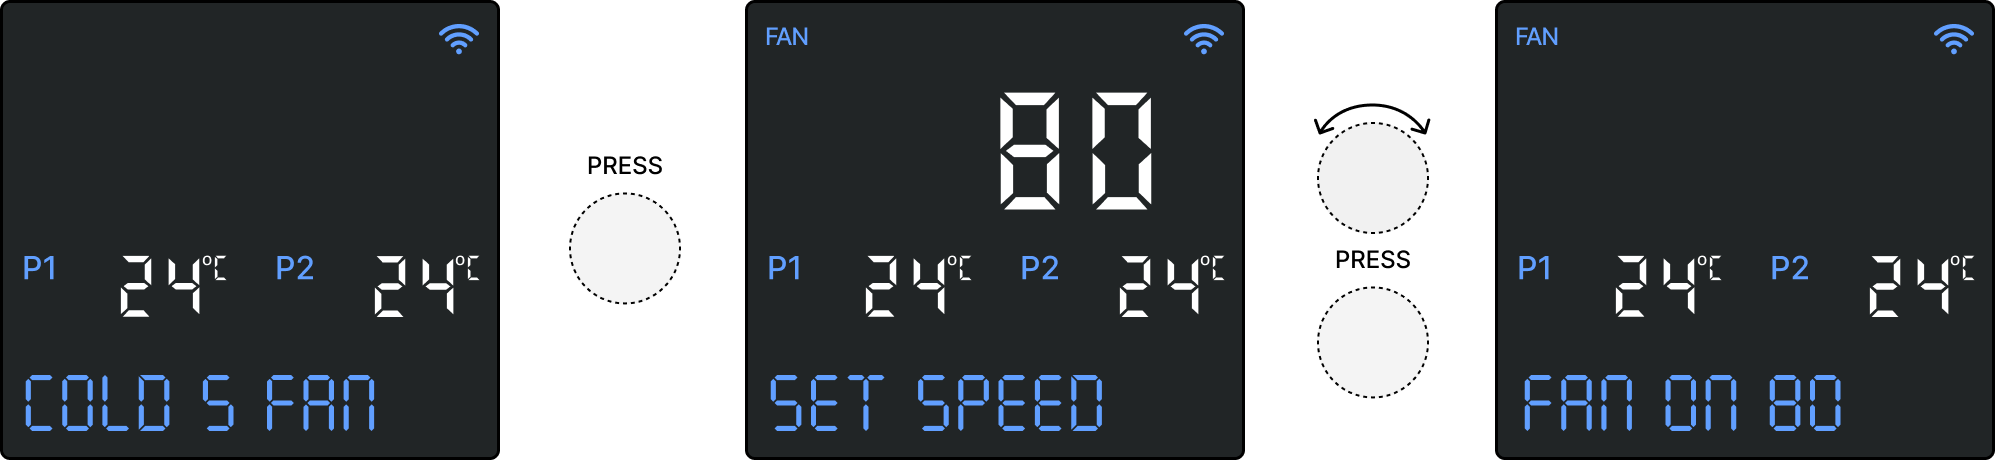
- The cold smoke fan function can be used to operate just the fan. This is useful for cold smoking cheese, fish or other food together in combination with a smoke generator. A fire will not be established so the grill will be cold.
- The controller display will still show the grill temperature and food probe temperatures.
Turn Fan ON
- Press and hold the control knob for 2 seconds to enter the MENU, then rotate to COLD S FAN and press again to confirm.
- The fan speed can be set from 50 to 100%. The fan will make a different noise when at lower speed levels.
- The grill temperature will not be displayed. To view temperatures inside the grill, place one or more food probes close to the food being smoked.
Change Fan Speed
- To change the fan speed press the button at any time, rotate and press again to set.
Turn Fan OFF
- To stop the fan, press and hold the control knob for 2 seconds to enter the MENU, then rotate to STOP FAN.
Temperature Units
- The controller can display temperature in degrees Fahrenheit (℉) or Celsius (℃)
- To change the temperature unit, press and hold the control knob for 2 seconds to enter the MENU, then rotate to TEMP UNITS, select the unit and press again to confirm.
Alarm Sound
- The controller can make beeping sounds to indicate when the grill fire is lit, when errors occur and when action notifications occur.
- Action Notification – 2 beeps
- Fire Lit – 3 beeps
- Error – 5 beeps
- By default the Alarm Sound it turned ON, but can be turned off (muted) so no sounds are made by the controller. If using the App, then the 3 different types of alarm sounds can be turned on/off individually in the grill settings.
- To change the Alarm Sound setting, press and hold the control knob for 2 seconds to enter the MENU, then rotate to SOUND OFF or SOUND ON and press again to confirm. Changing this setting directly on the controller will override the App settings, turning ALL three types of alarm sounds on or off, so manage from the App if possible.
- The alarm icon will be displayed with the X when the sound is OFF.
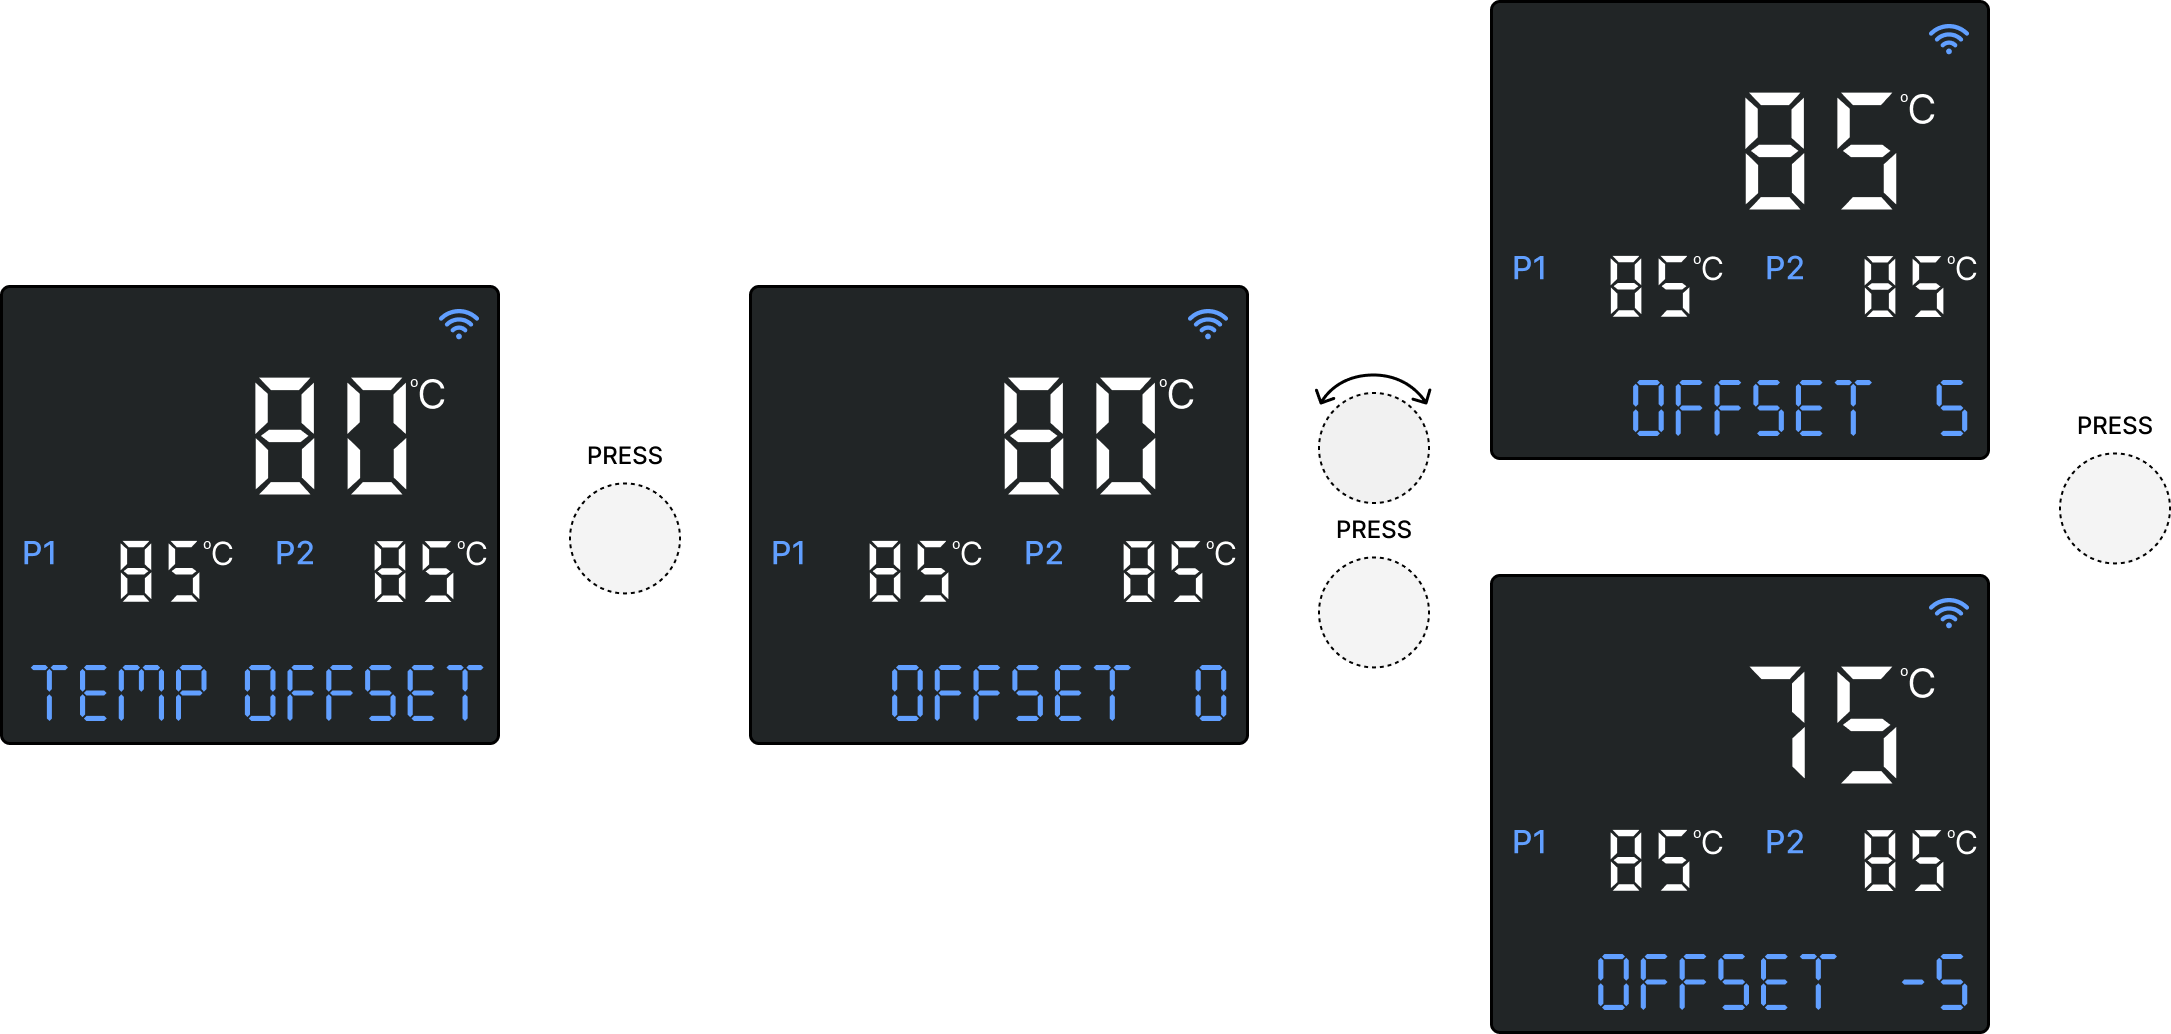
Temperature Offset
The grill temperature is measured on the left of the grill chamber, not in the middle of the grill rack where the food is located. There is a difference between these temperatures, with the grill rack up to 20℃ hotter at high operating temperatures. To account for this, an offset formula is added into the software to calculate what the approximate temperature of the grill rack is.
The actually offset may differ slightly for your grill based on a number of factors including wind, the configuration of racks and food on the grill racks (impacting air flow).
The TEMP OFFSET function can be used to adjust the displayed grill temperature to more closely match the grill rack temperature. It should be noted that a variance of up to 10℃ between the controller display and grill rack temperature is very normal and within an acceptable range, so only use this function if there is a larger variance.
The temperature difference will also cycle up and down as the air flow over the grill temperature sensor results much more temperature variance than a food probe located the centre of the bottom grill rack.
Adjust Temperature Offset
- Place at least 2 food probes on the middle of the grill rack to measure the temperature.
- Fire up the grill and set to the desired target and run until the temperature stabilises.
- Check the temperature of the two food probes (take an average of their two readings if slightly different) to obtain the grill rack temperature.
- Compare the controller grill temperature to the grill rack temperature to determine the offset.
For example:- Grill Rack = 90℃
- Controller = 82℃
- Offset required = +8℃
- Take a few reading over a 4 to 5 minute period to obtain the suitable offset, as both temperature will fluctuate up and down slightly.
- To set the offset, press and hold the control knob for 2 seconds to enter the MENU, then rotate to TEMP OFFSET and press again to open.
- Rotate the control knob to the desired value. The grill temperature will begin to adjust so you can see the changes the offset is making straight away. The changes are immediately saved even without pressing again to confirm, so return to a zero offset if no changes are required.
- Note that this adjustment does not mean the temperatures will exactly match at all times. Each time a batch of heat is released from the fire the grill temperature sensor temperature will increase and so fluctuation will still occur.
- Note also that the adjustment may not translate to matching values at all grill operating temperatures. For example, if adjustment is done at 80℃, there may still be variance at 200℃ as much larger temperature difference will be present at high temperatures.
- The offset can be adjusted as often as desired, but it is recommended to simply adjust for the most commonly used grill temperature. Another good strategy is just adjust for medium temperature (140 – 180℃), at which point it may be a little high at low temps and little low at higher temperatures.
- When cooking, use the grill rack temperature as the most accurate value for what the food is being exposed to.
Temperature Sensor
Sometimes the grill temperature sensor can degrade and begin to provide erratic, high readings, or the cable may be damaged resulting in no signal at all. If there is no temperature signal or it is extremely erratic, ERROR 1 – TEMP SENSOR will occur and the grill will shut down.
Until a replacement temperature sensor can be obtained, the TEMP SENSOR function allows Probe 1 or Probe 2 to be selected as the temporary replacement sensor.
Select Temperature Sensor
- Ensure that Probe 1 (or Probe 2) is plugged into the controller.
- Place the probe vertically, tip to tip, beside the grill temperature sensor. Use a metal wire to strap them together if required.
- Press and hold the control knob for 2 seconds to enter the MENU, then rotate to TEMP SENSOR and press again to confirm. Rotate the control knob to select PROBE 1 or PROBE 2 and press again to confirm.
- The selected probe temperature sensor will be displayed in the normal location (e.g P1 24℃), as well as in the main grill temperature display. The main grill temperature will only slowly change and so will not immediately (or always) exactly match the actual probe temperature.
- The grill should now operate as normal using the alternative temperature sensor.
- Once the replacement temperature sensor is installed, use the TEMP SENSOR setting and select GRILL to return to the normal grill temperature selection.
Test Grill
During troubleshooting or after repairs it can be useful to manually operate the Auger Motor, Fire-pot Fan or Ignition Rod. The TEST GRILL allows each of these devices to be operated (one at a time) for 60 seconds. This function is only available when the grill is not operating.
Manually Operate Devices
- Press and hold the control knob for 2 seconds to enter the MENU, then rotate to TEST GRILL and press again to confirm. Rotate the control knob to select AUGER TEST, FAN TEST or I-ROD TEST and press again to confirm. The device will run for 60 seconds then turn off.
- Stop the device at anytime by pressing the control button.
Ignition Rod
If the ignition rod stops working (is not using power when it should be on), ERROR 7 – I-ROD will occur.
The ignition rod can be temporarily turned off, so not power is supplied and thus no error will occur. While waiting for a replacement to arrive, the grill can be manually lit (click here to learn how).
Turn OFF Ignition Rod
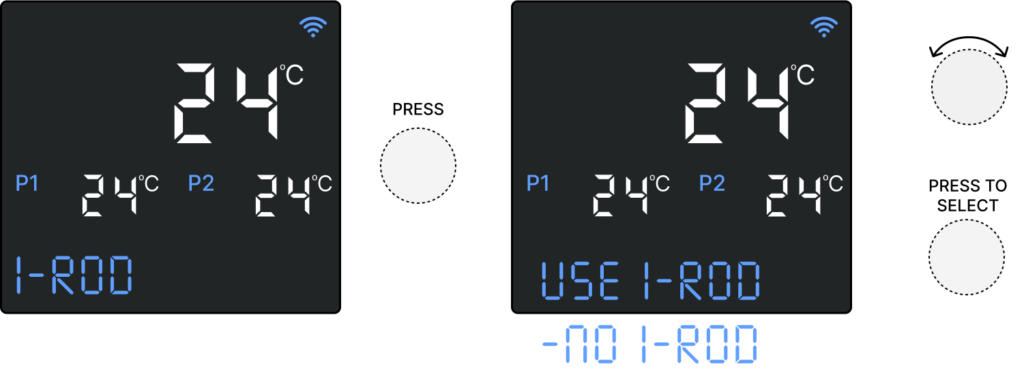
- While the grill is NOT operating, press and hold the control knob for 2 seconds to enter the MENU, then rotate to I-ROD and press again to enter the sub-menu.
- USE I-ROD is the default setting, so scroll one click to -NO I-ROD and press to confirm. The grill will be able to operate as normal but will not provide any power to the ignition rod, so the fire must be manually lit.
- Manually light by putting 1/3 cup of wood pellets in the fire-pot and light with butane torch or fire-lighter. Once the pellets are burning, Fire Up the grill as normal.
- It is advisable to operate the grill at no less than 90℃, as at lower temperatures the ignition rod may need to periodically operate to keep the tiny fire lit.
- This process should be repeated if the grill is unplugged from power, as it will default back to USE I-ROD again.
Calibrate Food Probes
If the temperature reading of a food probe plugged into the controller is off, you can adjust the temperature reading using the calibration function.
The calibration will be specific to the food probe that is plugged in.
Calibrate
- Press and hold the control knob for 2 seconds to enter the MENU.
- Scroll down to CALIBRATE and press again
- Scroll to the Probe to be calibrated, press to select.
- With the probe in hot water (ideally boiling), adjust the offset until the reading matches a reference thermometer in the same water. Press knob to confirm.
- The same calibration can be done ice cold water, which should read zero degrees celsius.
- Continue process for each of the probes, then scroll to EXIT to finish.

Food Temperature Probes
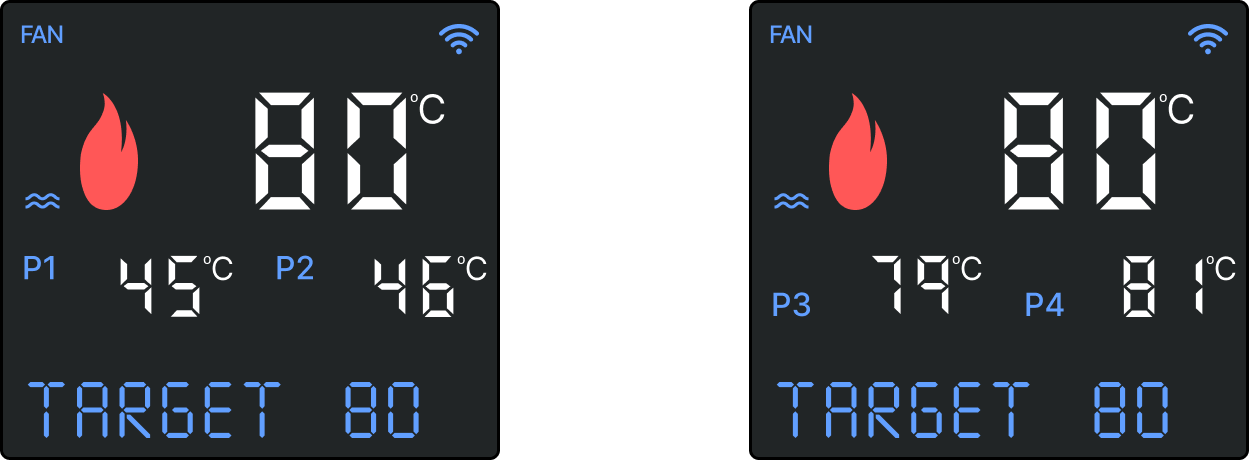
- Up to 4 food probes can be plugged into the grill.
- If several probes are plugged in the display will cycle between showing P1 and P2 together and then P3 and P4.
Grill Temperature Display
The controller software has been specifically designed to only slowly change the displayed temperature for the purpose of more reliable and consistent temperature operation.
For this reason, if the grill lid is opened the temperature measured by food probes on the grill rack (if being used) may drop far more rapidly than the grill temperature display. This is normal behaviour.
The temperature will “snap” to the target temperature if within a few degrees above or below. If the temperature rises or falls too far from the target it will then slowly adjust to display the actual temperature. This method gives a more accurate representation of the grill rack temperature, which reacts much more slowly than the grill sensor which is impacting more directly by the waves of hot air from the fire-pot.
WIFI Antenna
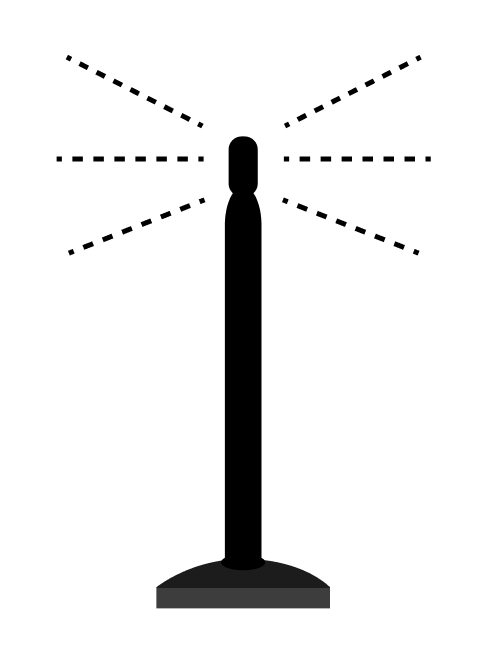
The grill is supplied with WIFI antenna that is packed together with the power cable underneath the hopper.
The long lead and magnetic base make it convenient to find the best location for the antenna.
A good location is underneath the hopper, but if the signal is not strong enough, try the top of the hopper lid, or higher up on a nearby wall.
Do not place the antenna on any hot parts of the grill as the base and lead may be damaged.
Errors
The controller monitors the grill operation and devices (Temperature Sensor, Fan, Auger & Ignition Rod) to detect any potential issues.
If an error occurs several things will happen:
- Three long “beeps” will sound (if Alarm Sound is turned on).
- The controller will begin the Shut Down cycle.
- The error will be displayed on the controller screen. e.g. ERROR 1 TEMP SENSOR
ERROR 1 – TEMP SENSOR
- Temperature sensor failure, or cable connection issue.
- Click here for more information.
ERROR 2 – HIGH TEMP
- Temperature measured above 260℃ for more than 1 minute.
- Click here for more information.
ERROR 3 – FLAME OUT
- Temperature has dropped significantly for at least 10 minutes, due to the fire potentially going out. Leaving the lid open can also lead to this error occurring.
- Click here for more information.
ERROR 4 – NO FIRE
- Fire has not been successfully lit.
- Click here for more information.
ERROR 5 – AUGER
- Auger motor is not using power and may be faulty.
- Click here for more information.
ERROR 6 – FAN
- Fan motor is not using power and may be faulty.
- Click here for more information.
ERROR 7 – I-ROD
- Ignition Rod is not using power and may be faulty.
- Click here for more information.
ERROR 8 – SYSTEM
- Fan, Auger Motor or Ignition Rod may be using power when not turned on, potentially due to a faulty in the controller.
- Click here for more information.
Controller Updates
The controller firmware and grill specific software may need to be updated from time to time with security improvements, bug fixes and functional updates.
A notification will pop up if an update is available and the details of the update will be listed in this section (scroll down). Updates are completed through the App and only take 1-2 minutes to complete.
The updates will never be completed automatically, only when you are ready to do them. Click here for more information on how the App works.
To complete the update:
- Power cycle the grill (unplug or switch off/on at wall socket)
- Quit and open the Z Grills Aus App.
- Wait for BOTH Wifi and Bluetooth icons to show as connected
- Navigate to the grill settings page and scroll to the bottom and wait for the red install button will appear.
- Tap the install button and monitor the progress of the install on the controller display.
- If the install stops before completing, unplug the grill and repeat process. This can sometimes happen if the internet speed is too slow.


Review the video below for step by step instructions to update. The video does not cover the need for Bluetooth to be connected, as this is new requirement.
Update Troubleshooting
- First scroll down and check if your grill is already updated to the latest version.
- Note that the update will only be available when the grill is not operating, but plugged into power and the display awake (press knob once to wake up).
Follow these steps:
- Quit and restart the App on your mobile device.
- Turn the power off (or unplug) the grill, wait 5 seconds then turn back on.
- Press the control knob once to wake up the screen.
- Make sure the WIFI logo on the controller is solid. If flashing, disconnect the grill from the App and reconnect, making sure to select a 2.4GHz WIFI network (Width: 20MHz or 40MHz not 80MHz) and type in correct password correct.
- Open the App, wait for it to connect and ensure BOTH the WIFI and Bluetooth icons show connected. Bluetooth is required for the update process only (not normal operation). Stand close to the grill. If Bluetooth does not connect, quit and reopen the App and if required also power cycle the grill.
- On the App, navigate to the grill settings page, scroll to the bottom and wait for the Install button to appear. Tap on the install button.
- Watch the controller screen to see the updated progress. Wait at least 5 seconds after the screen has turned off to press the knob to wake it up.
- Sometimes, depending on the network connection, the progress bar on the app may not move, in which case just wait until the grill has finished updating and simply quit and reopen the app.
- If the updated stops before finishing (gets stuck) unplug the grill from power, wait 10 seconds, plug back in and start the process again.
Lightblue App
Please use Lightblue if can’t see the update button, or can’t connect via bluetooth.

- If the update is not working or the red button not appearing, a free App called Lightblue can be used to initiate the update using Bluetooth.
- Lightblue video instructions
- Android Google Playstore Download
- Apple iOS Appstore Download
- The grill must have solid WIFI logo the controller display.
- Quit the Z Grills Aus app before using the Lightblue App.
- The codes to use in Lightblue to start the download (you may need to copy/paste and then delete and manually type in the last F in the code):
- Grill Software: FA07F9F9F9F9FF
- Wireless Module Firmware (ESP-32): FA07F9F9F9FAFF
- Once the grill is updated the the latest software it should be possible to install the Wireless Module Firmware through the Z Grills Aus App. If that still doesn’t work, it can also be done through Lightblue using the code above.
- After completing one update, power cycle the grill, connect again using Lightblue and do the additional update. The update will only complete if the grill is NOT already on the latest version.
Controller Firmware Version History
ESP32-25 (13-04-2026) – Current version
- Improves WIFI and Bluetooth connection reliability
- For all grill models fitted with Wireless controller.
- For more information and installation instructions click here.
ESP32-15 (25-11-2024)
- Improves WIFI connection reliability
Controller Software Version History
700E Series Grills
- Current Version 700-215 (30-03-2025)
- Improved low temperature operation in hot weather.
- 700-214 (22-12-2024)
- Improved low temperature performance (higher fan speed when above target temperature).
- 700-213 (25-11-2024)
- Improved low temperature performance.
- Correction for false-positive ERROR-8 occurring.
- 700-208 (04-08-2024)
- Improved cold weather heating up speed.
- Added food probe calibration function.
- Click here for full summary
- 700-197 (22-03-2024)
- Fix to menu where not able to progress past I ROD in the list.
- 700-196 (12-03-2024)
- More reliable and consistent temperature display across the controller and App screens.
- Improved connection reliability to the server.
- Added to manually enter (using number keyboard) trigger action settings in addition to the + and – buttons.
- Grill operating time (hh:mm:ss) and estimated wood pellets used are displayed in the grill settings page.
- Note the Z Grills Aus App must be updated to minimum iOS 1.1.8 and Android 1.1.2 for compatibility with the new controller software.
- 700-194 (17-01-2024)
- Support for cook recording & graphing feature (when supported by App update).
- 700-186 (16-11-2023)
- Support for timer countdown and food probe based trigger actions.
- 700-184 (27-10-2023)
- Various bug fixes to child lock function
- 700-182 (22-09-2023)
- Updated for child lock status sync with App
- 700-180 (14-09-2023)
- Added child lock function
7002B Series Grills
- Current Version 702-124 (10-03-2025)
- Improved low temperature operation in hot weather.
- 702-123 (01-12-2024)
- Correction for false-positive ERROR-8 occurring.
- 702-121 (04-08-2024)
- Added food probe calibration function.
- Click here for full summary
- 702-120 (22-03-2024)
- Fix to menu where not able to progress past I ROD in the list.
- 702-119 (12-03-2024)
- More reliable and consistent temperature display across the controller and App screens.
- Improved connection reliability to the server.
- Added to manually enter (using number keyboard) trigger action settings in addition to the + and – buttons.
- Grill operating time (hh:mm:ss) and estimated wood pellets used are displayed in the grill settings page.
- Note the Z Grills Aus App must be updated to minimum iOS 1.1.8 and Android 1.1.2 for compatibility with the new controller software.
- 702-118 (17-01-2024)
- Support for cook recording & graphing feature (when supported by App update).
- 702-116 (16-11-2023)
- Support for timer countdown and food probe based trigger actions.
- 702-115 (27-10-2023)
- Various bug fixes to child lock function
- 702-111 (14-9-2023)
- Added child lock function
450A Series Grills
- Current Version 450-115 (01-12-2024)
- Correction for false-positive ERROR-8 occurring.
- 450-114 (04-08-2024)
- Added food probe calibration function.
- Click here for full summary
- 450-113 (22-03-2024)
- Fix to menu where not able to progress past I ROD in the list.
- 450-112 (12-03-2024)
- More reliable and consistent temperature display across the controller and App screens.
- Improved connection reliability to the server.
- Added to manually enter (using number keyboard) trigger action settings in addition to the + and – buttons.
- Grill operating time (hh:mm:ss) and estimated wood pellets used are displayed in the grill settings page.
- Note the Z Grills Aus App must be updated to minimum iOS 1.1.8 and Android 1.1.2 for compatibility with the new controller software.
- 450-111 (17-01-2024)
- Support for cook recording & graphing feature (when supported by App update).
- 450-109 (16-11-2023)
- Support for timer countdown and food probe based trigger actions.
- 450-108 (27-10-2023)
- Various bug fixes to child lock function
- 450-105 (14-09-2023): 450-105
- Added child lock function