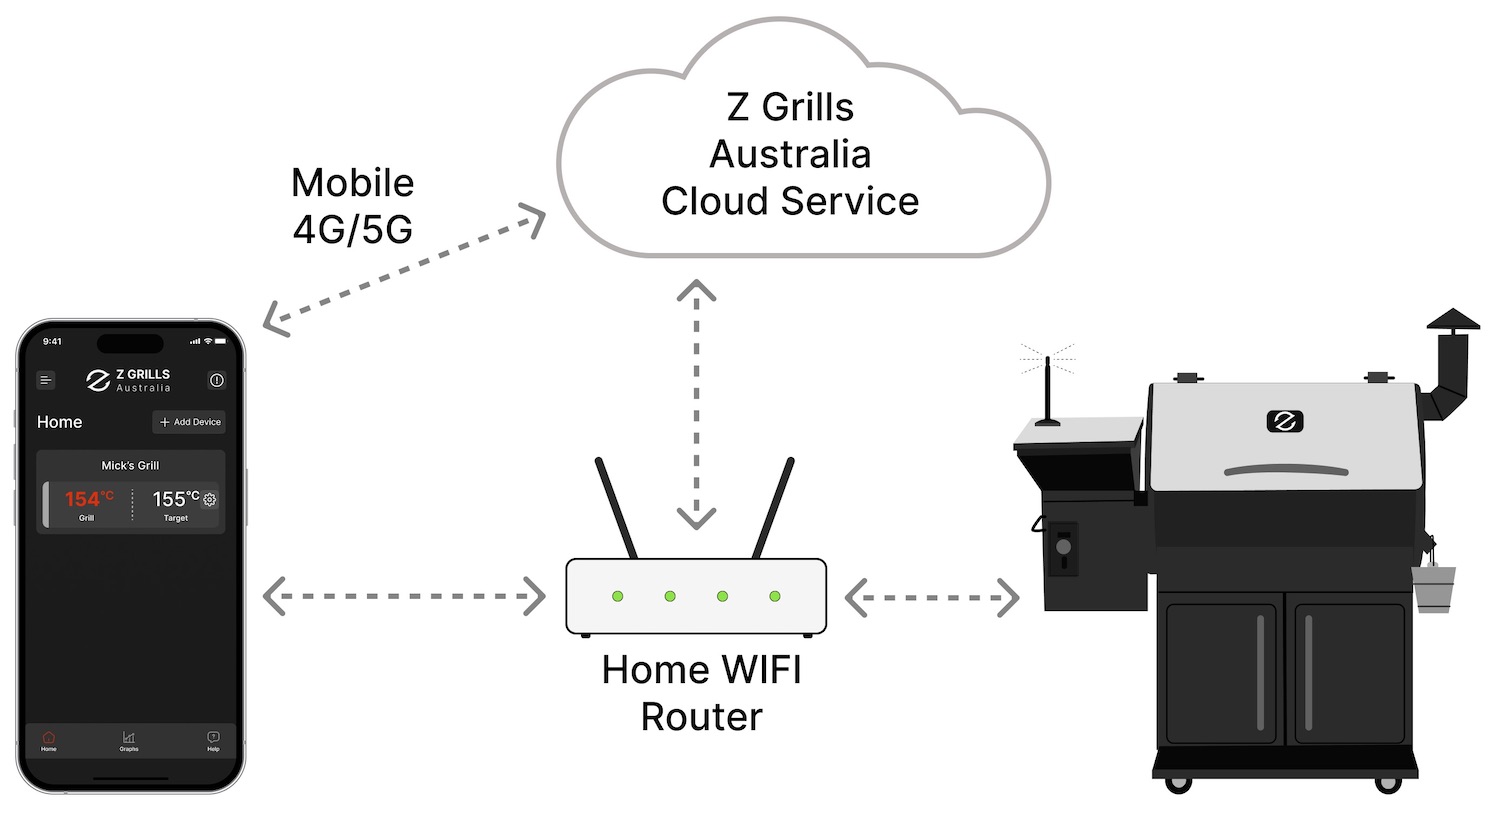
Use the Z Grills Aus iOS or Android app on your phone/tablet to effortlessly monitor and control your Z Grills smoker at home or anywhere that has internet access.
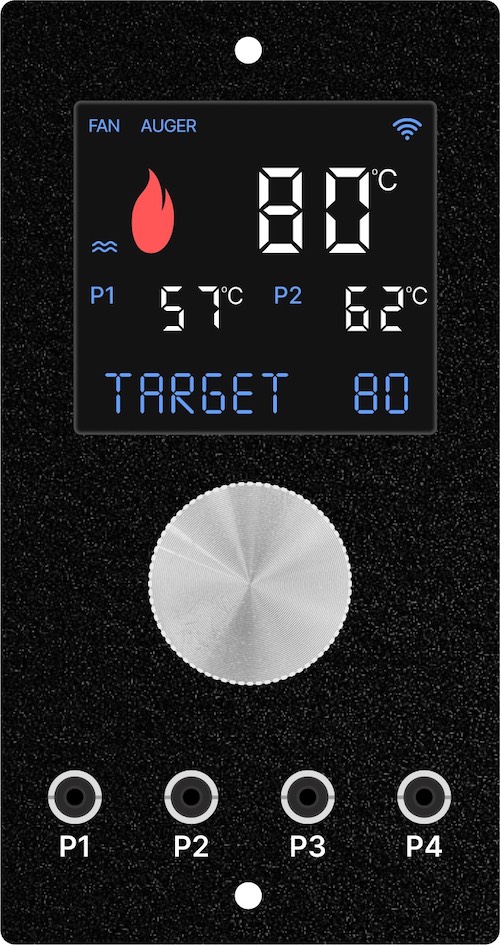
Wireless Controller
Z Grills smokers fitted with the Australian Wireless Controller (shown below) can connect to the Z Grills Aus App. To learn how to use the Wireless Controller click here.
Upgrade to a Wireless Controller
All 450A, 7002B, 700E and 700E-XL smokers sold in Australia can be easily upgraded to the WIFI controller, providing the latest software, functionality and wireless connectivity.
Click here for step by step instructions to change out the basic PID controller with a new Wireless controller.
Download the App
The Z Grills Aus App is available for Apple (iOS) and Google Play (Android) versions of the App. The App is called Z Grills Aus, NOT to be confused with Z Grills 2.0 which is for the USA market and not compatible.

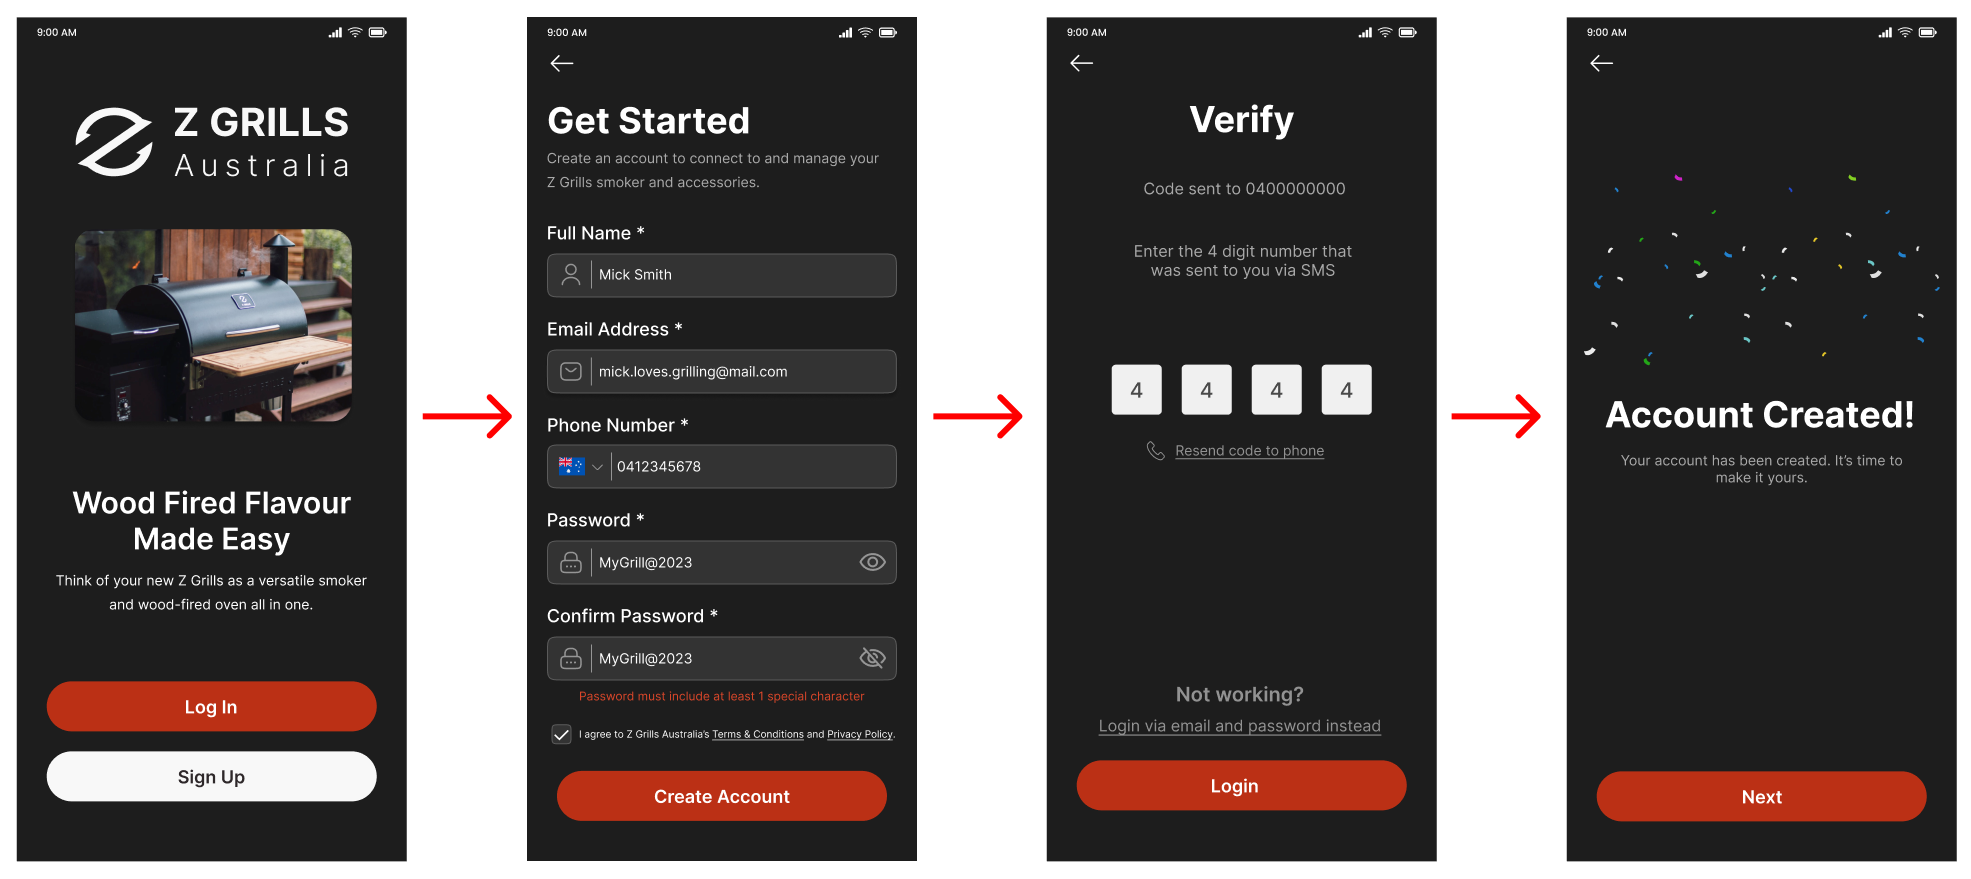
Create Account
An account is needed to use the App and connect devices such as smoker grills and wireless thermometers.
Follow the steps to establish an account, using your email and phone number. Confirmation codes will be sent to verify the account.
Once the account is established you can login with just your phone number and confirmation code, or email and password.
Can I sign into my account on multiple mobile devices?
Yes you can sign into your account (on the App) on multiple mobile devices to view and control your connected Z Grills smoker. For the most reliable operation only one mobile device should have the App open at a time to view and control the grill.
Connect Z Grills Pellet Smoker
The Z Grills App can connect via Bluetooth and WIFI. Connecting to WIFI is required to monitor and control the grill when outside the Bluetooth range, such as when away from your home. It is also required for any software updates.
WIFI Network Details
To connect to WIFI, you will need to know the network name and password. It may be on the bottom of the WIFI router, or on a card or fridge magnet supplied by our internet provider.
It is important to connect to WIFI when possible to ensure the grill is up to date with the latest software. WIFI is also required to utilise many advanced App features such as trigger actions and recording cooks.
Connection Steps
Follow the steps below to connect the grill to the App.
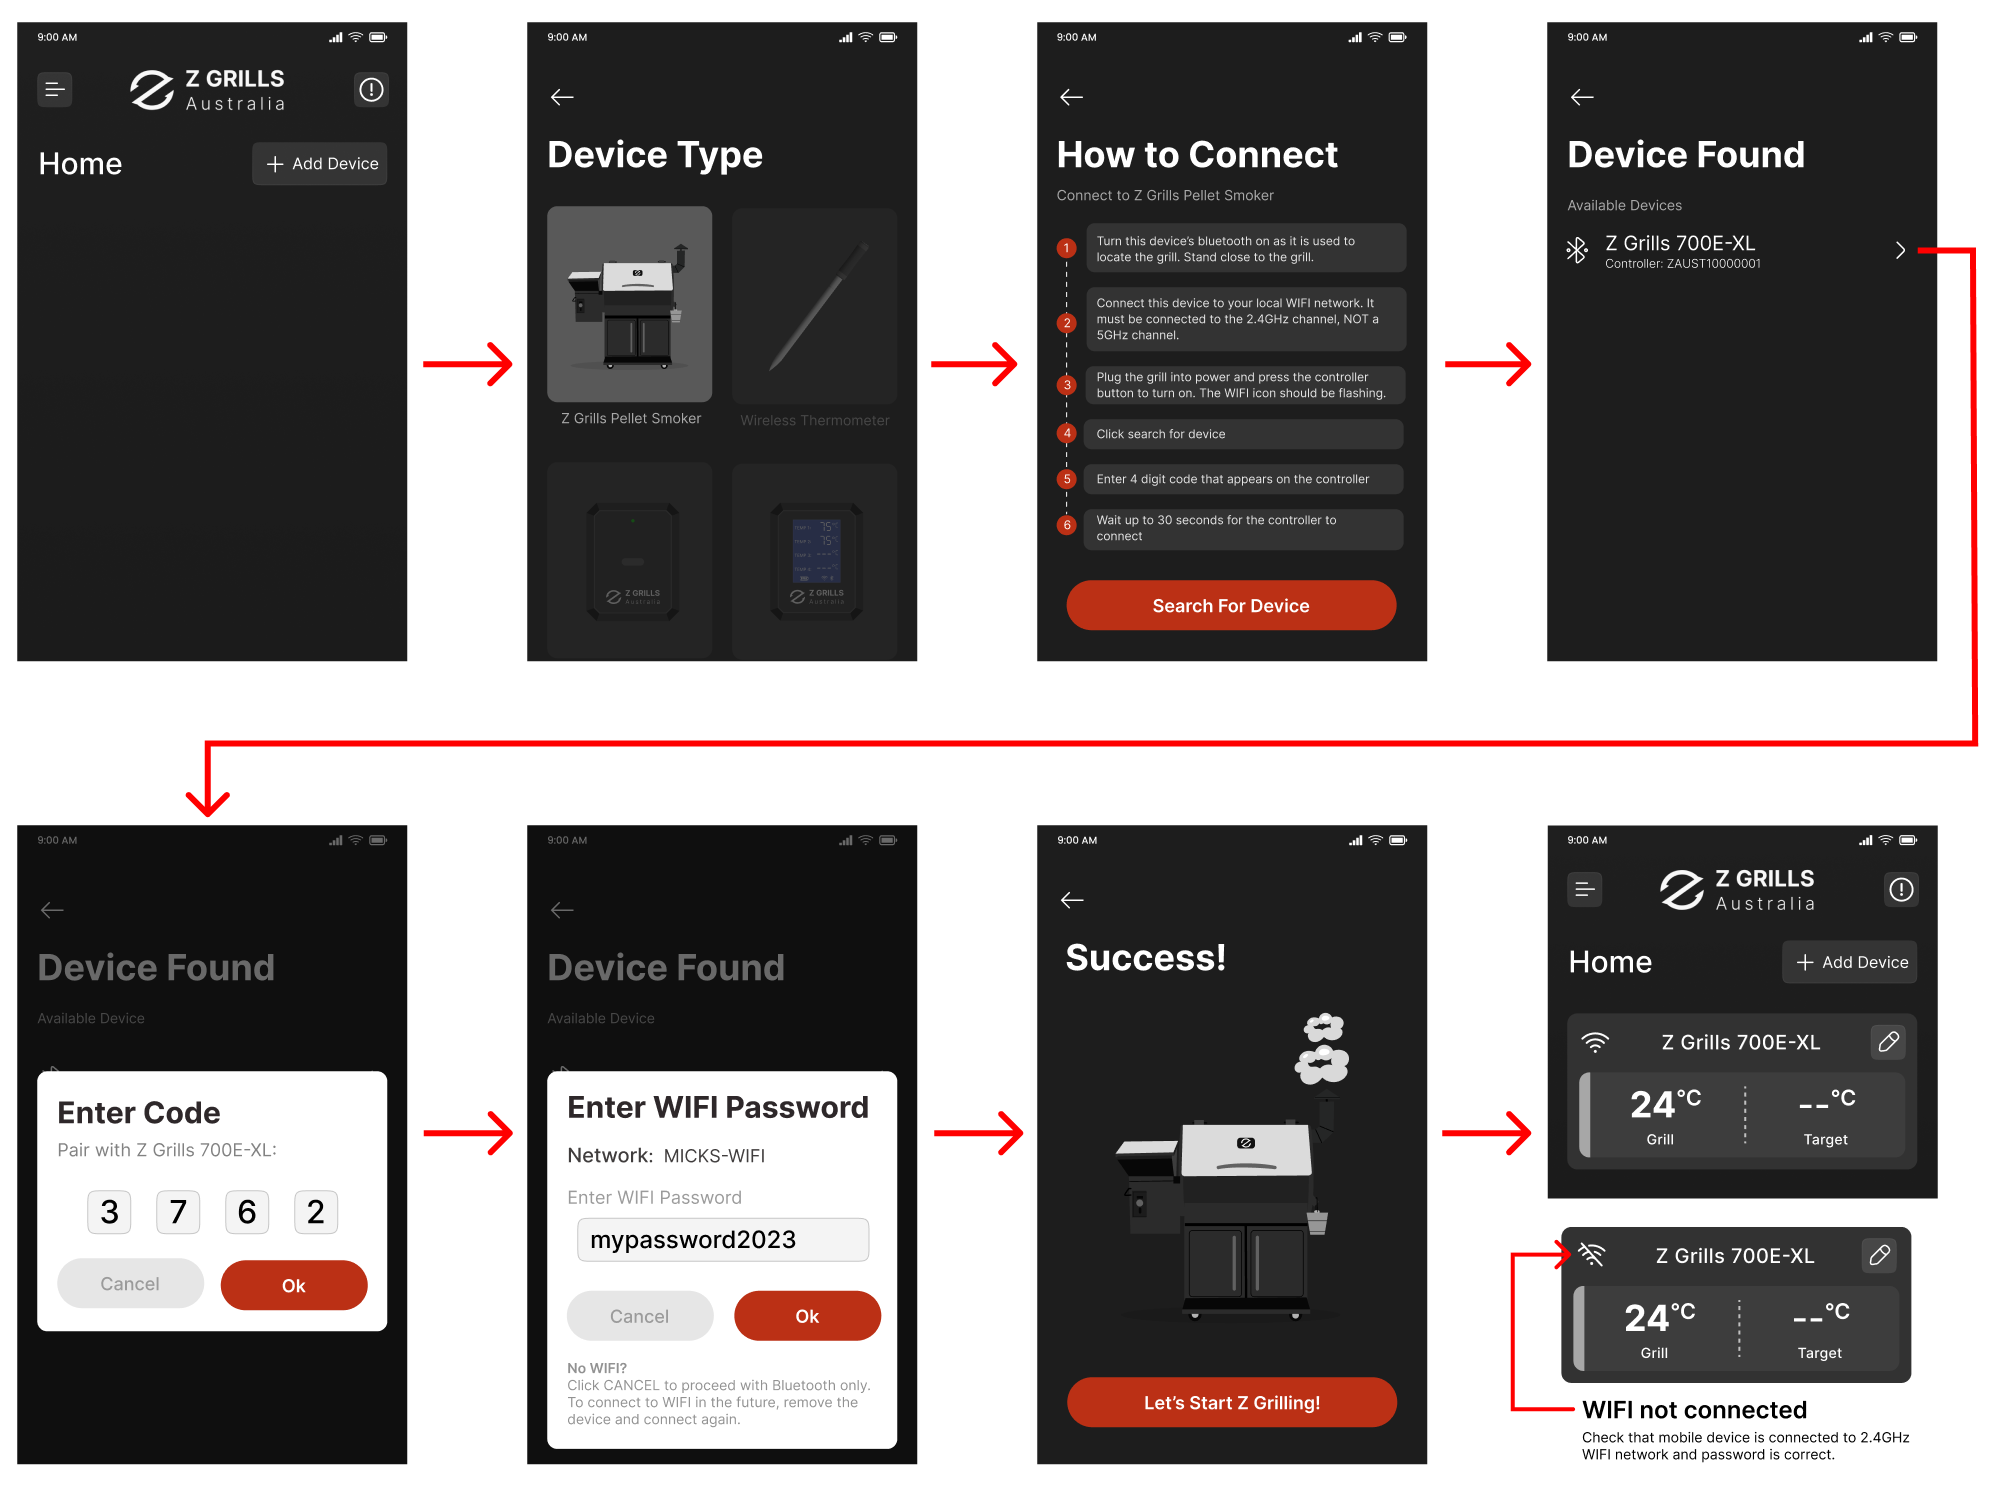
Step 1. Bluetooth & Location Services ON
- Make sure your mobile device Bluetooth is turned on so it can identify the grill.
- Stand close to your grill, so the Bluetooth signal is strong.
- Location services must also be turned on for the Z Grills Aus App for it to find the controller. They can be turned off once connected.
Step 2. Connect to WIFI (if available)
- Connect your phone/ipad/tablet to the local 2.4GHz WIFI network. It must be the 2.4GHz network, not 5GHz. 5GHz is faster than 2.4GHz, but not good at penetrating walls which is why most outside connected devices use 2.4GHz.
- The 5GHz network will normally have “5G” at the end of the network name (aka SSID). For example:
• MY-WIFI (this is the one to select)
• MY-WIFI-5G - Some networks will have a single network that combines both 2.4GHz and 5GHz. This may be referred to as “band steering” or “combined network”. Newer routers will automatically assign the correct one to devices in which case the grill should be able to connect easily.
- A great option (in all cases) is to turn on a “Guest 2.4 GHz” network on your router and connect your phone to that, and in turn your grill controller. This will be separate from your main internet and can result in a much more reliable connection.
- Router settings: Refer to your router manual for instructions on how to log in. Check the bottom of the router for the address, username and password.
For example:
• http://myrouter.com or 192.168.1.1
• User: admin
• Password: admin
Step 3. Turn the Grill ON
- Make sure the grill is plugged into power.
- Press the control button once to turn the screen on.
- The WIFI logo should be slowly flashing, indicating that it is not yet connected to your WIFI network.
Step 4. Add Device
- In the App, click on the + Add Device button.
- Select Z Grills Pellet Smoker on the Device Type screen.
- Click on Search for Device to find available grills.
- Select your grill from the list.
- More than one grill?
• If you have multiple grills that are not yet connected, a list of will be shown.
• Select the grill based on the model number.
• If there are multiple grills of the same model, only turn power on for the one you wish to connect to. - If you already have a Z Grills Smoker connected to the app you will need to remove that before connecting another grill, as only one grill may be connected at a time.
Step 5. Enter Code
- Enter the 4 digit code that appears on the grill controller screen.
Step 6. Enter WIFI Password
- Enter your WIFI password. The password is case sensitive so enter carefully.
- Remember your phone/ipad/tablet must be connected to the 2.4GHz network, or a modem router that can automatically assign the correct 2.4GHz channel to the controller.
Step 7. Success
- Once connected (to at least Bluetooth) the success screen will be displayed.
- As outlined above, the connection will still be successful with only Bluetooth connected.
- Your grill should now be listed on the home screen of your Z Grills Aus App.
- If the controller did successfully connect to WIFI (or anytime network connection is lost), the WIFI icon on the grill summary tile in the App HOME screen will change as shown below.
Bluetooth Connection
- The bluetooth icon on the grill summary tile in the App HOME screen will change as shown below.
- Once WIFI is connected Bluetooth does NOT need to be connected for normal control of the grill from the App.
- Bluetooth needs to be connected to complete a software update to the controller. To connect, stand close to the grill and quit/reopen the App and power-cycle the grill. The Bluetooth should then automatically connect. Check the phone/tablet bluetooth settings if still not connecting.
- If the WIFI connection is not successful, the grill can still be viewed and controller when in close proximity via Bluetooth. As the grill is not connected to the cloud server, advanced functions such as trigger actions and recording will NOT be available.
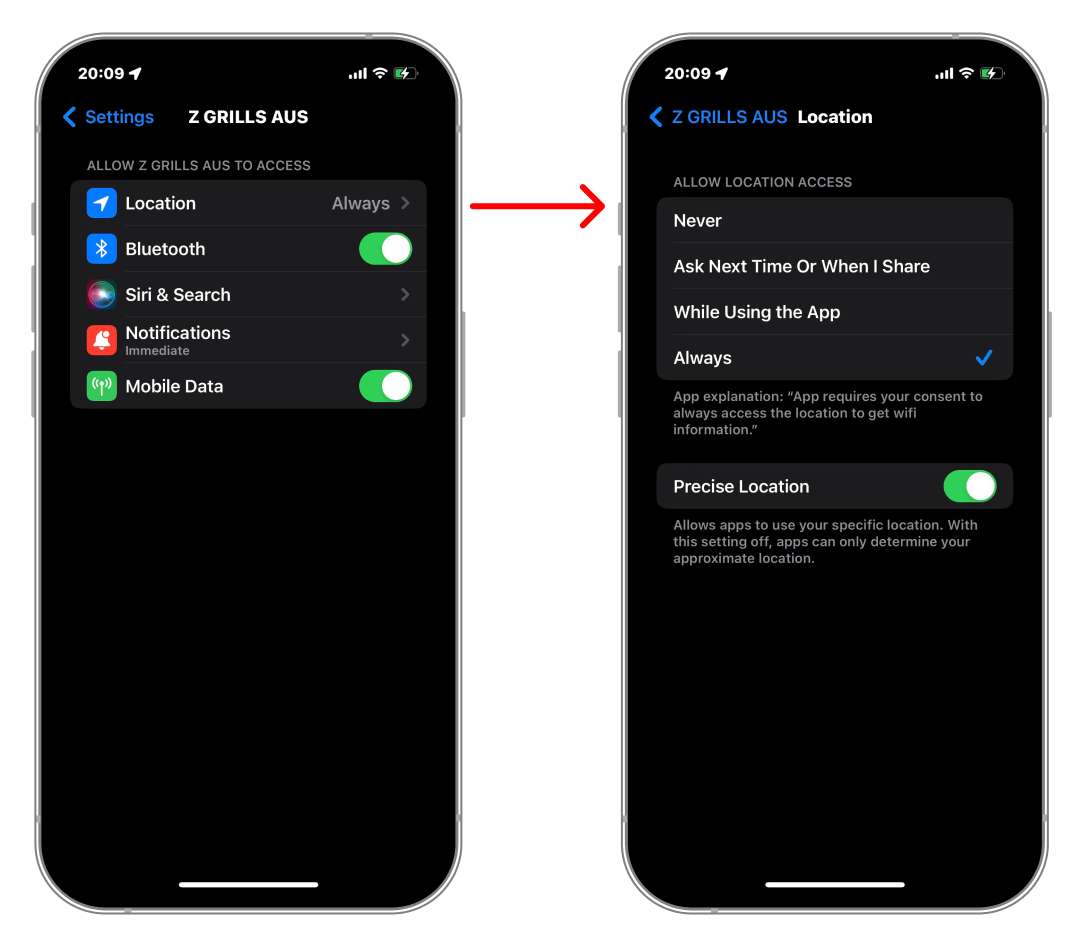
Mobile Device Location Setting
By default when you install the App location services will be turned on (as shown below) as they are required when connecting to a new wireless controller.
Once connected you may turn location services off (change to “Never”), as we do not collect or have any use for location data.
Manage Connected Devices
Click on the gear icon to manage the grill (or other devices), with the following options:
- Rename: Give your grill a personalised name. e.g. Mick’s Grill
- Remove Device (Disconnect): This will entirely remove the grill from the App and the local WIFI network.
Change WIFI Network
To change to another WIFI network, disconnect the grill from the app (as outlined above) and then add again as a new device.
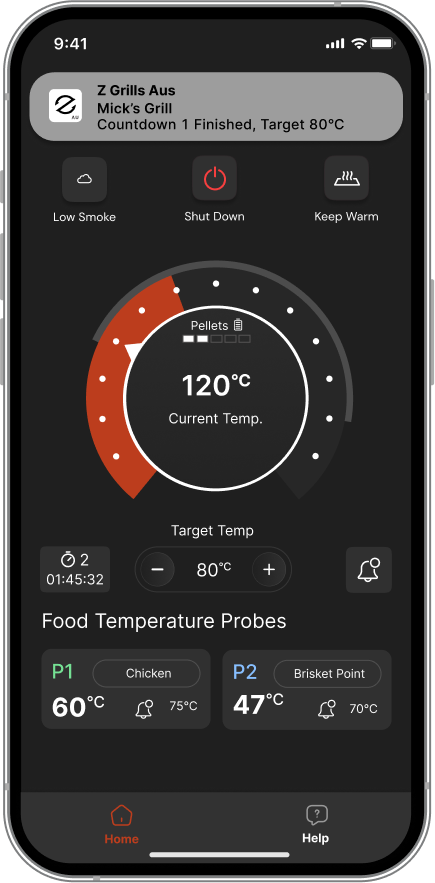
Manage Grill Page
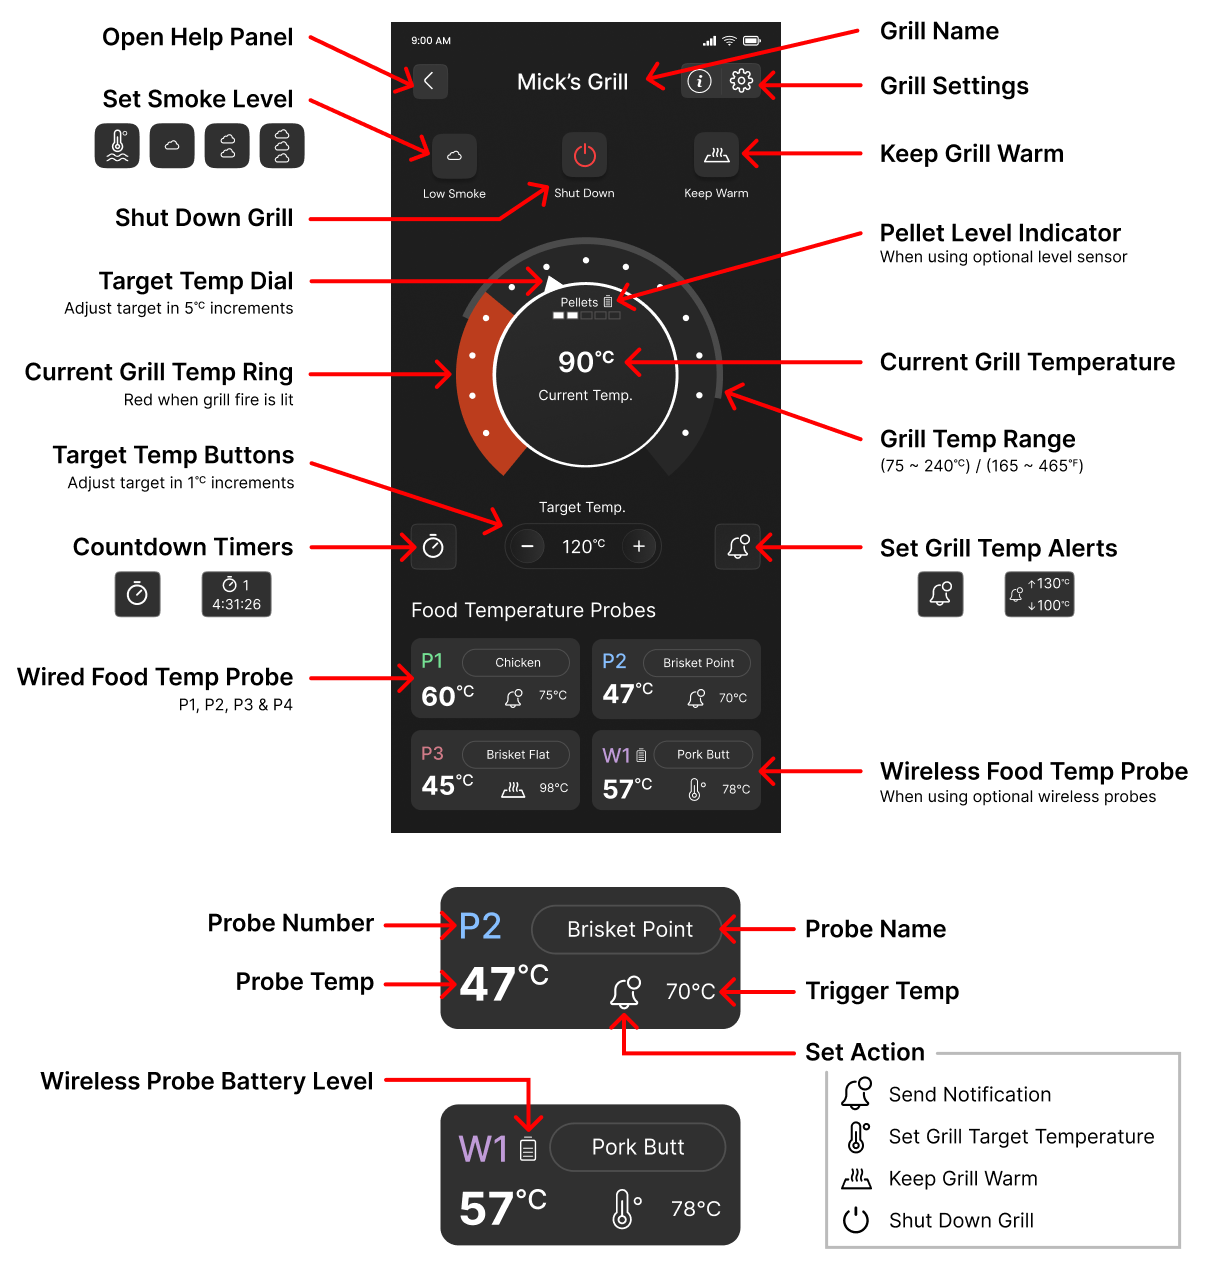
From the HOME page, click on an online grill to open up its Manage Grill page
The layout has been designed to give clear information about the operation of the grill and single touch access to most common functions.
Operate the Grill
Firing Up
- For safety reasons the grill cannot be Fired Up remotely from the App. It must be Fired Up directly on the controller.
Click here to learn how to use the Wireless Controller.
- When the grill is not operating (but power is on), the current grill temperature on the ring will display in grey (meaning no fire), and no target temperature will be displayed.
- Once the Firing Up process begins, the temperature dial will change to yellow and then red once the fire is lit.
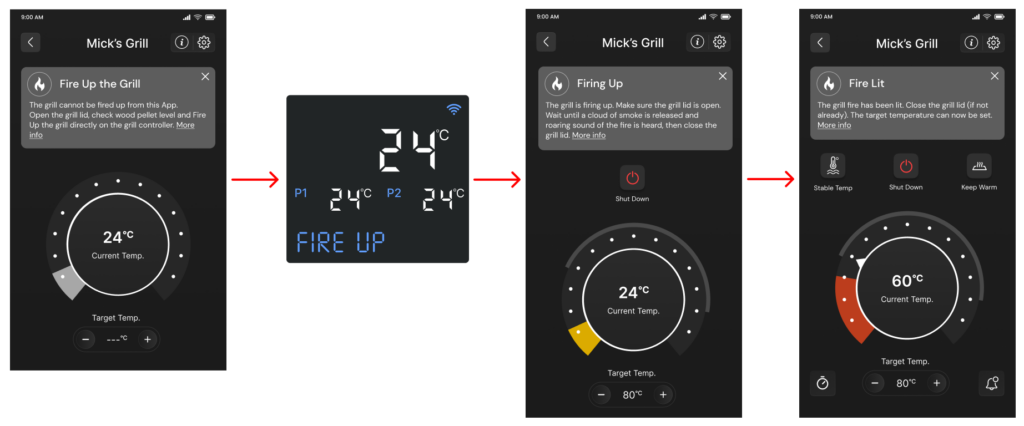
Set Target Temperature
- Once the fire is lit and the dial grill temperature turns from yellow to red, the target temperature can be set.
- The default starting temperature is temperature 75℃ or 167℉ with the stable smoke level setting.
- Press and hold for a second on the temperature dial to view the dial on a black background.
- Use your finger to rotate the dial clockwise to adjust the grill target temperature in 5℃ / 10℉ increments. Tap anywhere in the black area of the screen to close the adjustment dial.
- Further adjust the temperature in 1℃ / 1℉ increments with the ⊖ and ⊕ buttons.
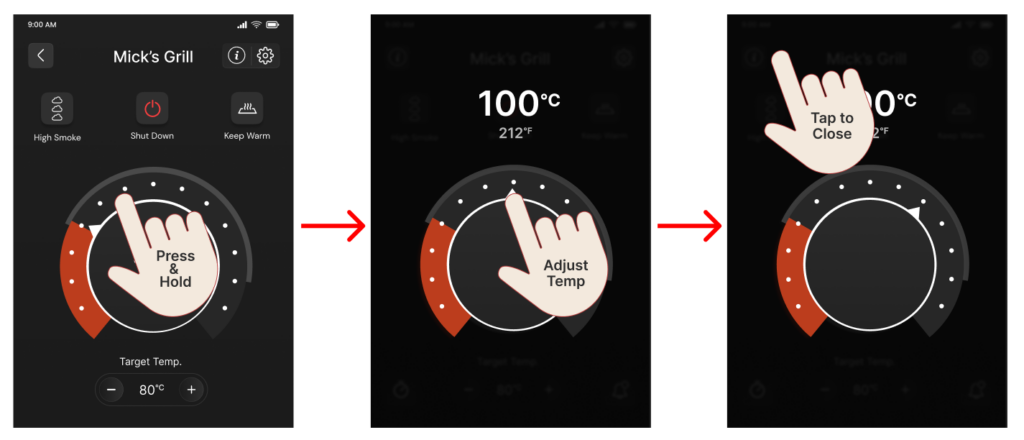
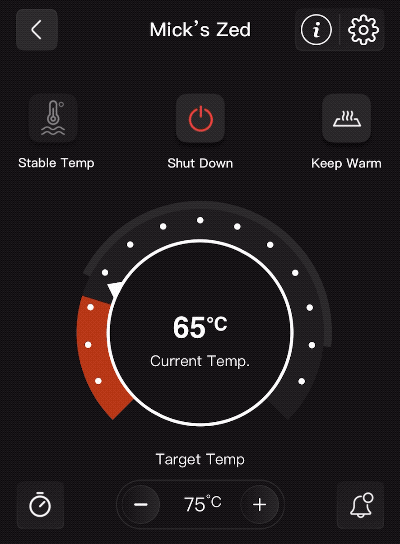
- The white arrow indicates the target temperature.
- The red ring indicates the current grill temperature. This provide a quick visual indication of the grill temperature in relation to the target white arrow.
- The light grey outer ring light grey shows the target temperature range for the model of grill, normally 75℃ to 240℃ / 165℉ to 465℉.
- The full dial grill temperature display range range is 0 to 280℃ / 32℉ to 536℉.
- The target temperature is shown below the dial.
- The target temperature will update immediately on the grill controller as it is changed on the App.
Smoke Settings
- Smoke settings (Stable, Low, Medium or High) can be set for grill target temperature of 110℃ / 230℉ and below.
- The difference between these smoke settings is subtle and is achieved by changing how frequently the auger on/off operation ratio is adjusted (PID cycle time).
- To change the smoke setting (110℃ / 230℉ and below) press the Smoke Setting icon to cycle through the 4 options.
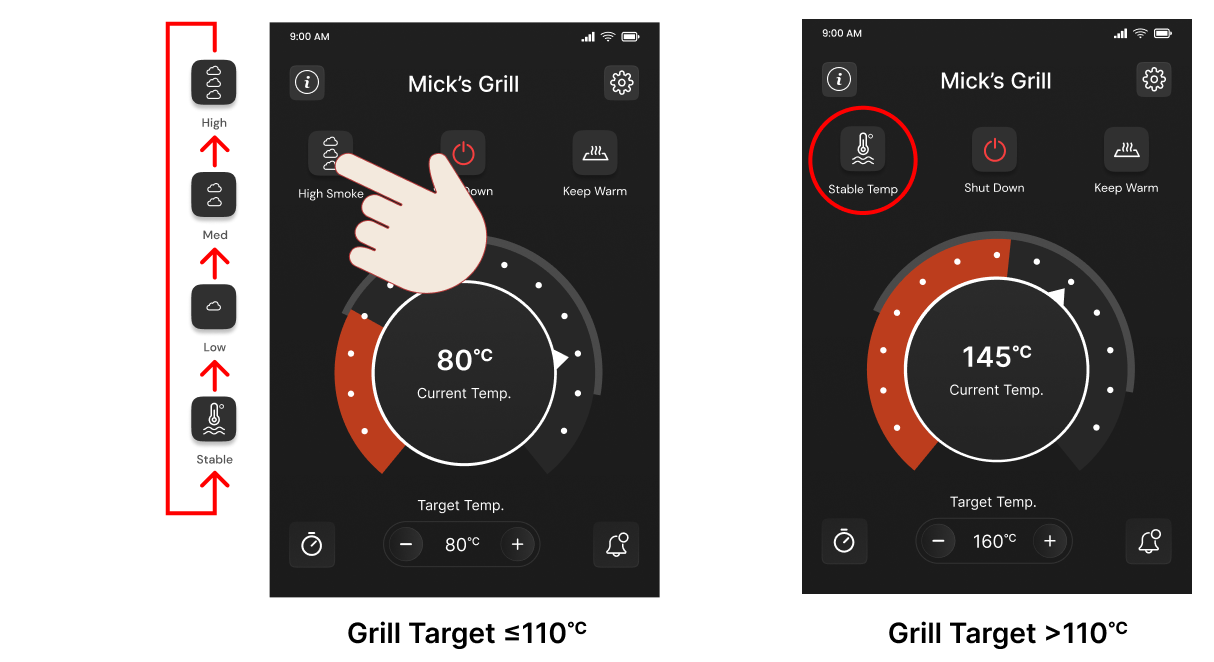
- For maximum smokey flavour use a low temperature setting (<90℃ / 194℉) with the HIGH smoke setting as a starting point. Depending on the pellets being used, MEDIUM or LOW may actually provide more consistent smoke release, so test to find which setting works best for you!
- The STABLE temperature option will attempt to maintain the most consistent temperatures, but smoke will still be released (as will always be the case at low temperatures).
- At grill target temperatures above 110℃ / 230℉ only the stable option is available as the fire burns hot and clean with less smoke.
Note that any changes to the smoke setting made on the controller will also be reflected on the App.
Keep Warm
- At the end of a cook the Keep Warm setting can be used to maintain the temperature of the food until it can be taken out.
- The grill will be set to 80℃ / 176℉ with stable smoke level setting for the most consistent temperature possible.
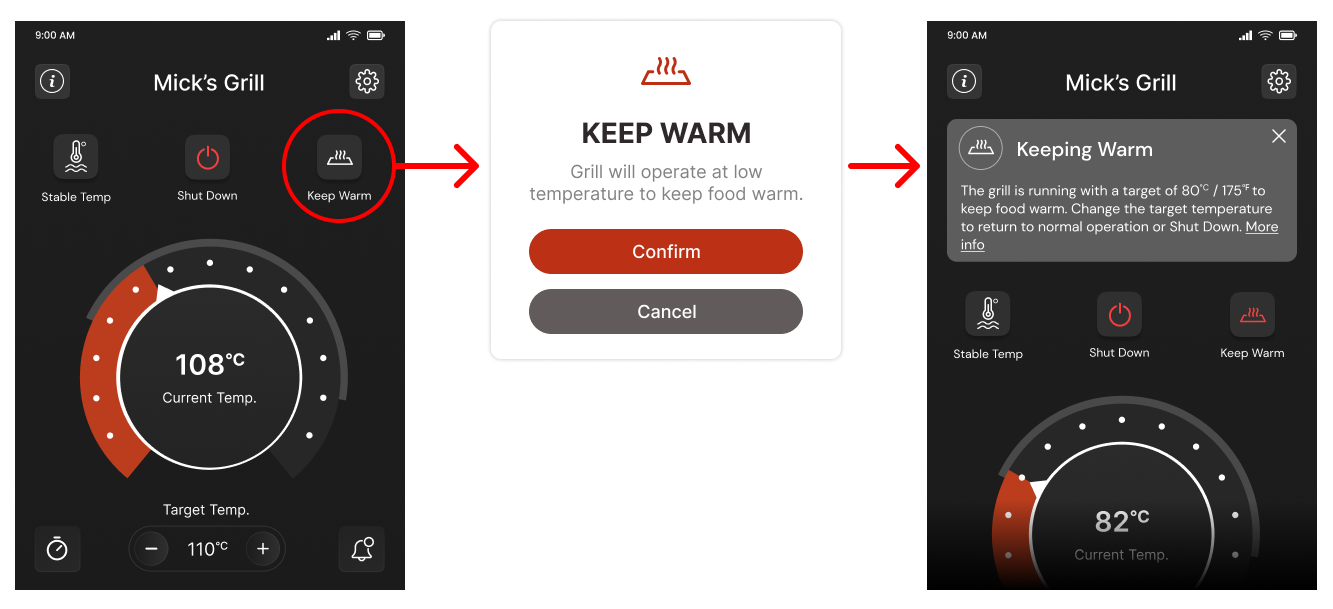
- Keep Warm can be manually turned on by pressing the icon and confirming, or automatically using a Countdown or Food Probe trigger-action.
- When active the Keep Warm icon will turn red.
- Keep Warm can be turned off in two ways:
• Press on the icon again and confirm. Once turned off the grill will still continue to operate at the same target temperature (80℃ / 176℉).
or
• Adjust the grill target temperature (this is the fastest way!).
Shut Down Grill
The grill can be Shut Down directly by pressing the icon, or automatically using a Countdown or Food Probe trigger-action.
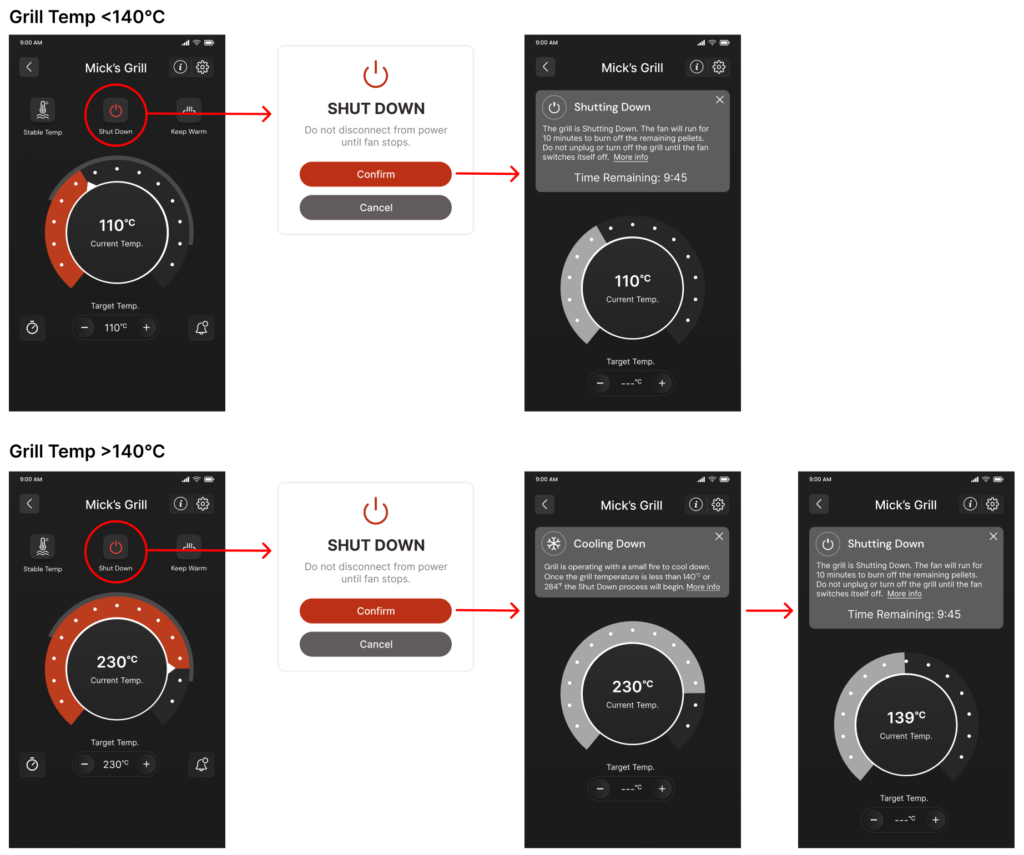
Grill below 140℃
- If less than 140℃ / 284℉ the grill will begin the Shut Down Cycle, running the fan for 10 minutes then turning the power off.
- Never disconnect the power until the fan stops.
Grill above 140℃
- If the grill is hotter than 140℃ / 284℉ it will first go into Cooling Down mode by continuing to operate with a small fire to cool down below 140℃ / 284℉ before commencing the normal Shut Down Cycle.
- Cooling the grill down first helps prevent back-burn, which is possible after running at high temperatures.
- While the Cooling Down process is underway, change the Grill Target Temperature at anytime to continuing running the grill as normal.
Fire Up Again While Shutting Down
- The grill can be Fired Up again during the Shut Down Cycle directly on the controller, but not through the App. Click here for instructions on Firing Up a grill that is still hot or currently Shutting Down.
Food Temperature Probes
Temp Probe Tiles
- At the bottom of the Grill Control Page any plugged in food temperature probes (P1, P2, P3, P4) or wireless probes connected to the controller (W1, W2, W3, W4) are displayed in tiles.
- Each tile displays all the relevant information, as outlined below.

• Probe Number: P1, P2, P3 and P4 for wired and W1, W2, W3, W4 for wireless probes.
• Probe Name: Can set a suitable name.
• Probe Temp: The current probe temperature.
• Trigger Temp: Temperature set for action to occur.
• Set Action: Indicates the action that will occur once trigger temperature is exceeded.*
• Battery Level: For wireless probes connected to the grill controller.
Manage Temperature Probes
To manage a temperature probe, click on its tile to access various options:
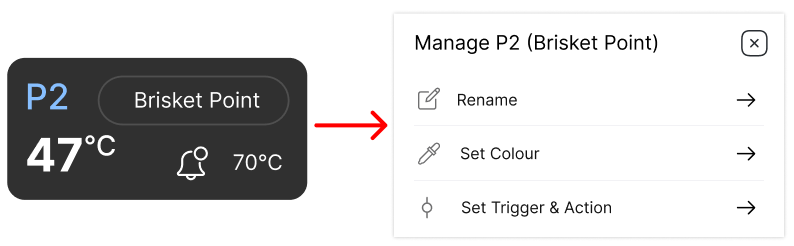
• Rename: Set a suitable name for the probe.
• Set Colour: Choose a colour to set for the probe number (P1, P2, W1 etc) and temperature graph (if activated).
• Set Trigger & Action: Set a trigger temperature and associated action.
Set Triggers & Actions
Trigger-Actions allow control of the grill based on food probe temperatures or countdown periods and are particularly useful for longer cooks.
Triggers
Actions will occur once a trigger condition is met. There are two types of triggers:
- Countdown Timer: Trigger at the end of the countdown.
- Food Probe Temperature: Trigger when the temperature exceeds the set value.
Actions
The following actions can be completed once a trigger has occurred:
- Send Notification: Pop up message in the App and push notification to phone (if enabled in settings)
- Set Grill Target Temperature and Smoke Setting: Multiple can be set, one for each trigger.
- Shut Down: Only one can be set, linked to one trigger.
- Keep Warm: Only one can be set, linked to one trigger.
Note that Shut Down and Keep Warm can only be linked to one trigger.
Notifications
Notifications will appear on your phone once a countdown is completed or trigger-action occurs. Make sure notifications are enabled for the Z Grills Aus App.
Also consider any Focus, or Do Not Disturb settings on your device which may restrict the notification sounds or pop-ups.
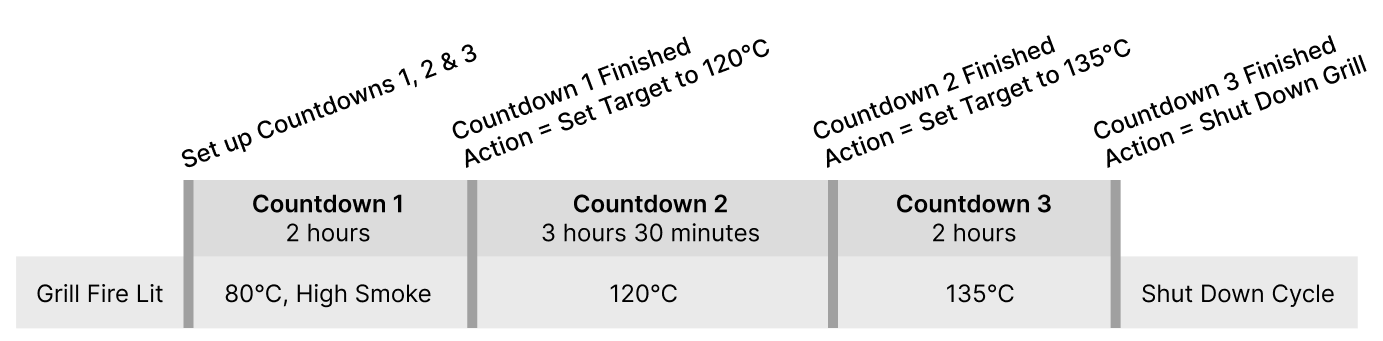
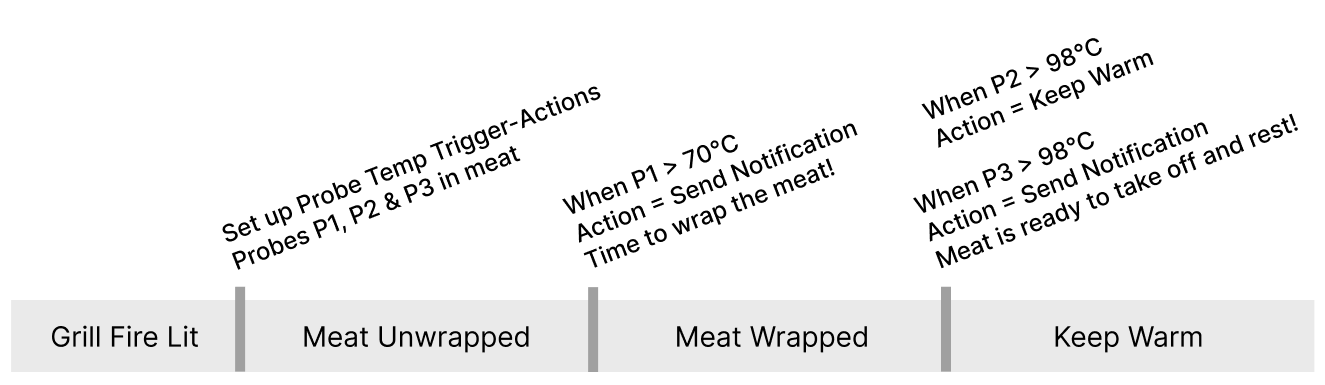
Trigger-Action Example
Here is a practical example for a low ‘n’ slow cook using both countdown and food temperature probes triggers and associated actions “trigger-actions”.
- Manually fire up the grill, set at 85℃ on the High smoke setting.
- Countdown 1: 2 Hour Countdown = Set Target Temperature to 120℃.
- Temperature Probe 1: If P1 > 70℃ = Send Notification (reminding you to wrap the meat)
- Temperature Probe 2: If P2 > 98℃ = Send Notification (reminding you it is ready to take off the grill)
- Temperature Probe 3: If P3 > 98℃ = Start Shut Down Cycle
Once a food probe temperature has been triggered and action completed, a new trigger and action can be set with that probe.
Trigger-Action Ordering Conflict
It is important to think about the desired order of trigger-actions to avoid conflicts, or illogical operation.
For example, if two trigger-actions are set:
- Countdown 1: 2 Hour Countdown = Set Target Temperature to 130℃.
- Temperature Probe 1: If P1 > 70℃ = Set Target Temperature to 120℃.
In the above case it is very likely the meat won’t reach 70℃ until 4 or 5 hours into the cook. By that time the temperature will have already been increased to 130℃ by Countdown 1, at which point it would not be logical to then reduce the temperature to 120℃.
Reset All Trigger-Actions
- Food temperature probe based trigger-actions can be individually deleted.
- Countdown based trigger-action cannot be individually deleted, so much be deleted and reconfigures. This is because they are sequential, so removing one would impact the finishing time of the subsequent countdowns which may be confusing.
- All trigger-actions can be removed at once using the Reset Action button in the settings page. Click here to learn more.
Countdown Timer Trigger
The Countdown Timer is a great tool for setting up more complex cooks as it allows up to 4 actions to be completed in sequence and can be used in combination with food probe temperature triggers.
A countdown can’t be started by another trigger.
e.g. When P1 > 70℃ then start Countdown 1 (this is not possible).
See the example below of how sequential countdowns could be used. Click on the image to more detailed overview.
Set up First Countdown
Setting up a countdown and its action is super easy and can be done once the grill is Fired Up.
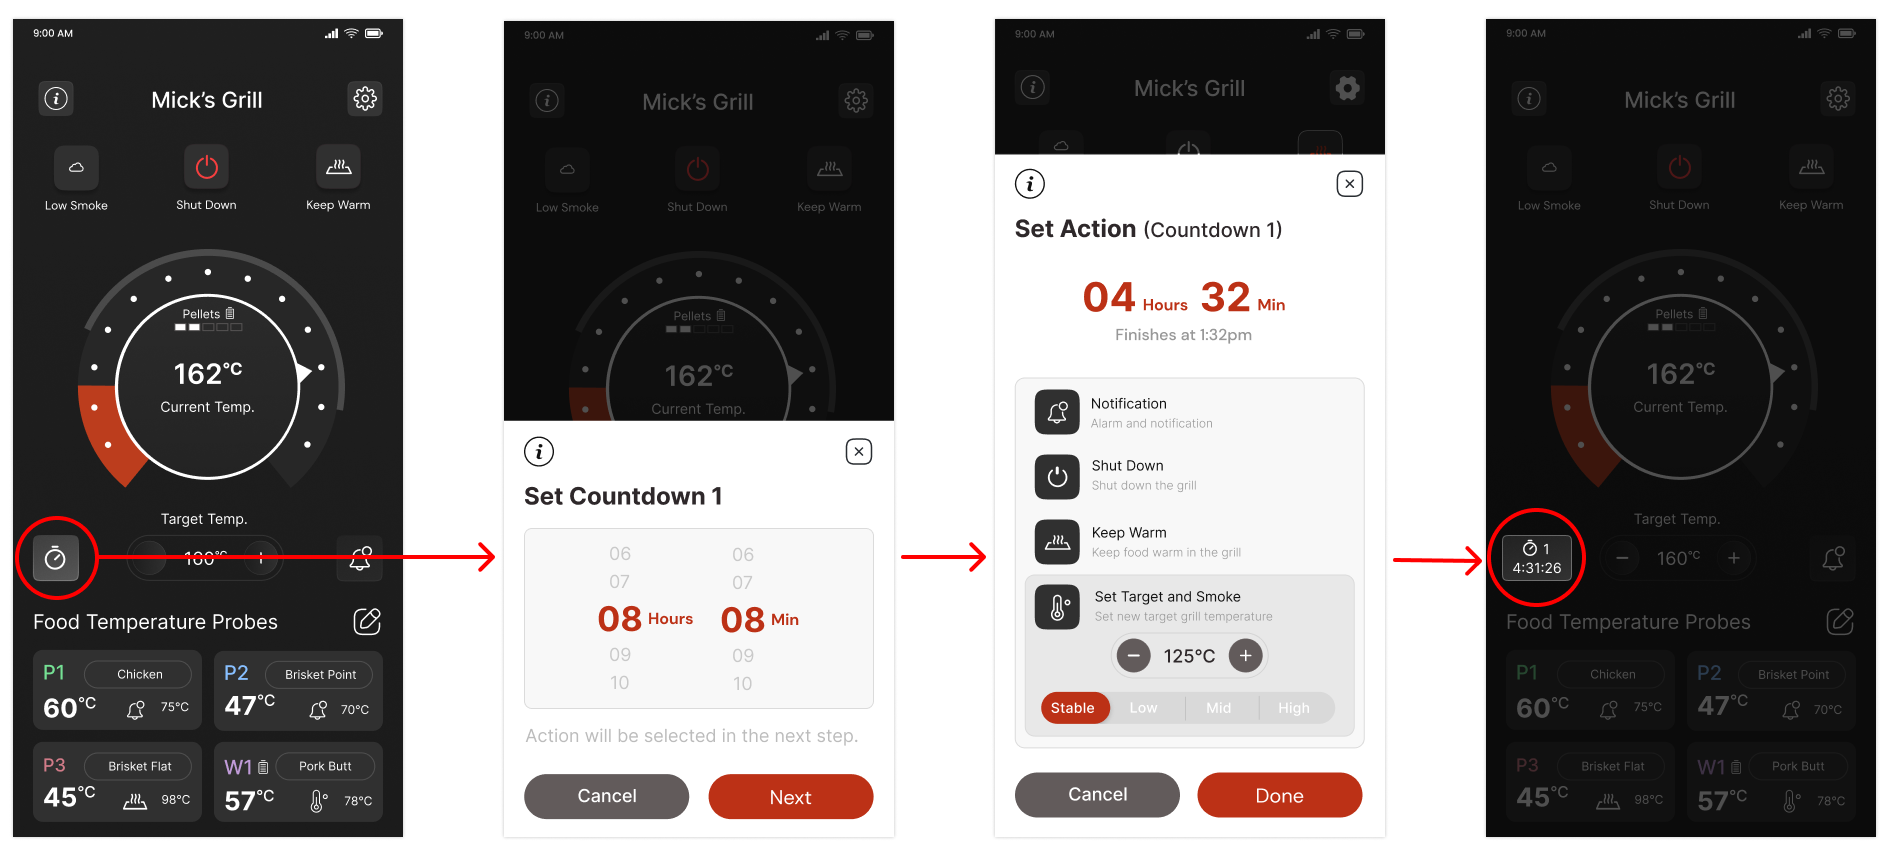
- Tap on the countdown icon.
- Set the Hours and Minutes and press the next button.
- On the following screen the countdown time will be shown along with the time of day it will finish (if started immediately).
- Select the action to complete.
- If an action is light grey, it has already been assigned to another trigger and cannot be used.
- To free up the action, delete the associated trigger-action, or reset all actions in the settings page, click here to learn more.
- If Set Target and Smoke is selected, the set temperature can be adjusted using the ⊖ and ⊕ buttons. Press and hold to change the target more quickly.
- For target temperatures at or below 110℃ / 230℉ the smoke level option will also become visible.
- Press Done to confirm the trigger-action set.
Multiple Countdowns
Up to 4 sequential Countdowns Timers can be set.
Note that once a Countdown Timer has been established, the icon changes to display the current active time remaining.
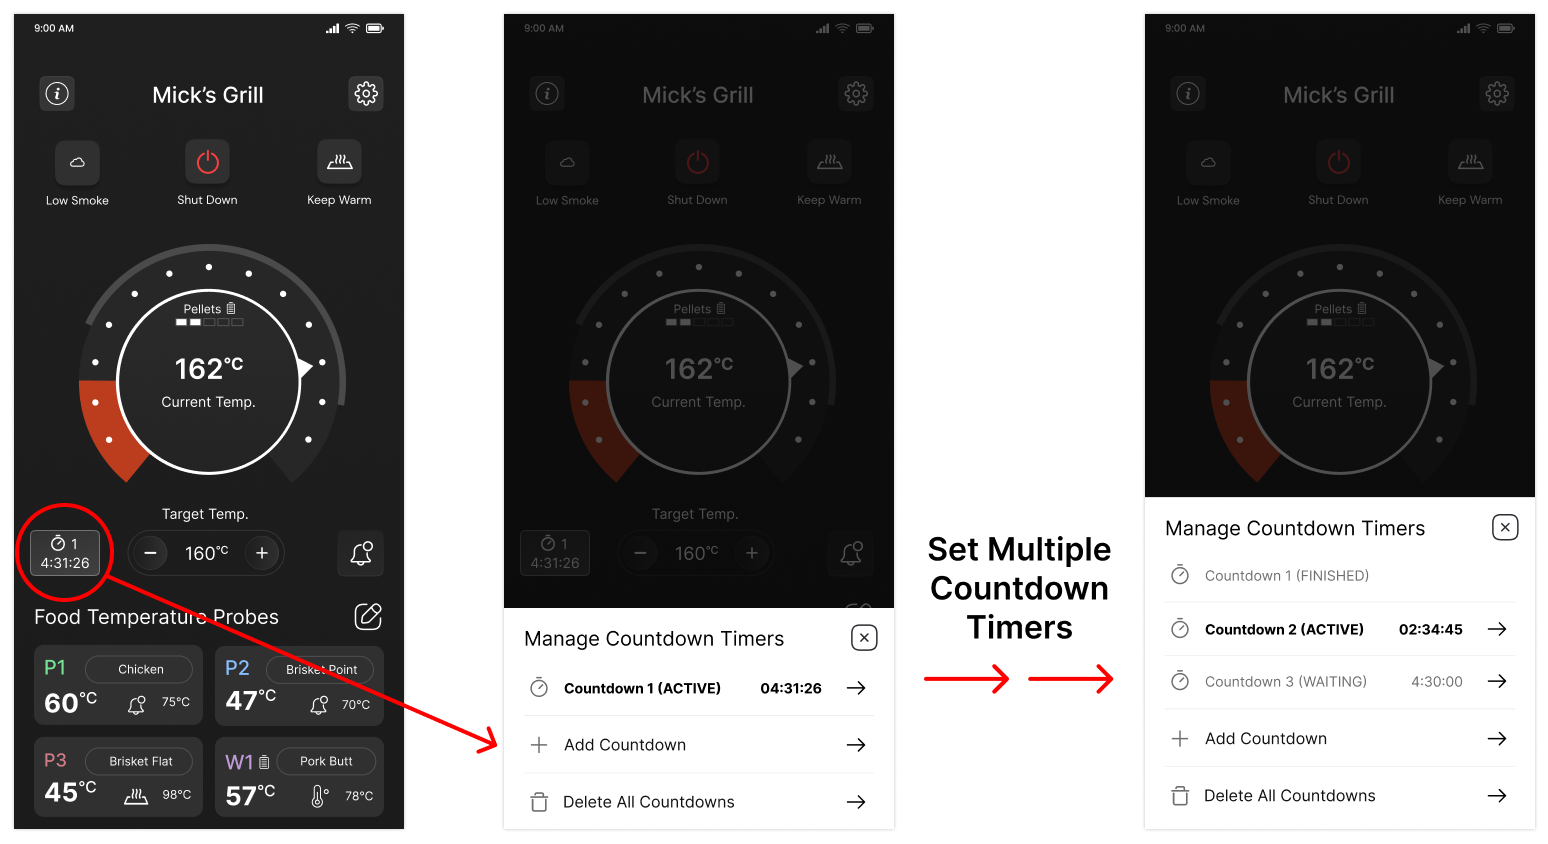
- To set up the 2nd countdown, tap on the countdown icon and select + Add Countdown to add Countdown 2. Repeat for Countdowns 3 and 4 (if desired).
- If a mistake is made, select Delete All Countdowns and start again.
Food Temperature Probe Trigger
The Food Temperature Probe trigger is a great tool for setting up actions based on the cooking progress of the food.
See the example below.
Set Temp Probe Trigger-Action
Setting up a food temperature probe trigger-action is super easy and can be done once the grill is Fired Up. Click on the image to open a more detailed overview.
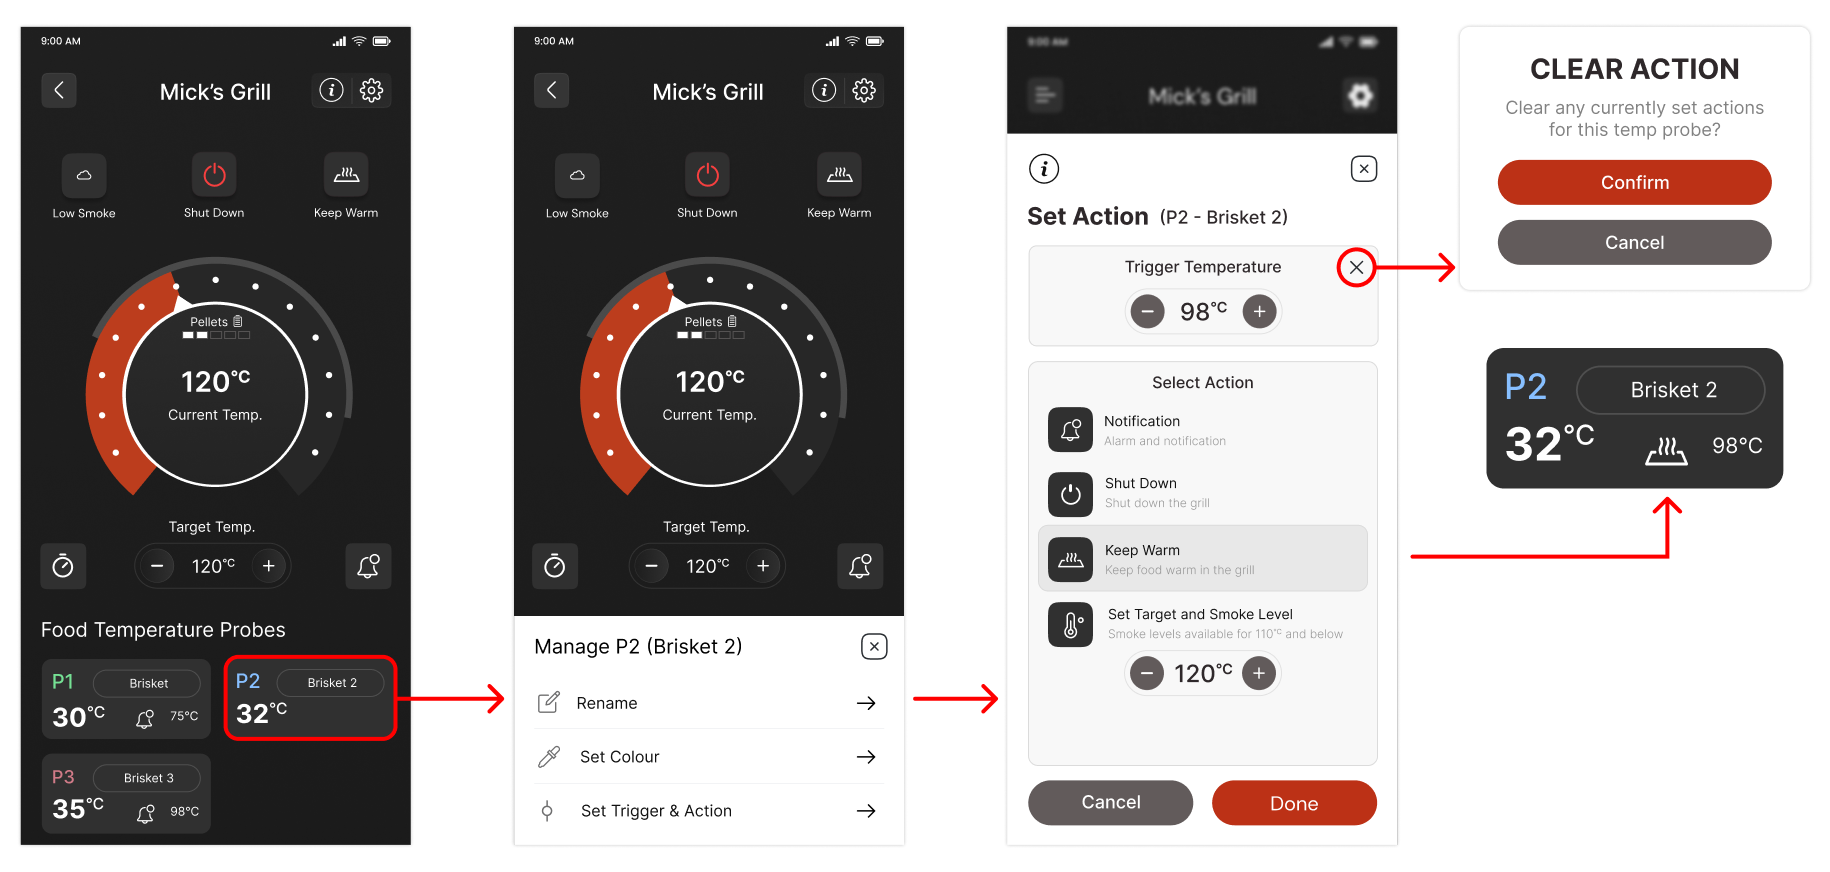
- Tap on the food temperature probe tile to view the available options.
- Tap on Set Trigger & Action
- Select the action to complete.
- If an action is light grey, it has already been assigned to another trigger and cannot be used.
- To free up the action, delete the associated trigger-action, or reset all actions in the settings page, click here to learn more.
- If Set Target and Smoke is selected, the set temperature can be adjusted using the ⊖ and ⊕ buttons. Press and hold to change the target more quickly.
- For target temperatures at or below 110℃ / 230℉ the smoke level option will also become visible.
- Press Done (save the settings) or Cancel (do not save)
- The tile will be updated showing the relevant action icon and trigger temperature.
Delete Food Temp Probe Trigger-Action
- Tap on the food temperature probe tile to view the available options.
- Tap on Set Trigger & Action
- Tap the X at the top right corner of the Trigger Temperature box and then confirm.
Hierarchy of Actions
The actions operate in the following hierarchy, meaning that once a higher one happens the lower ones can no longer occur. Notifications can occur at anytime except during Shut Down cycle.
- Shut Down (no other actions can occur)
- Keep Warm (Set Target Temperature cannot occur, except for manually on App)
- Set Target Temperature
Recording Cooks
Cooks can be recorded to live monitor or review the operation of the grill including:
- Grill target temperatures
- Grill temperature
- Food probes temperatures
- Estimated wood pellet usage from grill fire-up until end of recording (measured from grill Fire Up).
Controller software requirements
For recording to work optimally it is important that both the controller and App are on the latest versions. If a notification for Software Update appears in the App, please complete that before next using the grill.
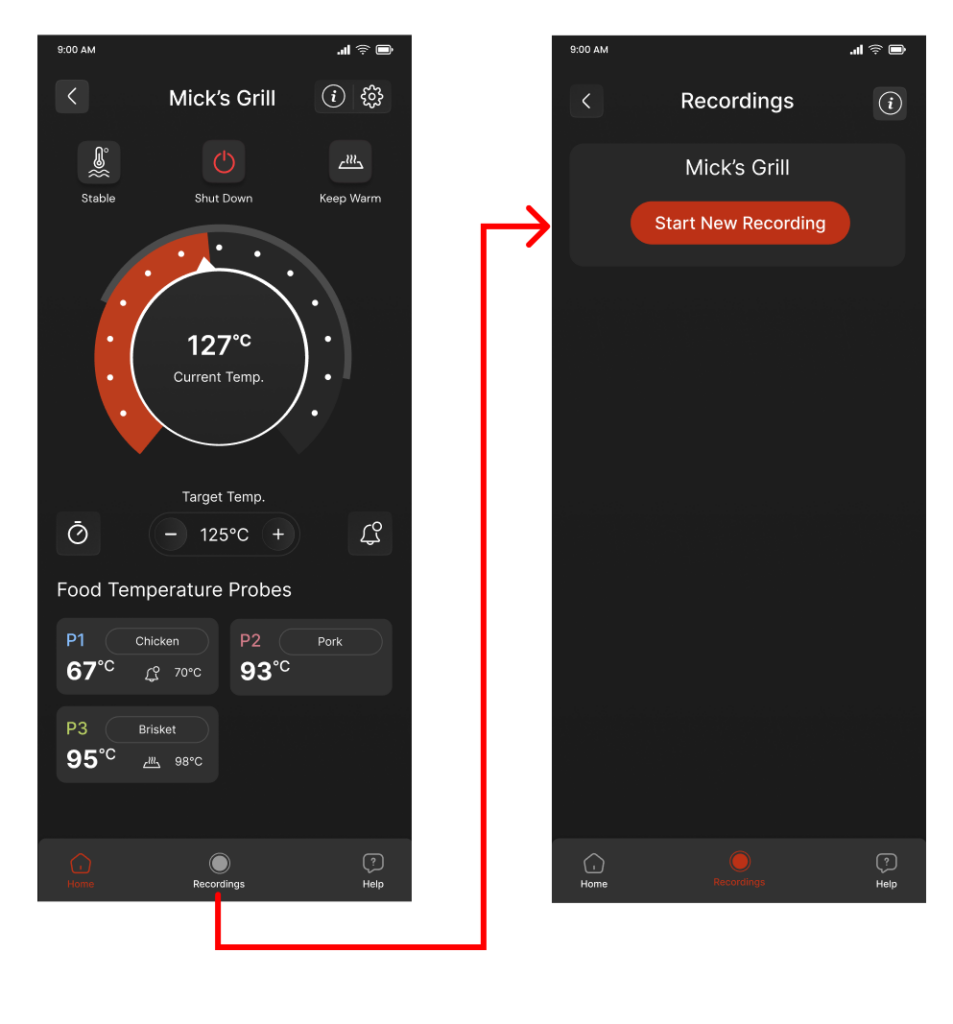
Start a new recording
- Click on Recordings.
- Grill must be operating (firing up, fired up or cold smoke mode).
- Click on Start New Recording.
- Recording will continue for up to 18 hours.
- Values are recorded in 1 minute intervals.
- The graph will appear after 2 values are measured (after 1 minute).
Navigate the graph
- The default view is always fully zoomed out, showing the full time length of the cook on the bottom x-axis.
- Pinch and zoom on the view to zoom in and scroll the graph.
- Tap on the temperature tiles to show or lines on the graph.
- The x-axis time of day view is always in 24 hour format.
- 1:00 pm = 13:00, 2:00pm = 14:00 and so on.
- Tap on the “expand” icon to open in landscape view, and tap back arrow to return to portrait view.
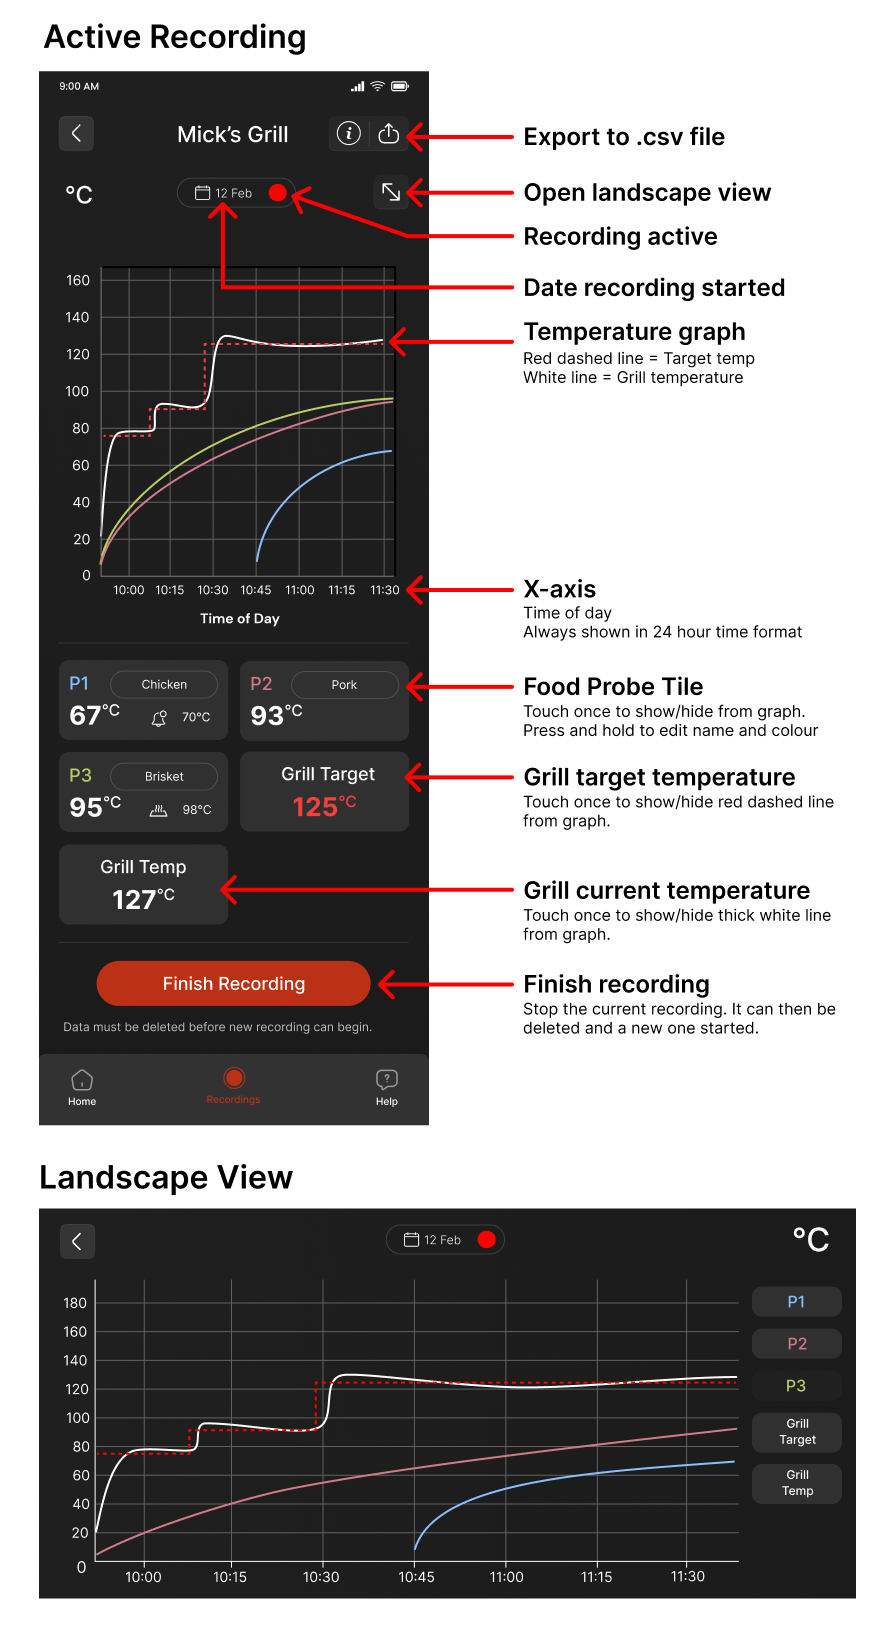
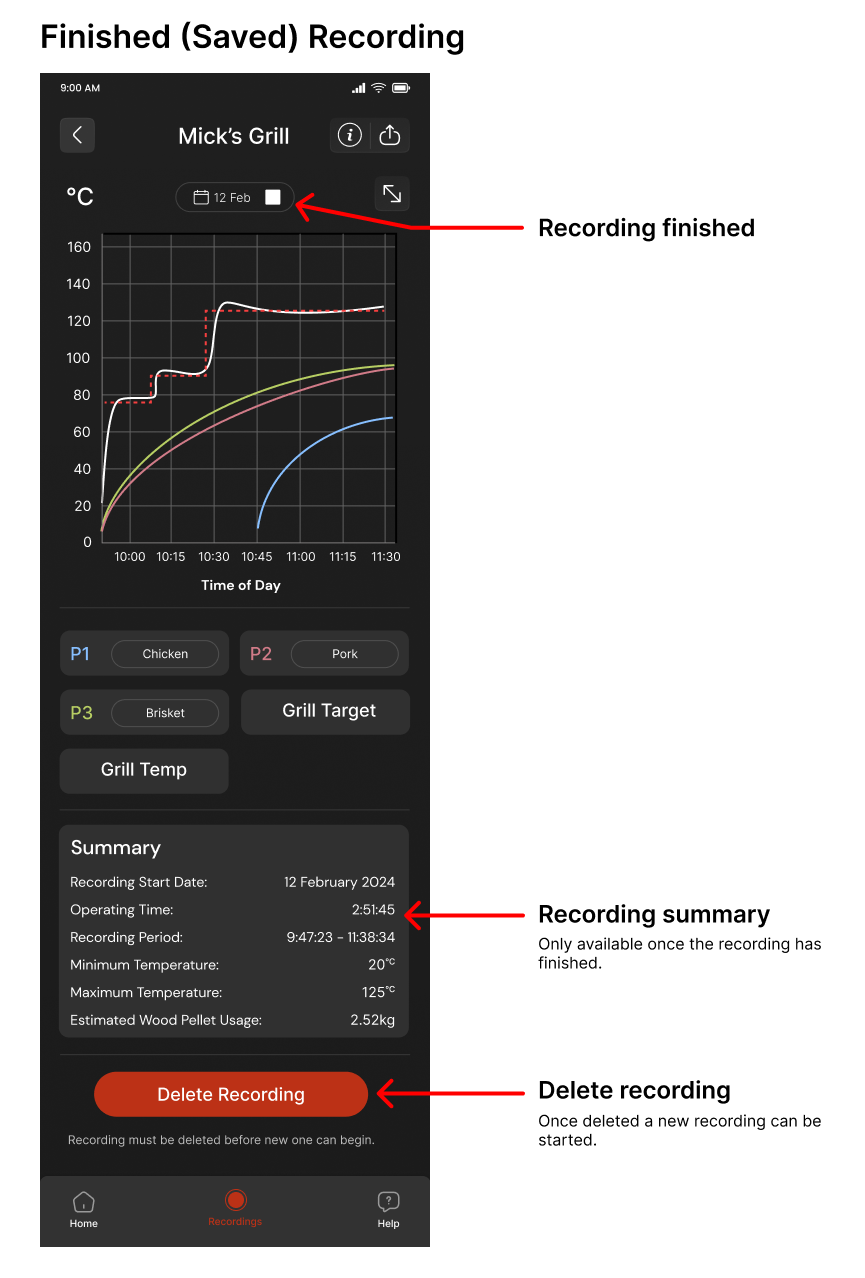
Finishing a recording
- Recording will automatically stop:
- After 18 hours
- After the grill is shut down
- If the controller goes offline (no data to record)
- It is best practice to manually end the recording by scrolling to the bottom of the recording screen and tapping on Finish Recording, and confirm.
- Finished recording will be viewable from the Recordings page.
- Up to 5 cooks can be saved, thereafter one or more cooks will need to be deleted before a new recording can begin.
Export data to csv file
All the data recorded can be exported to a .csv file which is extremely handy if you want to save the cook information long term. CSV files can be opened by all spreadsheeting software programs such as Excel, Google Sheets, Mac OS Numbers etc.
- Tap on the export icon at the top right of the recording screen to save a .csv file.
- The file can be saved during an ongoing recording or from an already finished recording.
- Values are recorded in 1 min increments with date and time.
iOS (export file)
- The csv file will be saved to your selected location in the Files app, as shown below.
Android (export file)
- File will show download progress and then automatically save to the following location on your Android device. Unfortunately there isn’t yet an option to select a different save location.
- File location: My Files/internal storage/Samsung/data/com.taylor.zgrills/
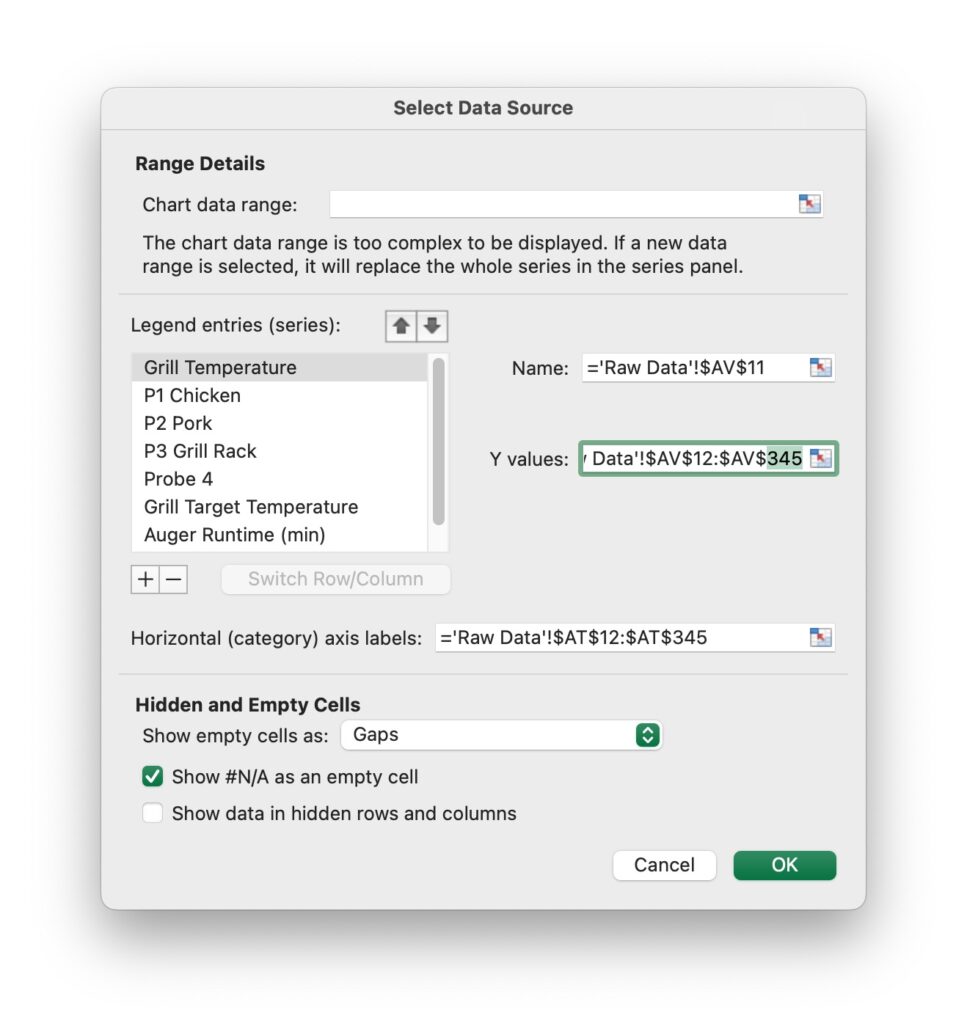
Excel Template
We have developed a handy Excel template that you can copy and past your cook data into. With some simple adjustments a detailed graph and single page cook summary can be easy created for printing or saving as a pdf. See example below.

Click here to download the Excel template.
The tabs in the Excel file are locked to avoid accidentally breaking the formula, but if you are experienced with Excel and want to modify the file, unlock with the password Smoking@ZG.
Please note that basic knowledge of how to use Excel graphs is required to configure the graph to match the data pasted in. The “Y values” data in the Select Data Source settings must be adjusted for each series to the correct last row of the data set, as shown in the screenshot below.
Grill Settings
Click on the gear icon in Grill Control page to open the Grill Settings page. See below for explanation of each setting.
Certain sections of the settings will be shown/hidden based on the operating status of the grill and if certain accessories like the pellet level gauge are connected.

Reset Actions
- Reset (cancel) all countdown and food probe temperature based trigger-actions that have been set.
- This is useful to clear out all settings at once.
- Individual triggers and actions can be changed or cancelled by clicking on the Countdown icon or Temperature Sensor Tile on the grill management page.
Grill Operating Time
- Time (hh:mm) the grill has been operating since Fire Lit was achieved.
Temp & Time Units
- TEMPERATURE: Set temperature display to Celsius or Fahrenheit. This will apply to both the App screens and grill controller display.
- TIME: Set 12 hour (am/pm) or 24 hour display.
Operating Mode
- Default mode is Smoker Grill. Set to Cold Smoke Fan to operate only the fan (no fire).
- Once the fan is turned off, the setting will return back to Smoker Grill.
Pellet Usage
- Pellet Usage This Cook is estimated based on the total operating time of the auger motor since Fire Up. The accuracy has been measured to be around +/- 5%, but may vary more based on pellet brand and length so use only as a guide.
- When pellet sensor is connected (available soon), the battery sensor battery level, remaining pellet level and low pellet alarm setting will also be displayed in this section.
Controller Settings
- FIRE LIT SOUND: Sound 3 short beeps once the fire is lit. This is handy so you don’t forget the grill is firing up.
- ERROR SOUND: Sound 3 long beeps if an error occurs. This can alert you to an issue requiring investigation.
- ACTION NOTIFICATION SOUND: 2 short beeps if an action notification is triggered.
- TEMP SENSOR: Select the temperature sensor for grill operation. This is useful if Error 1 (temp sensor failure) occurs.
Grill Component Testing
- Operate the Auger, Fan or Ignition Rod for 60 seconds.
- This is useful when testing components during diagnosis or after repairs.
- Can only be used when the grill is not operating (fire not lit).
App Settings
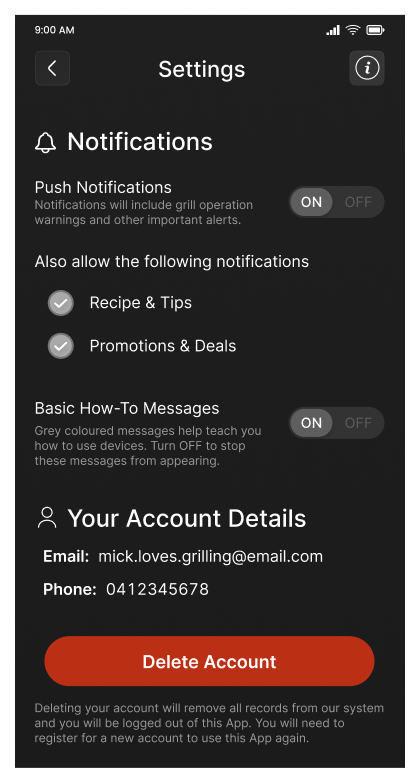
Push Notifications
Push notifications will display on your device accompanied by sounds, if applicable.
Un-select if you would not like to receive notifications for:
- Recipes & Tips (from time to time)
- Promotions & Deals (from time to time)
Basic How-to Messages
Show or hide the basic messages that pop-up to help guide the basic operation of the grill for beginners such as Fire Lit, Shutting Down etc.
Your Account Details
View the email address and phone number currently logged into the App.
Click on the Delete Account button to remove account from our system. You will need to Sign Up for a new account to use the App in the future.
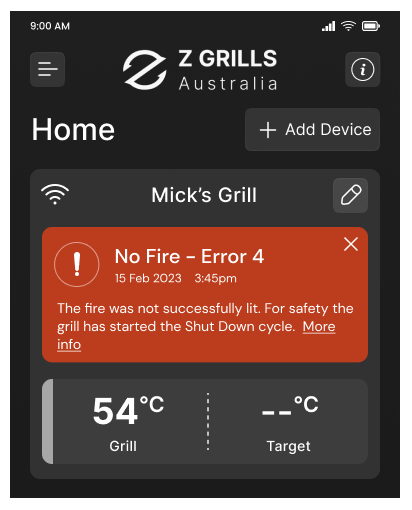
Errors
If an error occurs during the operation of the grill, the App will display a red information tile, as shown below. For more information on each error type and how to troubleshoot the issue please click here.
Grill Connection Issues
If the connection between the controller and your home WIFI is lost, indicated by the WIFI icon on the controller flashing, try these steps.
- Turn off the power supply to the grill, wait 5 seconds and turn back on. Press the controller knob once to wake the screen. If the WIFI does not connect automatically proceed to the next step.
- Disconnect the grill from your App (see how to here) and reconnect.
- Review the steps for connecting to your Wifi router here.
- Troubleshoot your network settings and the 2.4GHz channel. Click here to learn more.
- If you still can’t connect please contact our support team with the following information:
- Your grill name (if renamed) or serial number. Eg. ZGAUST10000000
- The email used to register your Z Grills Aus account.
App Crashing
If you are experiencing crashing or freezing of the app, please try the methods outlined below and if still having issue please contact our support team.
Android phone in particular are more likely to have issues due to so many device models the app needs to support.
iOS (Apple)
- Quit the app and open again.
- Log out of our Z Grills Aus account and log back in.
- Remove the device and then Add Device again.
Android
- Quit the app and open again.
- Log out of our Z Grills Aus account and log back in.
- Remove the device and then Add Device again.
- Clear the cache by going to Settings > Apps > (app name) > Storage and cache, and tap Clear cache. If that doesn’t work, you can also tap Clear storage.