This article covers how to free up a stuck or jammed auger shaft in a Z Grills pellet smoker.
For Models: 450A, 7002B, 700E, 700E-XL
Time: 30-45min
Difficulty: Medium
Tools Required:
- Pliers
- Phillips head screwdriver
- Scissors or knife
- 7/64″ Allen key (if removing the auger motor is required)
What is the Auger Shaft?
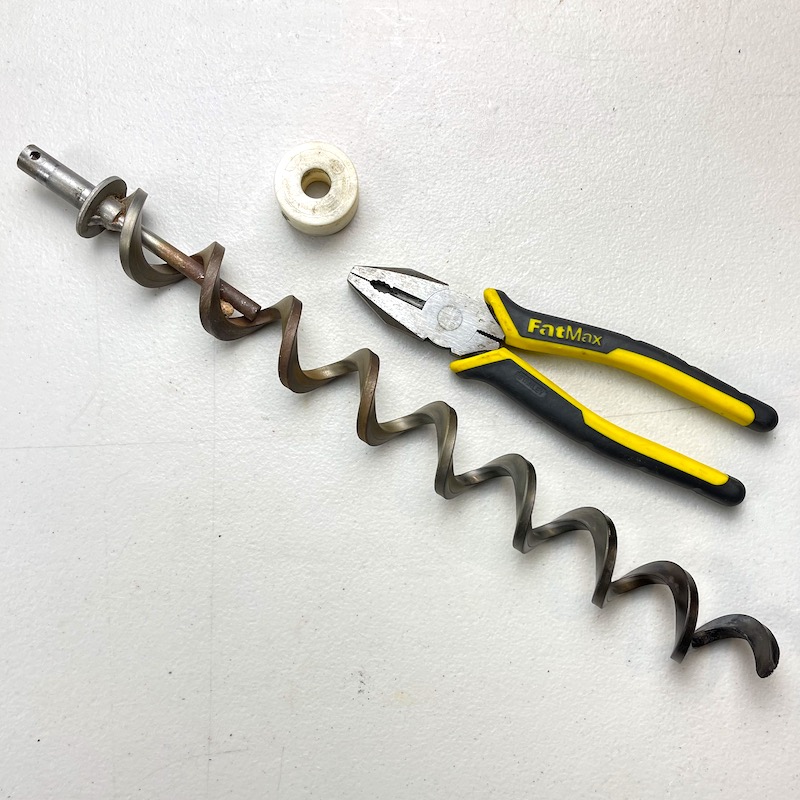
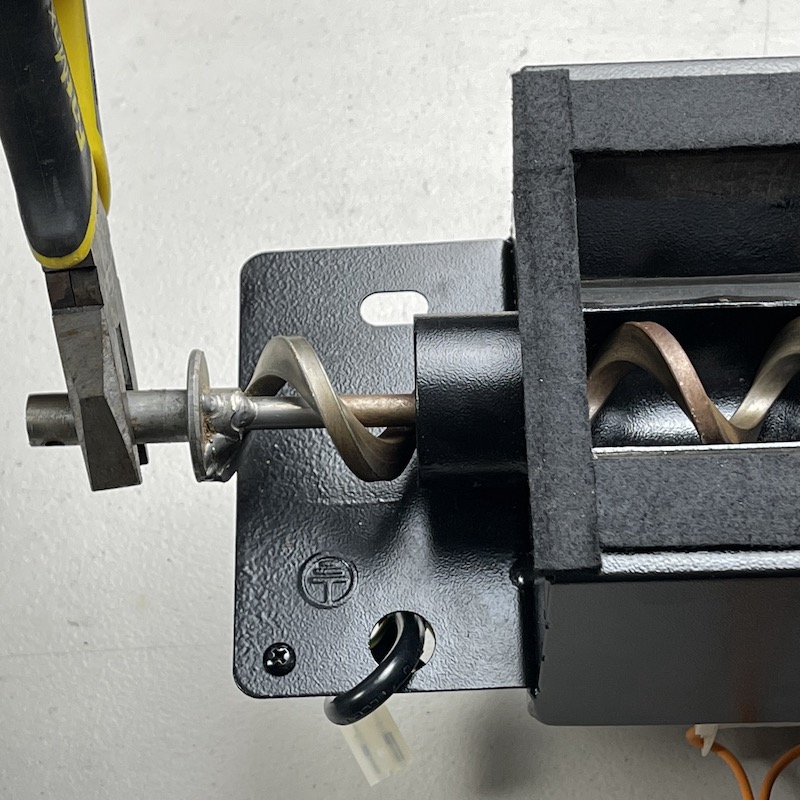
The auger shaft is a long spiral metal shaft that acts as a worm drive to slowly push wood pellets from the hopper through a feed tube into the fire-pot.
In the animated gif above you can see the blades of the auger shaft pushing the wood pellets through the feed tube. The auger motor attached to the end of the auger shaft rotates it very slowly, only 1.6 to 2 RPM (revolutions per minute) depending on the Z Grills model.
Is the Auger Motor working?
If the auger is not rotating it may be due to the auger shaft being jammed, or a failed (burnt-out) auger motor.
If the auger shaft is moving freely (see how to check that further below) but not rotating, then it is possible the auger motor is the issue. A failed auger motor will often will give off a “burnt plastic” smell and also show brown discolouration around the plastic fins and fabric covering over the windings of the motor.
Click here for instructions on how to replace a failed auger motor.
Is the Auger Shaft Stuck?
The auger shaft (and motor attached to the end) should be quite loose, able to move in/out and rotate slightly as shown above.
Try to wobble the end of the auger motor in the fire-pot, or down in the bottom of the hopper to confirm that it is able to move freely. If there is little or no movement then the auger shaft may be stuck in place, which can happen for two main reasons:
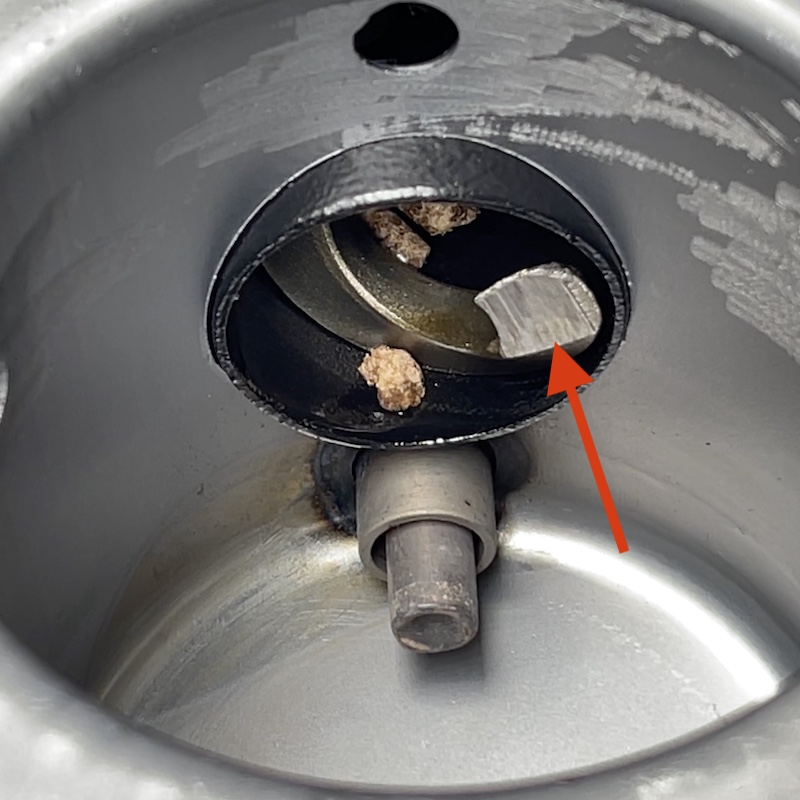
Jammed Pellets
One or more wood pellet can get jammed between the auger shaft and the feed tube wall.
This is rare, but will more commonly happen with very long wood pellets that are more than about 20mm or 3/4″ long or thicker than the standard 6mm diameter.
If the bottom of the auger tube appears clean after vacuuming out, but the auger still won’t move it is likely a pellet in the tube that is stopping the movement.
The jammed pellet can often be cleared by the following methods:
Method 1. Power Cycling the Auger Motor
- Turning the controller knob repeatedly between Shut Down Cycle (2 seconds) and Smoke (2 seconds).
- Each time the knob is turned to Smoke the auger motor will turn for about 3 seconds.
- Look down at the auger in the bottom of the hopper to see if it is moving at all.
- If after 4 to 5 tries the auger is still not moving, try the next method.
Method 2. Gently Tapping the Auger Shaft
- Use a hammer and piece of wood to gently tap the end of the auger in the fire-pot, and the blades of the auger shaft in the bottom of the hopper.
- This can help to free up the auger shaft.
- Try wobbling the shaft, and if it appears to have freed up, try power cycling the auger motor again as described above in Method 1.
If neither of these methods work you will need to open up the grill and remove the auger shaft and clean it. Scroll down for step by step instructions.
Moist Pellets = Wood Concrete
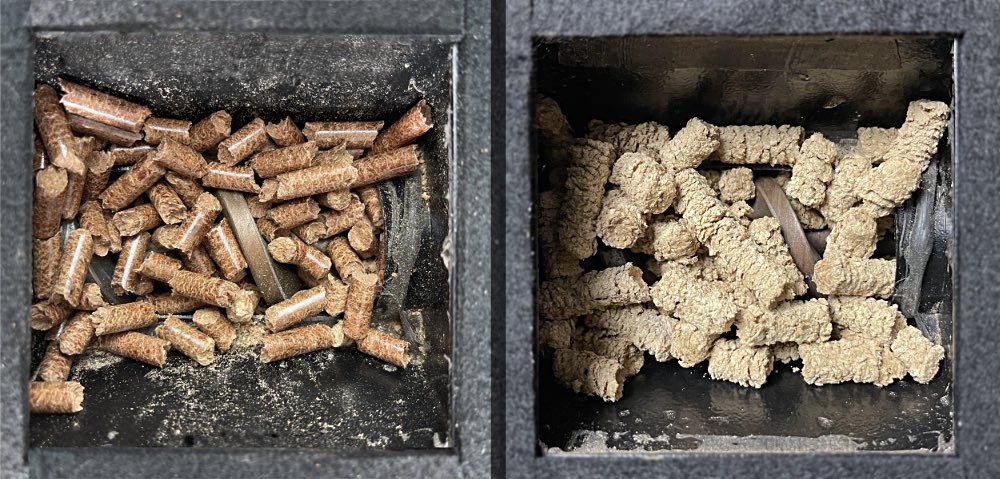
If any moisture gets down into the hopper or feed tube, the wood pellets, and in particular wood dust, can gradually set like wood concrete. The image above shows dry pellets on the left and wet and swollen pellets on the right. If the pellets are still wet they are soft and can be pushed out by the auger rotating, but once dry they can bind up the auger shaft and need to be broken up and cleaned out.
Moist pellets are more common in very humid climates when the grill has been left for a long time between uses. Lots of wood dust accumulated in the bottom of the hopper also increases the likelihood of this occurring. Pouring the wood dust in the bottom of the bag of pellets into your hopper should be avoided. Also regularly run the pellets totally out and give a good vacuum.
Clearing concrete pellets from the auger shaft normally requires taking the whole auger shaft out and giving it a good clean. You can try breaking them up, but you are only able ot access the small portion at the entrance of the feed tube and it is likely the whole tube is full of concrete wood pellets. So follow the instructions below to get access to the auger shaft and clean it out.
Freeing a Stuck Auger Shaft
To process to get access to the auger shaft is similar to that of replacing a fan or the auger motor. The hopper cover needs to be take off, and ideally the auger motor removed as well. Follow these instructions step by step.
The instructions below show images of a 700 series pellet smoker grill. The process is very similar for a Z Grills 450A pellet smoker, but it may be useful to review this guide which shows how to remove the cover 450A and get access to the auger motor and shaft.
Step 1. Unplug the Power
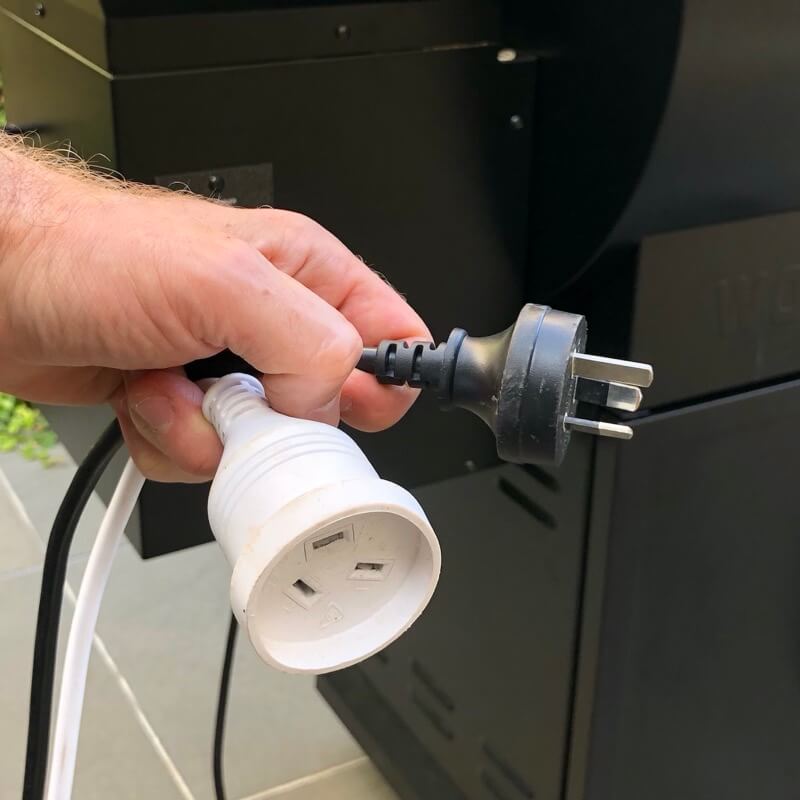
Before doing any maintenance or cleaning, always unplug the power to the grill.
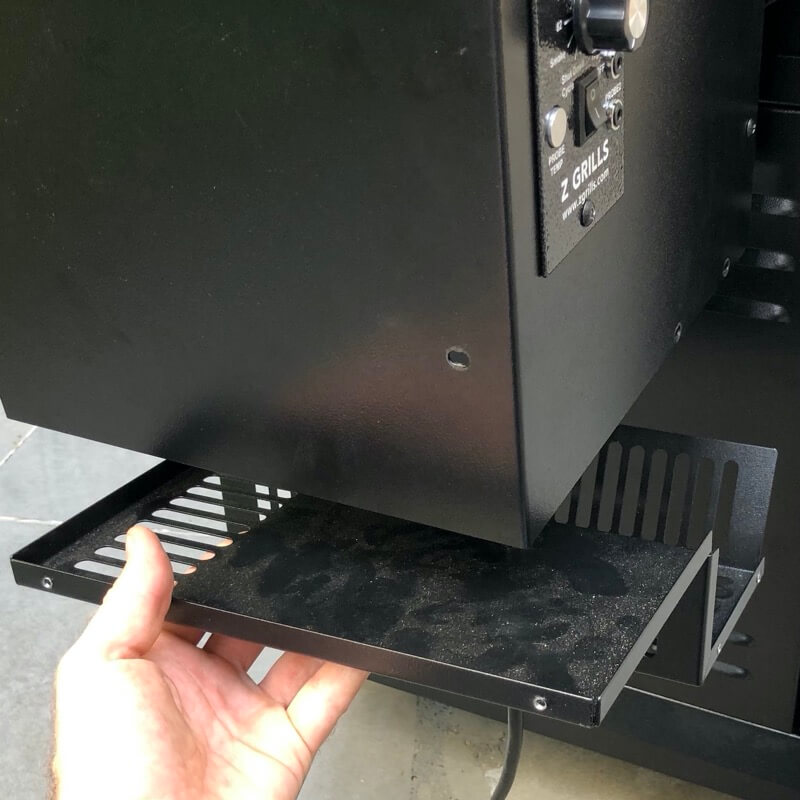
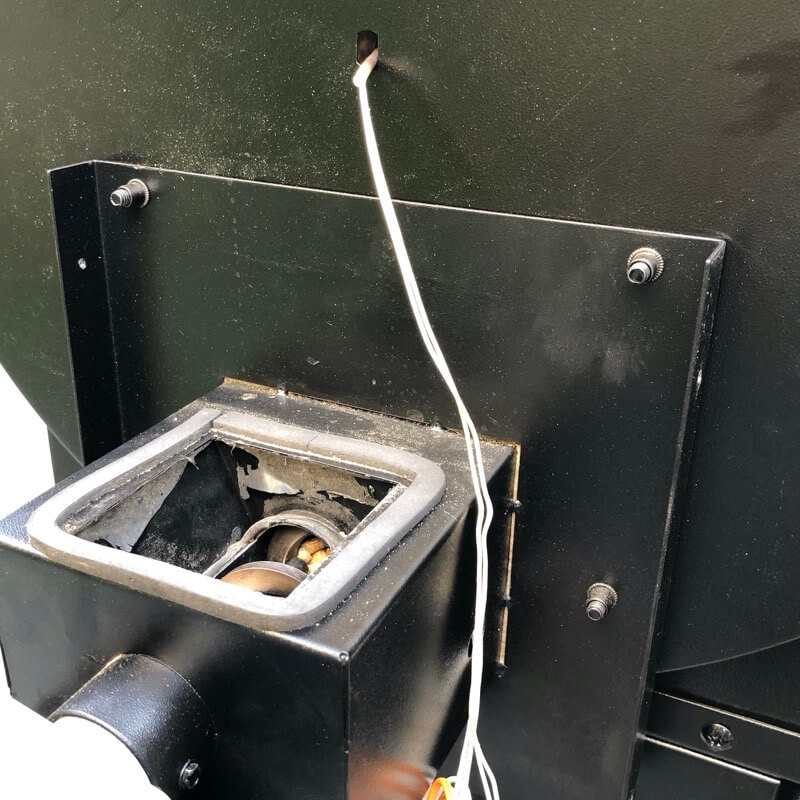
Step 2. Empty the hopper
Scoop as many pellets out as you can using a plastic scoop or cup.
Vacuum out the remaining pellets so you can see the Auger.

To make cleaning out all the wood pellets easier, you may want to temporarily remove the guard plate. 4 screws are located just under the front and rear lips of the guard. Take care not to drop the screws down into the auger entry hole.
Step 3. Remove base cover
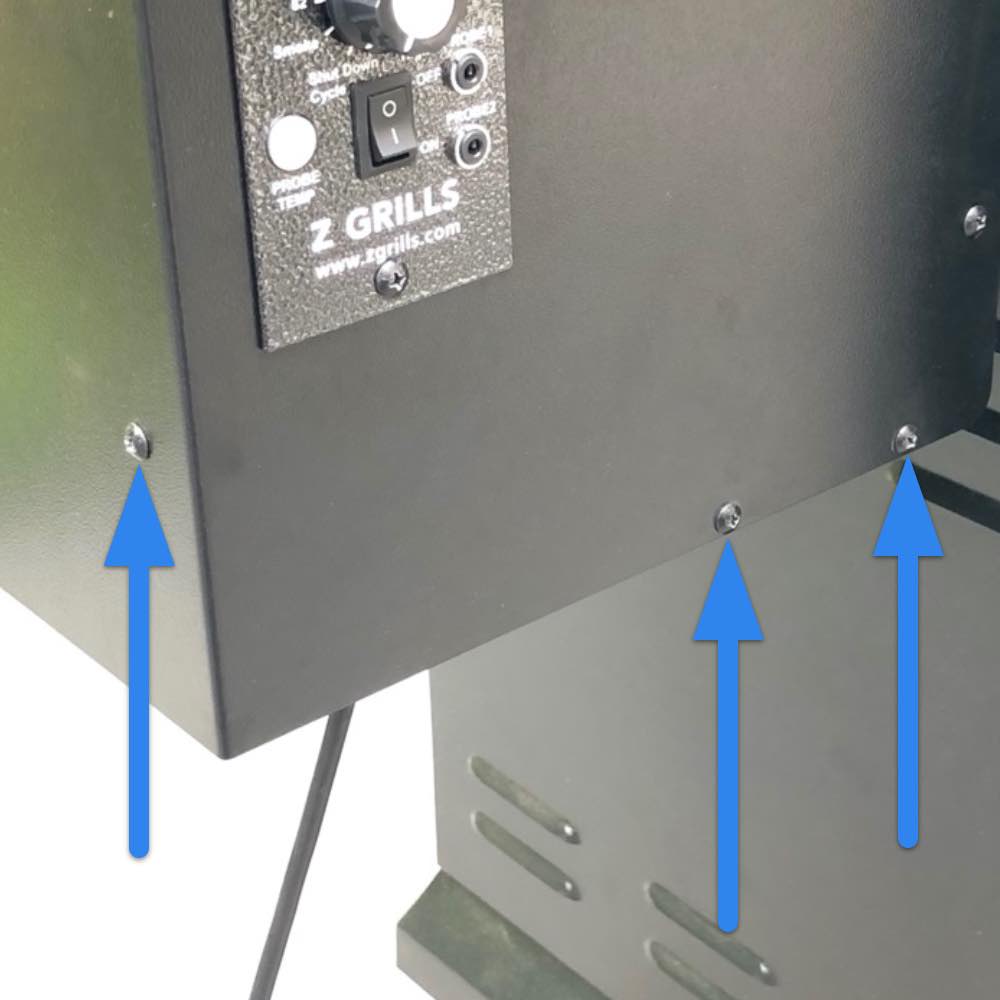
Remove the 6 screws (3 front, 3 rear) to release the base cover.
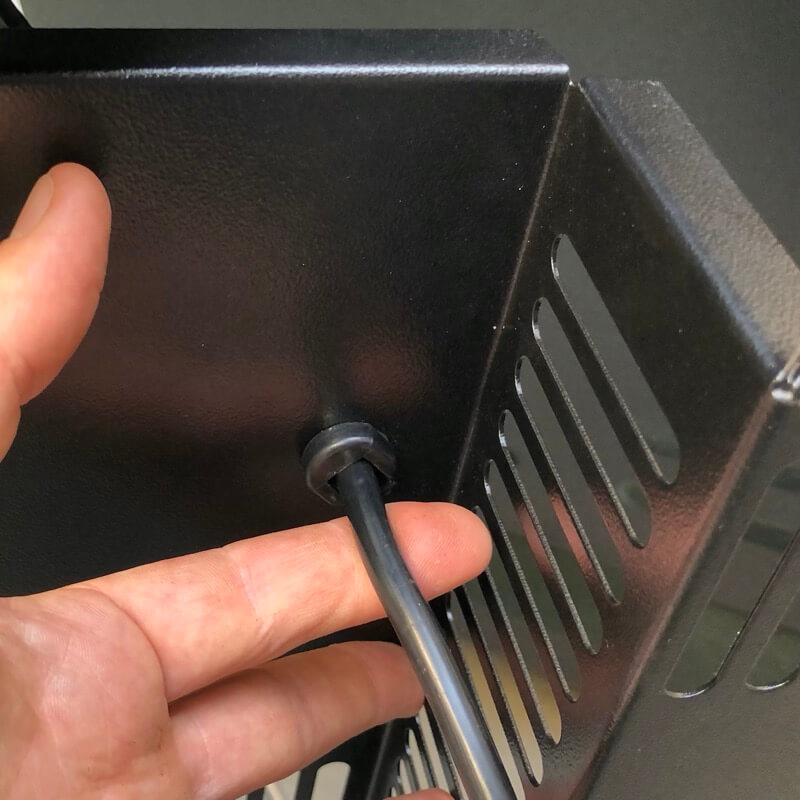
The base cover should drop down once the screws are removed but will be held in place by the power cable.
If possible, gently push the cable up through the cable tension ring to drop the cover down a bit lower. This will make getting the hopper box off a little easier.
Step 4. Release the Controller
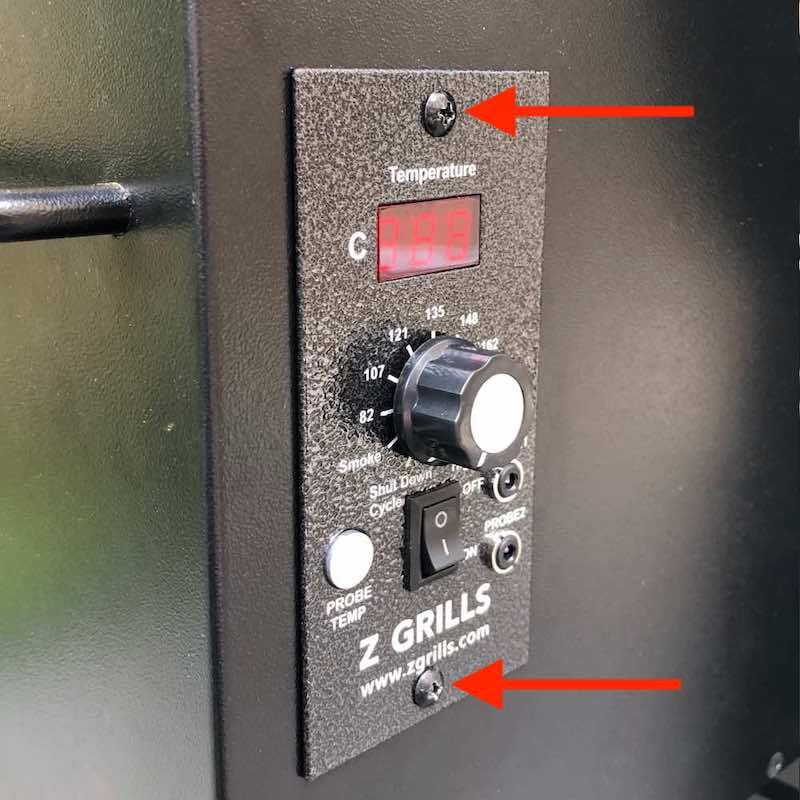
Remove the two screws from the controller.
Gentle pull the controller forward and then tilt sideways to push back in through the hole in the hopper box.

Once pushed through the hole, the controller may dangle down below the hopper box as shown.
Step 5. Remove hopper box
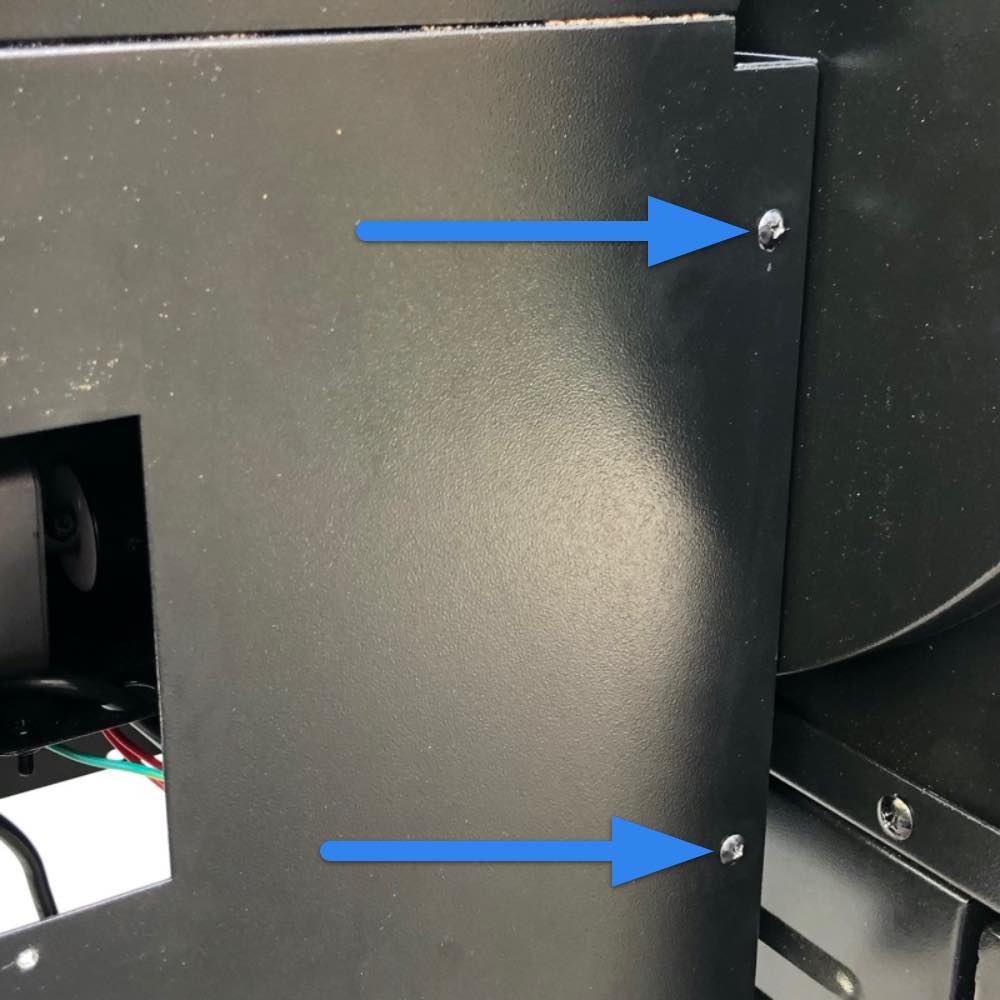
Remove the two front and two rear screws.
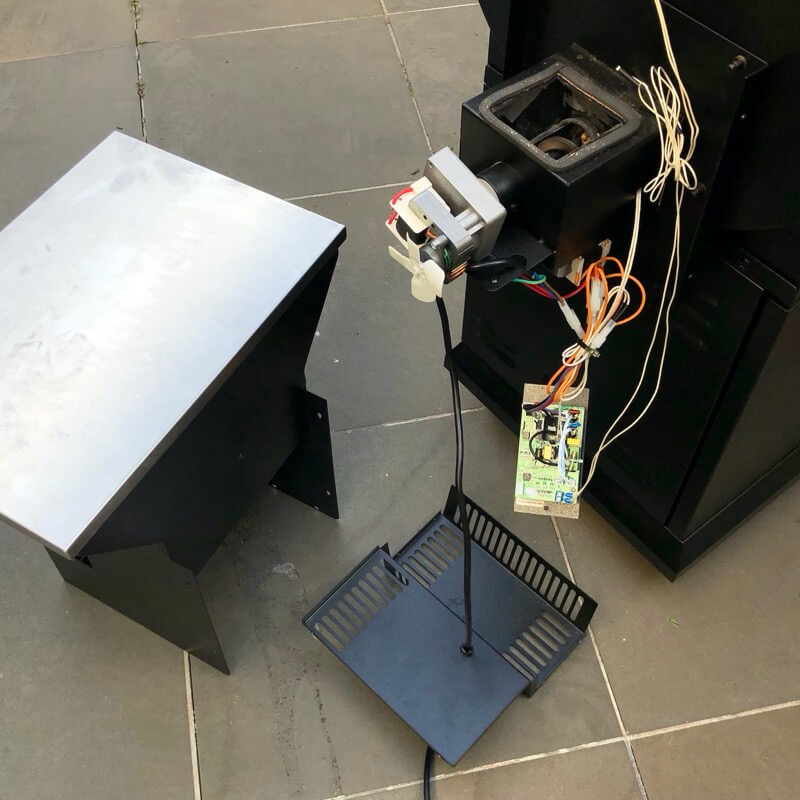
Carefully lift the hopper box up and off and place to the side out of the way.
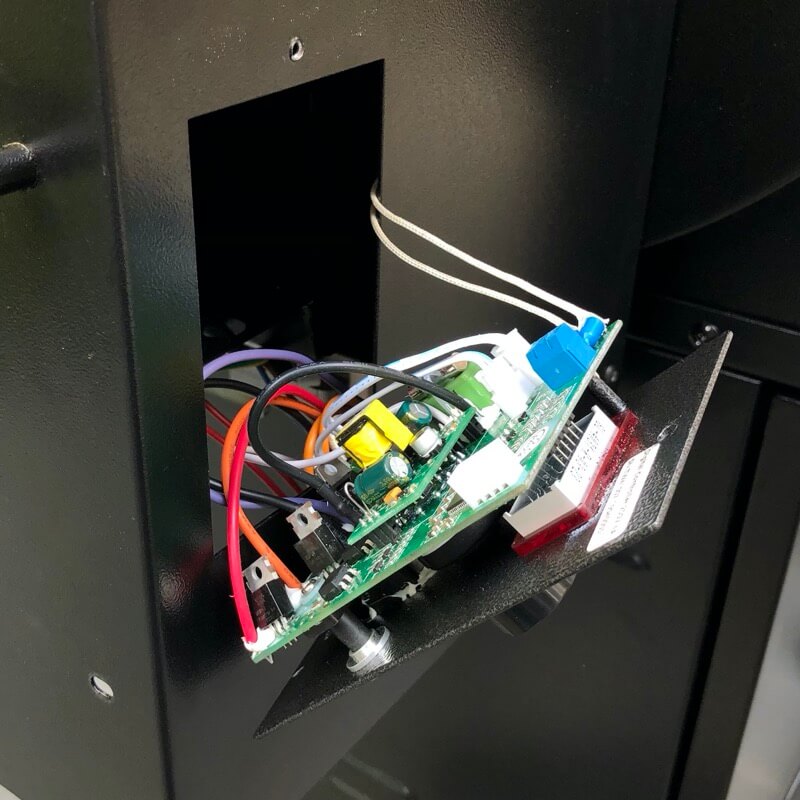
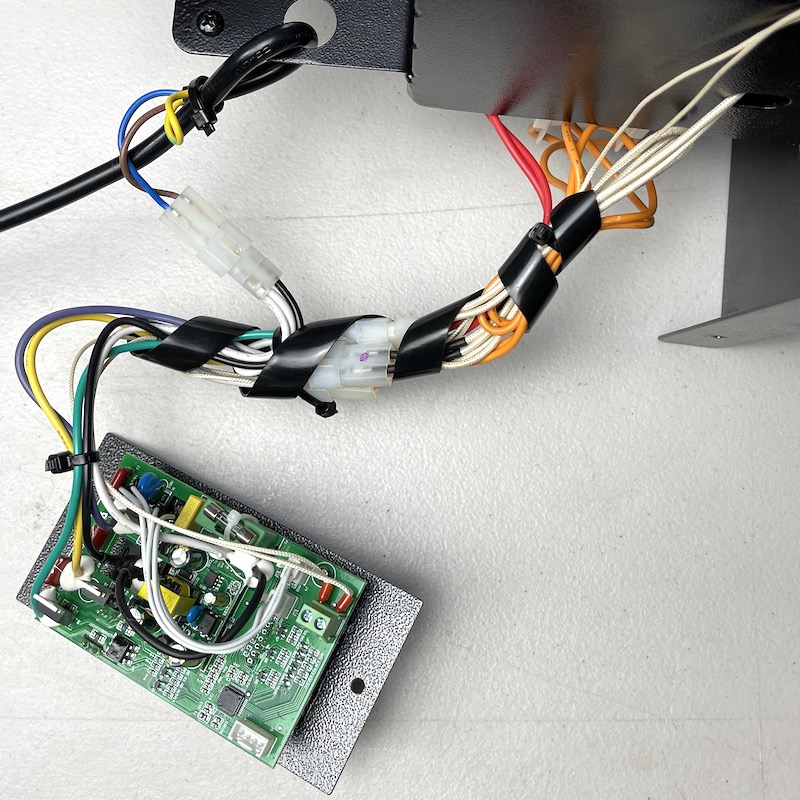
You now have clear access to the controller and all the electrical components.
Step 6. Unplug the auger motor cable
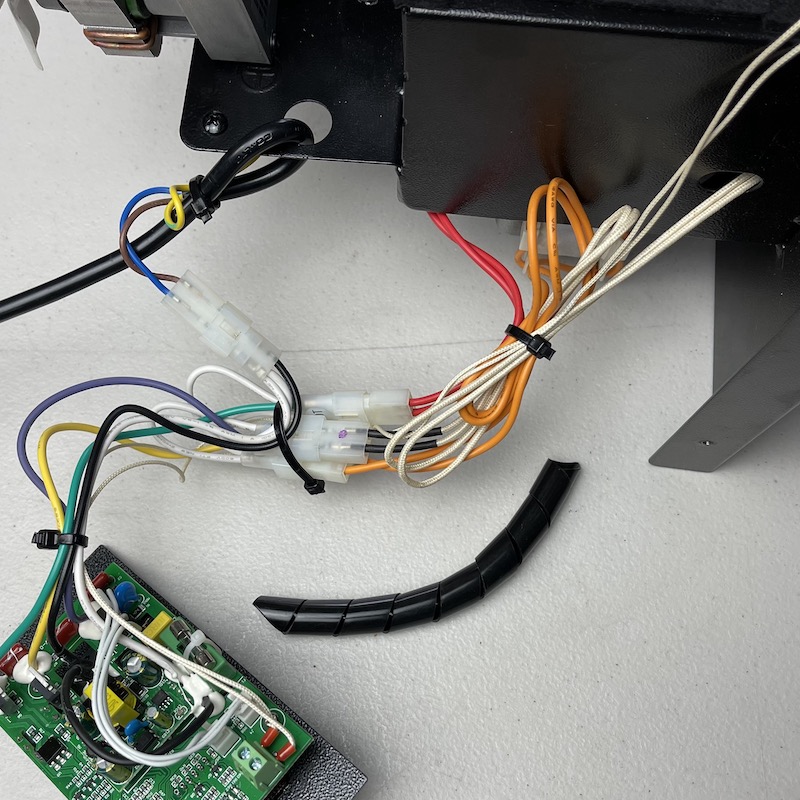
Cut off all the cable ties to free up the cables.
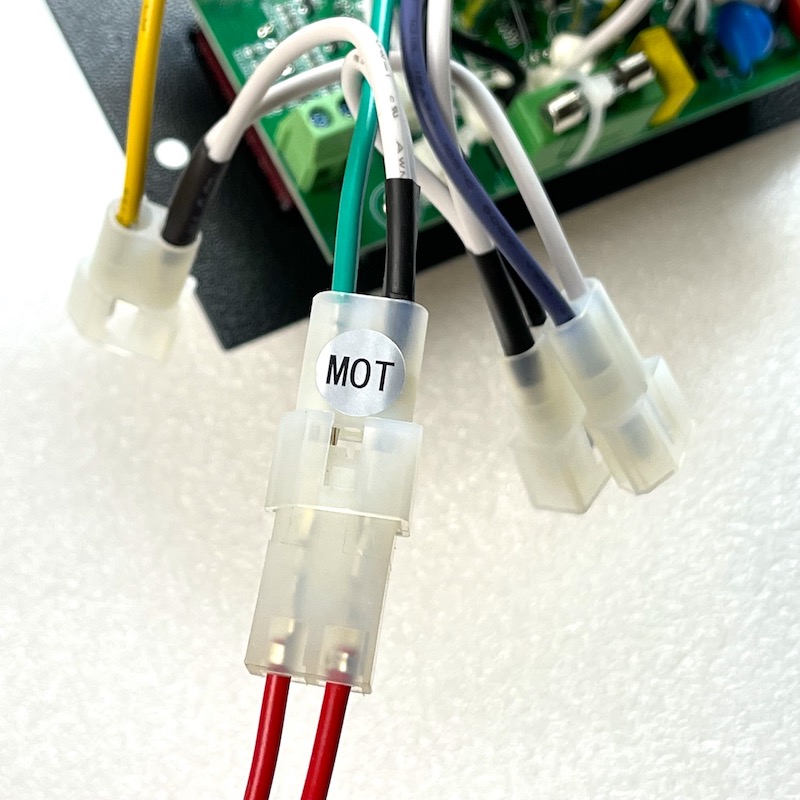
Identify the cable labelled MOT on it which powers the auger motor.
Carefully unplug by gripping the plastic connectors, not the wires.
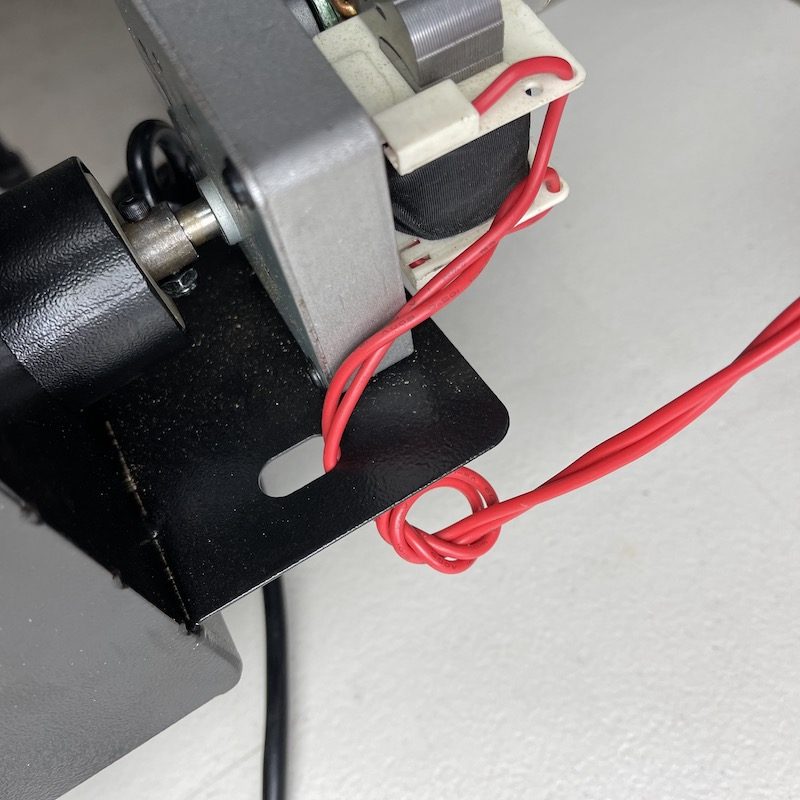
Undo the knot in the auger motor power cable and pull the cable and plug through the hole in the metal plate.
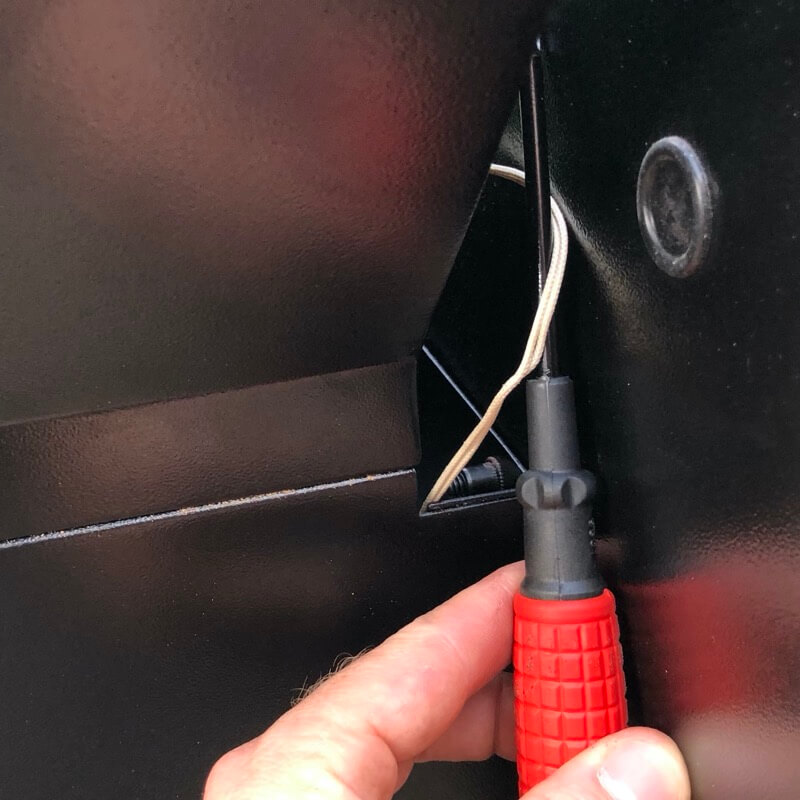
Step 7. Release a stuck auger shaft
Using a screwdriver or similar instrument break up any accessible wood pellets (or wood dust) in the auger tube and vacuum them out.
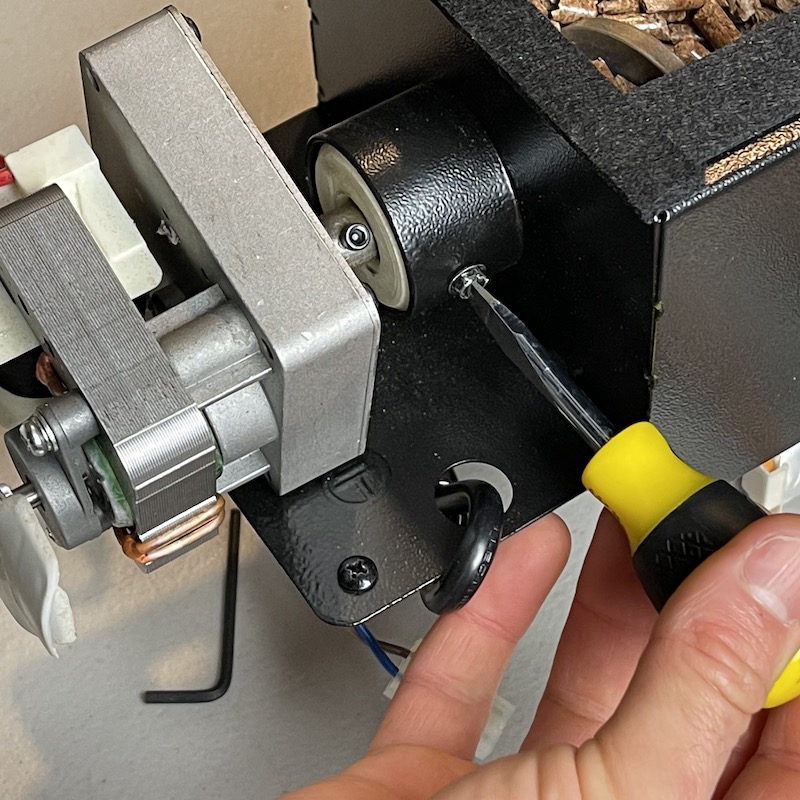
Remove the screw in the side of the tube that secures the white plastic spacer. With this remove the auger can slide right out (once freed up).
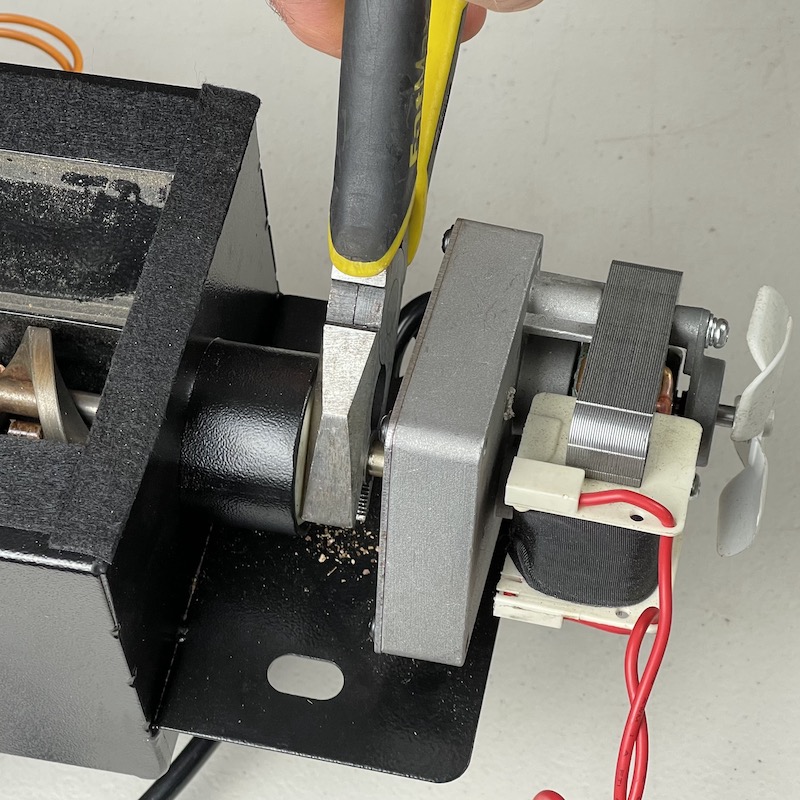
At this point you can try tapping the end of the auger in the fire-pot with a hammer and piece of wood (so as not to damage the auger shaft).
This may break up the wood concrete enough to pull the whole auger motor and shaft out.
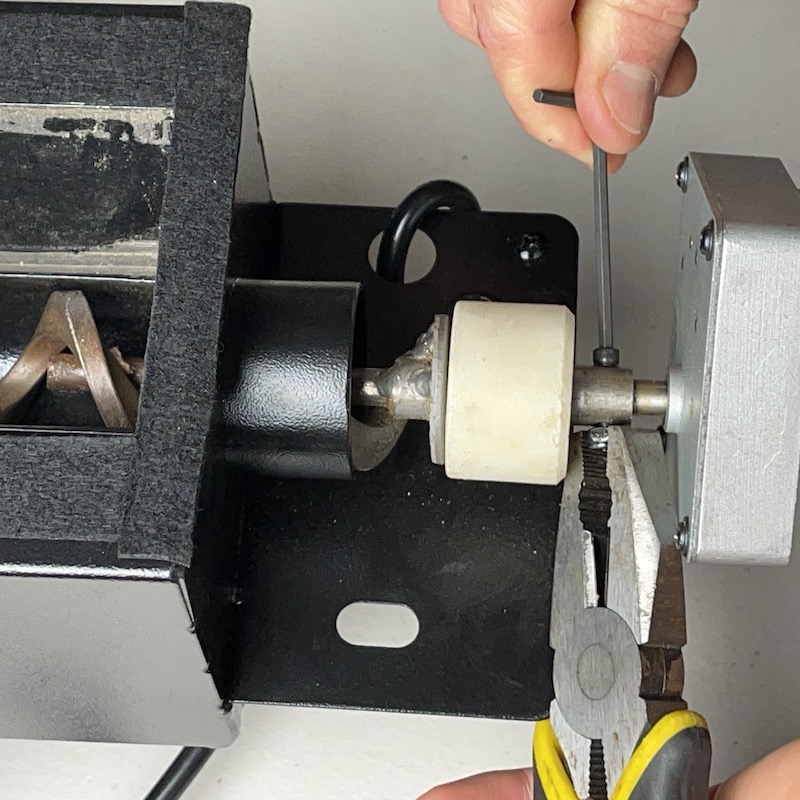
If the auger shaft is not easily pulled out the auger motor should ideally be removed. Use a 7/64″ size Allen key (see here). If the Allen key head of the bolt cannot be accessed (shaft can’t be rotated), then the auger motor will need to stay attached for the moment.
If the auger motor is still attached, carefully grip the shaft without damaging the black bolt. Gently rotate the shaft and tap the end of the auger shaft. A combination of these actions should free the shaft up so it can be removed.
If the auger motor was able to be removed, the process is easier as you can tap the end of the auger shaft (where the auger motor was attached) as well as rotating with pliers or vice grips, to help free it up.
Continue to clean out any wood dust or pellets that can be accessed.
Eventually the combination of rotating the shaft and tapping gently should free the shaft up and allow it to be pulled out.
Clean off any wood attached to the auger shaft. A wire brush can work well to achieve this. If wet pellets were the reason for the jammed auger shaft, the surface of the auger metal may have some surface rust, which is not a concern. Just give it a good clean with a wire brush.
If there is wood dust stuck to the inside of the feed tube, run a rag through the tube and scrap off any chunks so it is clean and smooth.
Once clean, reverse the above process to put the auger shaft back in place and attach the auger motor (if removed).
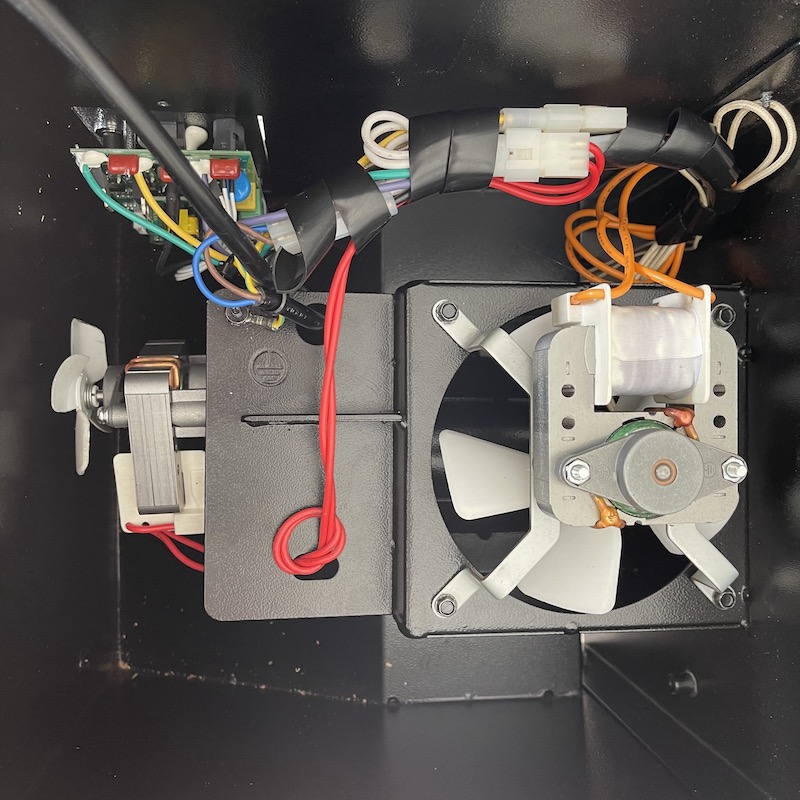
Step 8. Reassemble
Make sure the auger motor is put back in the correct position as shown above with the cable to the side with the elongated hole.
Pass the cable through the elongated hole and make a loose knot, providing enough slack for the auger motor to freely rotate left and right.
Connect the auger motor plug back to the controller plug labelled MOT.
Bundle all the cables together neatly using the thick white cable exiting the hopper box (power the ignition rod) as an anchor so that the cables are across to the right of the auger box.
Use several cable ties to secure the cables neatly.
Plastic spiral wrap is great to make the cables even neater. It is important to ensure that none of the cables are close to either the auger motor fan, or main fan.
Ensure the temperature sensor cable is handing down on the INSIDE of the mounting plate as shown above.
Step 9. Put Controller Back
Pass the controller back up through the hole in the hopper box.
Do the two controller front plates screws up.
Gently pull up all the slack in the temperature sensor cable so no loose cable is in the hopper box.
Bundle the cables up and secure using twist tie or cable tie, then tuck down between the hopper and grill.
Using a mirror or the selfie camera on your photo check underneath to ensure none of the cables are close to the main fan or the auger motor fan. It should look nice and neat like the image above.
Step 10. Test operation
Before replacing the bottom cover first test the operation of the grill.
Plug into power, switch on and turn the controller knob to Smoke setting.
- FAN: Listen for the fan sound and air blowing into the fire-pot
- AUGER MOTOR: Look to see if the auger it slowly rotating and intermittently. You may need to wait 30-40 seconds to see it rotate.
- IGNITION ROD: Check if the ignition rod is getting hot (in the fire-pot) by touching with long piece of rolled up kitchen paper. It should start to get hot enough to char/burn the paper after a few minutes.
If any of the components are not working, turn the grill OFF, disconnect from power and check the plug connections of the cables.
If a high speed buzzing sound is heard, one of the cables is contacting a fan. Check the view from underneath again to ensure all cables are neatly in place and not close to the auger fan or main fan.
Once confirm everything is working, turn the power OFF and disconnect from power.
Step 11. Replace bottom cover
Slide the cover back up into place by wiggling the cable through the cable tension ring.
Put all 6 screws back in place. Don’t over-tighten them.
If the auger feed tube has been totally emptied of wood pellets you will need to follow the initial startup procedure to prime the wood pellets. Click here for instructions. The initial burn-in does not need to be completed again.