If there is a problem with the operation of the MINI fan or auger, lifting the lid to inspect the components is the best first step.
Open Grill and Inspect
Remove Lid & Hopper
To make inspection easiest, it is best to remove the lid and hopper, both of which are very easy.
Pull the split pins, lift the lid to take the weight of the through-pins and pull them out.

Undo the two screws to remove the hopper.

Remove Body Screws
Remove the four screws in front/rear of the hopper. Note the far lefts screws are long threaded screws and the remaining two are short self-tapping screws. Separate the screws to avoid confusion when returning them into place.

Remove the long threaded screw in the fire-pot area. This screw can be tight, so use force when pushing to avoid stripping the head.

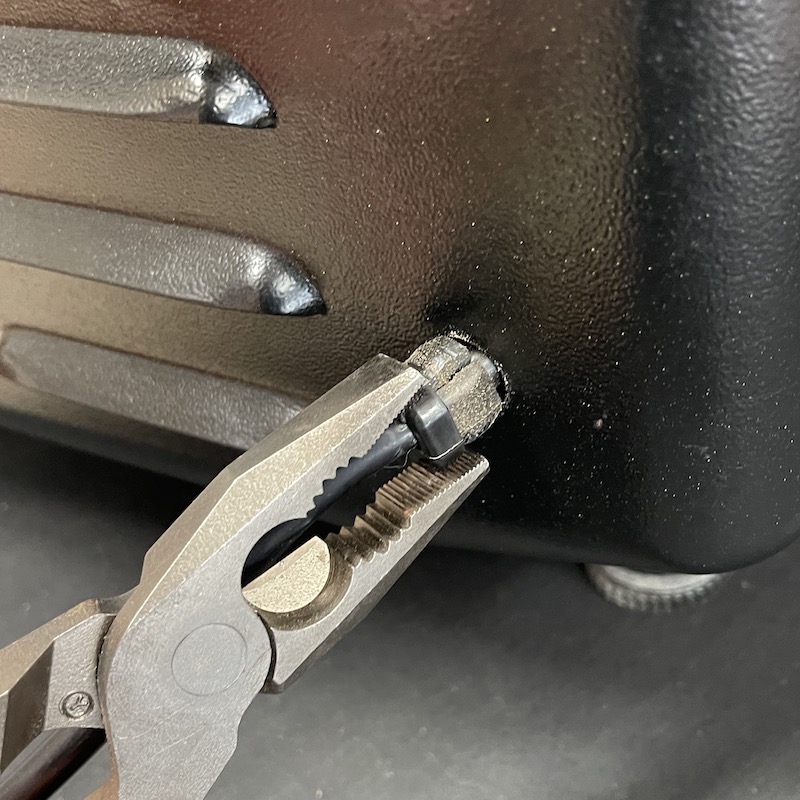
Remove Cable Gland
The cable gland on the back of the grill holds the power cable in place.
If there is enough slack on the cable to lift up the lid, then there is no need to remove this. If not enough slack inside the drum to lift the lid, or if the ignition rod needs to be replaced then the gland should temporarily removed.
To remove, squash the protruding part of the gland tightly with pliers, wiggle and pull out.
Lift Grill Up
The handle inside the fire-pot area can be used to lift the body up enough to rest the centre wall up on the sides of the drum. This gives clear access to all the main components.
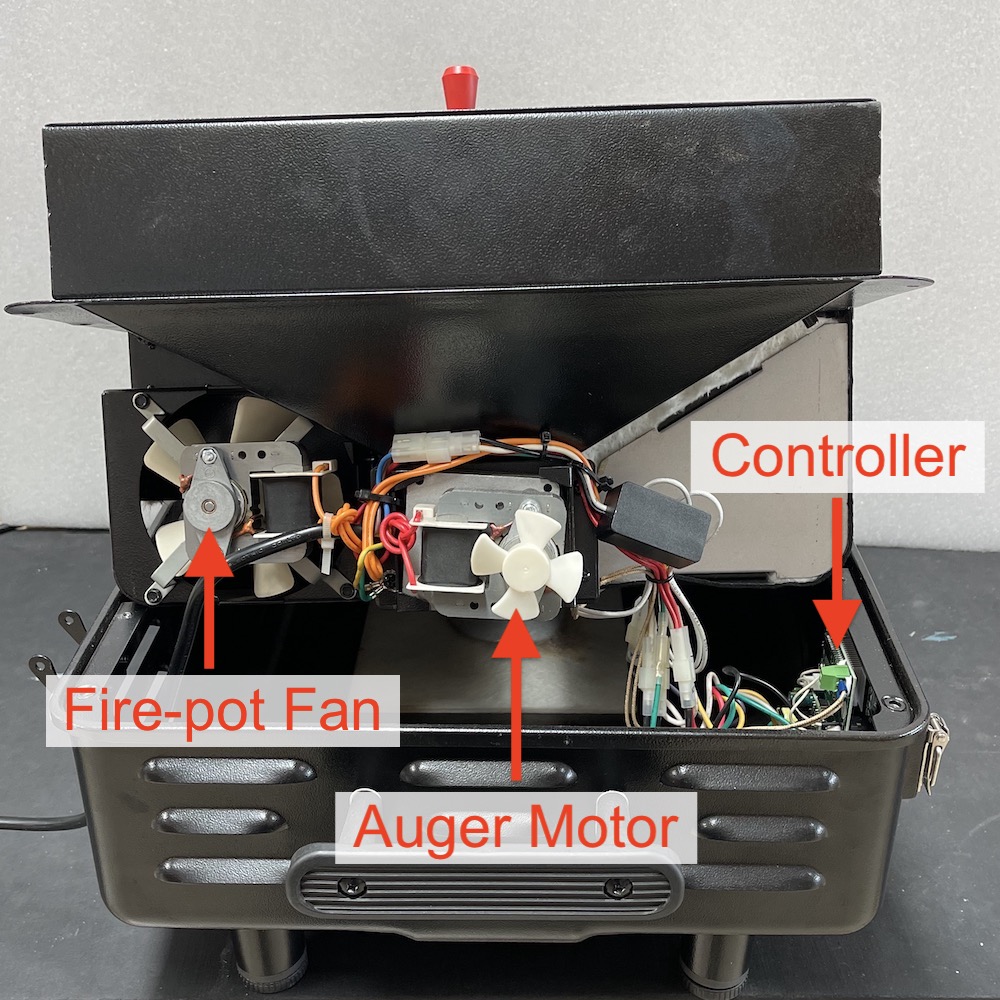
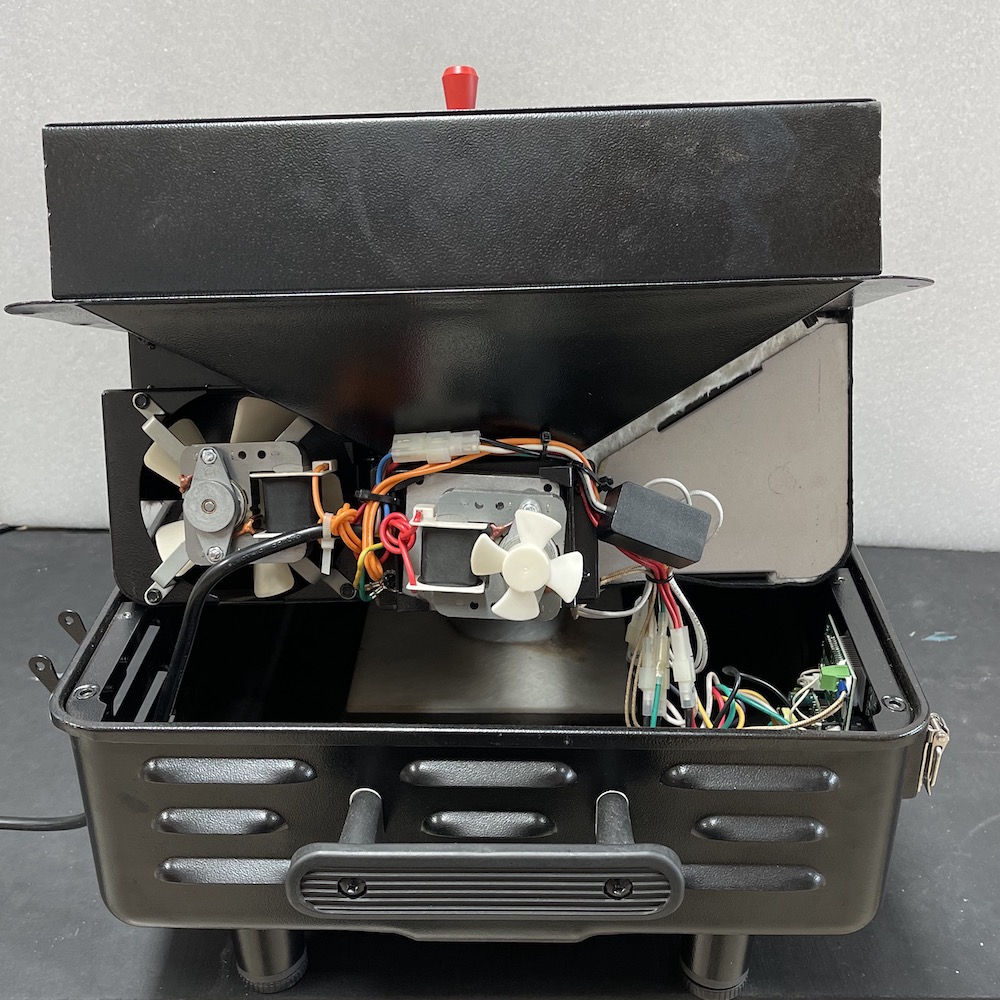
Check Components
Now the grill components all visible, an inspection can be completed to see if there are any issues.
With the grill elevated in this position plug the grill into power and turn the controller on.
The main fan should start and the auger motor (little fan) will turn for a few seconds. Have a look at the ignition rod (in the fire-pot) to see if that is getting red hot. If any of these three are not operating normally you may have found the problem.
Turn the controller knob to OFF and unplug from power (even if the fan is still running). Do not run the grill for more than 30 seconds in this open position.
Click here for instructions on how to access and replace the ignition rod.
Buzzing Noise
Continual buzzing noise
With the grill sitting in the base, the thick black power cable may be contacting the fire-pot fan. Try twisting the power cable to see if the noise changes or stops. To fix, remove the cable gland, pull out the slack in the power cable and replace the cable gland. Click here for instructions.
Intermitent buzzing noise
If the buzzing noise only occurs intermittently and changes pitch it is most likely the little cooling fan on the front of the auger motor contacting the outside casing of the grill or screw on the front of the auger assembly. Opening the grill in inspecting the position of the fan can confirm this.
If the spline (fine lines on the shaft) are visible, the fan may be too far out and contacting the inner wall of the grill casing. It can be gently tapped in further.
If too far in it may contact the screws on the front of the auger motor. Use a flat object to pry it back out slightly.

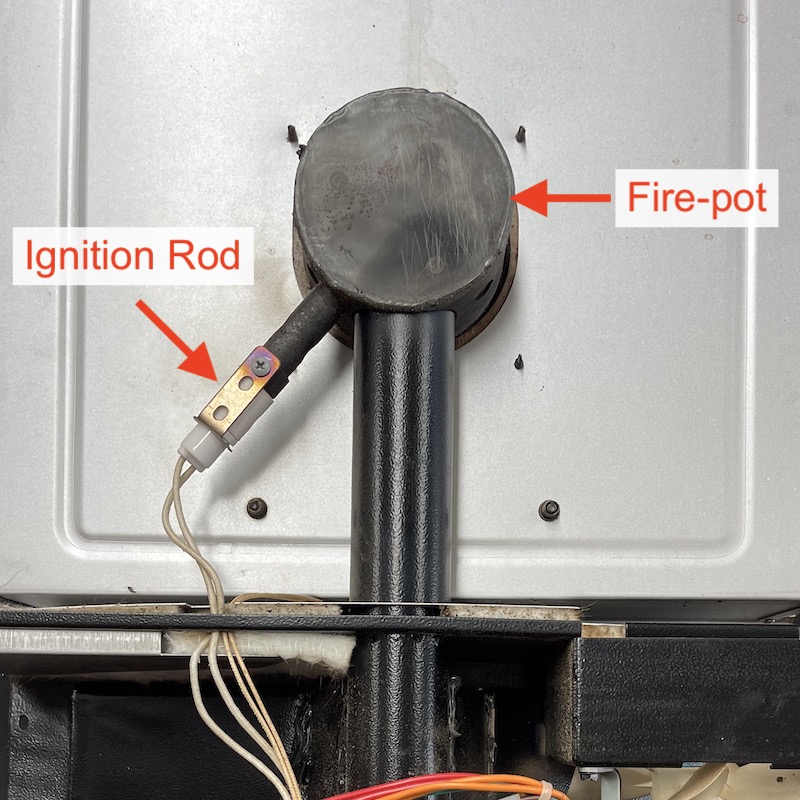
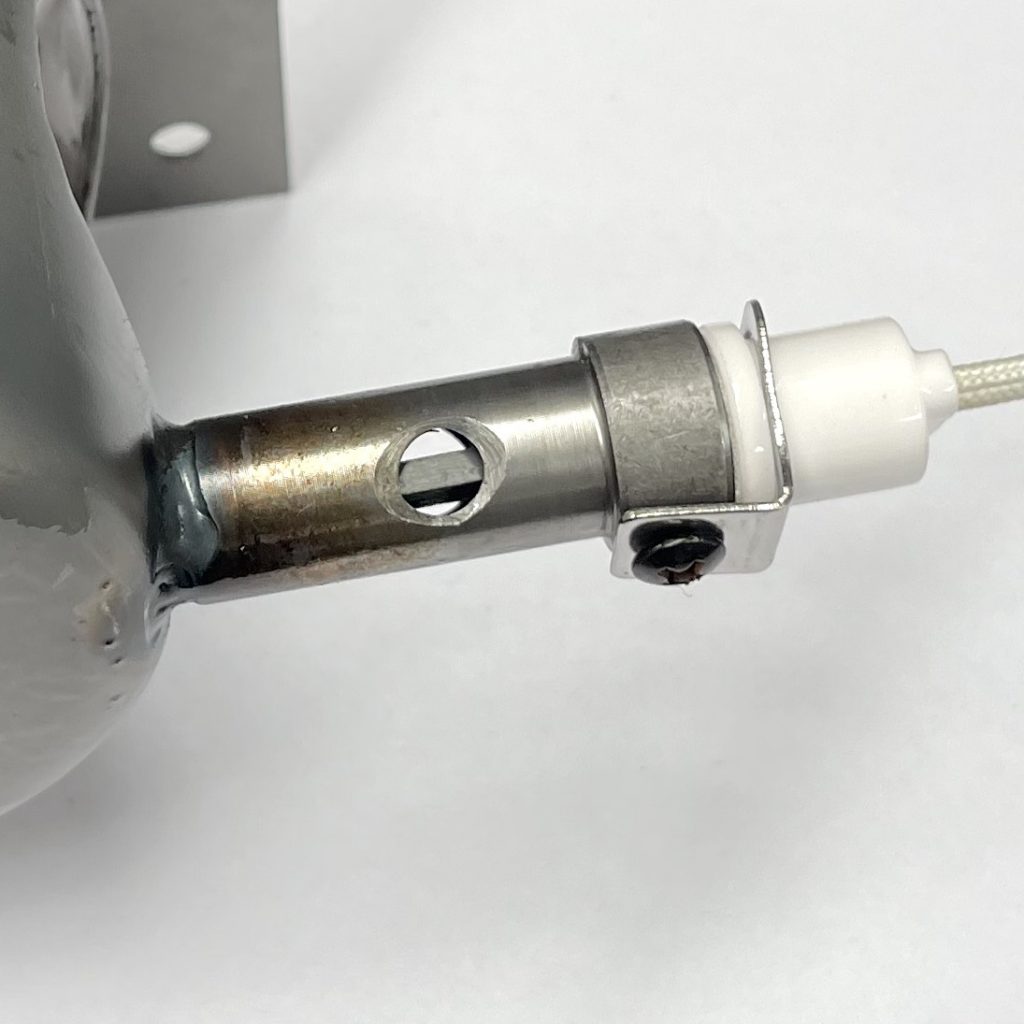
Replace Ignition Rod
If determined the ignition rod is not operating, it can be replaced.
Release the controller
Remove the two screws on the front of the controller so it can be passed through the hole. This frees everything from the base and allows the assembly to be turned up-side-down to access the ignition rod.
Change over the ignition rod
Undo the screw to remove the old ignition rod. Cut the ignition rod cable and pull the end through the hole in the wall.
Unplug the cable from the controller red/black cable.
Install new ignition rod
The new ignition rod will look like the image below, which may be different from the previously longer version that was installed. Note the new one must be installed with the fibre washer in place. Use the supplied black screw.
Route the new cable through to the controller and plug directly into the plug with red/black cable. Proceed to the next section to clean up the cables and put back together.
Clean Up and Assembly
Re-organise Cables
A better route for the cables has been developed that makes it much easier to put the top section into the base without any cables potentially touching the fans, or just getting in the way. It is advisable to do this even if no problems were identified with the components during the in inspection.
Loosen brackets
Loosen off, but don’t fully remove, the 4 screws that are holding the metal plates in place left/right of the auger motor. They are perfect anchor points to run a cable tie through for securing the cables. Run a cable tie under both the top left and top right sections of the bracket, underneath the screw.
Cut all cable ties
Cut ALL cable ties, allowing a neat re-routing of the cables.
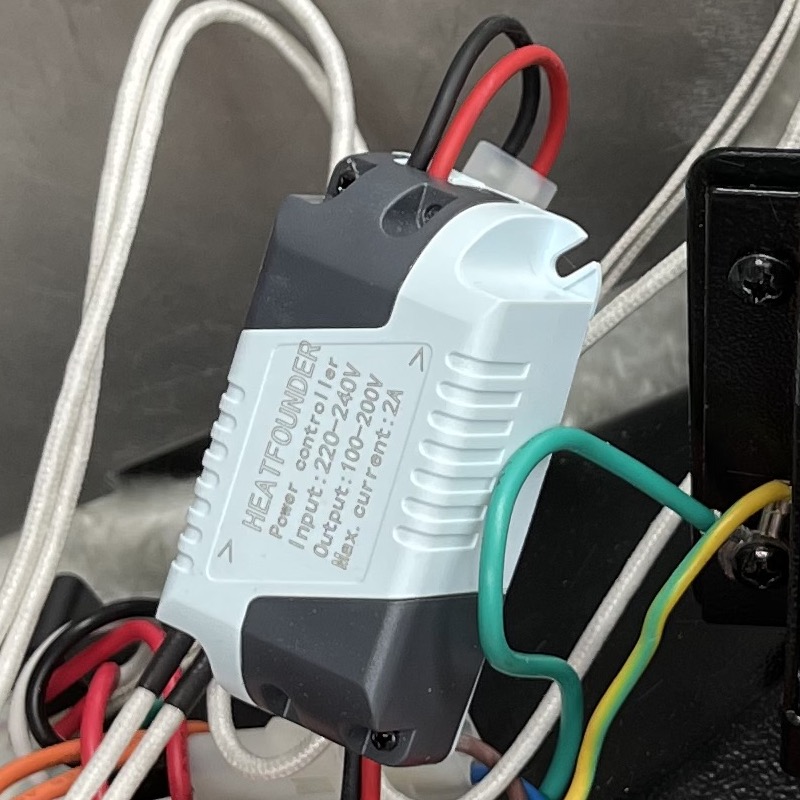
Remove Ignition Rod Power Limiter Box
If present, remove the light blue/grey power controller box that is inline between the HOT plug and the Ignition Rod cables. The grill will fire up faster without this installed, and is no longer used in newly assembled Mini grills. Connect the remaining plug together (HOT to Ignition Rod).
Route cables above auger motor
Route the orange (FAN), red (Auger Motor) and power supply (thick black) cables above the auger motor, securing using the two cable ties previously prepared.
Tighten the cable ties a bit to gather up the cables, then tighten up the bracket screws. Now tighten (not too much) the cable ties, just sufficiently to securely the cables nicely in place.
Cable tie the thick black power cable vertically as shown below.

Clean Up Cables Next to Controller
Use another one or two cable ties to bundle the cables together near the controller. Leave enough slack that they will be able to move down when the top is placed back down into the base.
Drop Back Into Base
Once all components are back in place and cables rerouted and secured with cable ties the top can be lowered back into the base.
If the cable gland on the power cable was NOT removed, take care to ensure the power cable is positioned away from the main fan. If the cable gland was removed, the slack can be pulled out and cable gland put back once the top is back in the base.
Using the handle gently lift up the top and lower back down into the base. Watch to ensure the cables and power cable are position in suitable location and not in contact with the Fan or Auger Motor.
Push the top down into place and put all the screws back in.
Replace the cable gland on the power cable.
Plug the grill into power and turn on to ensure it is all working properly.
Job done, great work!